A2A 协议详解


A2A,即
Agent to Agent 协议,是 Google 推出的一个开源框架,旨在促进 AI 代理之间的通信和互操作性。通过为代理提供标准化的协作方法,无论其底层框架或供应商如何,该协议使 AI 代理能够在不同的企业平台和应用程序中安全地交换信息、协调行动和操作。简单来说,它解决了这样一个问题:由不同团队使用不同技术并由不同组织拥有的 AI 代理如何有效地通信和协作?
为什么需要 A2A
随着 AI 代理变得越来越专业和强大,它们在复杂任务上协作的需求也随之增长。想象一个用户请求他们的主 AI 代理来规划一次国际旅行——这个单一请求可能涉及协调多个专业代理的能力:
- 一个用于航班预订的代理。
- 一个用于酒店预订的代理。
- 第三个用于当地旅游推荐和预订的代理。
- 第四个处理货币兑换和旅行建议的代理。
如果没有一个通用的通信协议,将这些不同的代理集成到统一的用户体验中将成为一项重大的工程挑战。每次集成可能都需要一个定制的点对点解决方案,这将使系统难以扩展、维护和扩展。
应用场景
企业自动化
在企业环境中,A2A 使代理能够跨孤立的数据系统和应用程序工作。例如,供应链规划代理可以与库存管理、物流和采购代理协调——即使它们是由不同供应商或基于不同框架构建的。这增强了自主性,提高了生产力,并降低了长期成本。
多代理协作
A2A 协议促进了真正的多代理场景,其中代理可以在其自然、非结构化模式下进行协作,即使没有共享内存、工具或上下文。这超越了简单地将一个代理用作另一个代理的“工具”——它允许每个代理在处理复杂任务时保留其能力。
跨平台集成
对于业务应用程序,A2A 允许 AI 代理在整个企业应用程序生态系统中运行。这意味着代理可以访问并协调各种平台上的其他代理,例如 CRM 系统、知识库、项目管理工具等。管理跨不同平台和云环境的代理的标准化方法对于充分发挥协作式 AI 的潜力至关重要。
运作方式
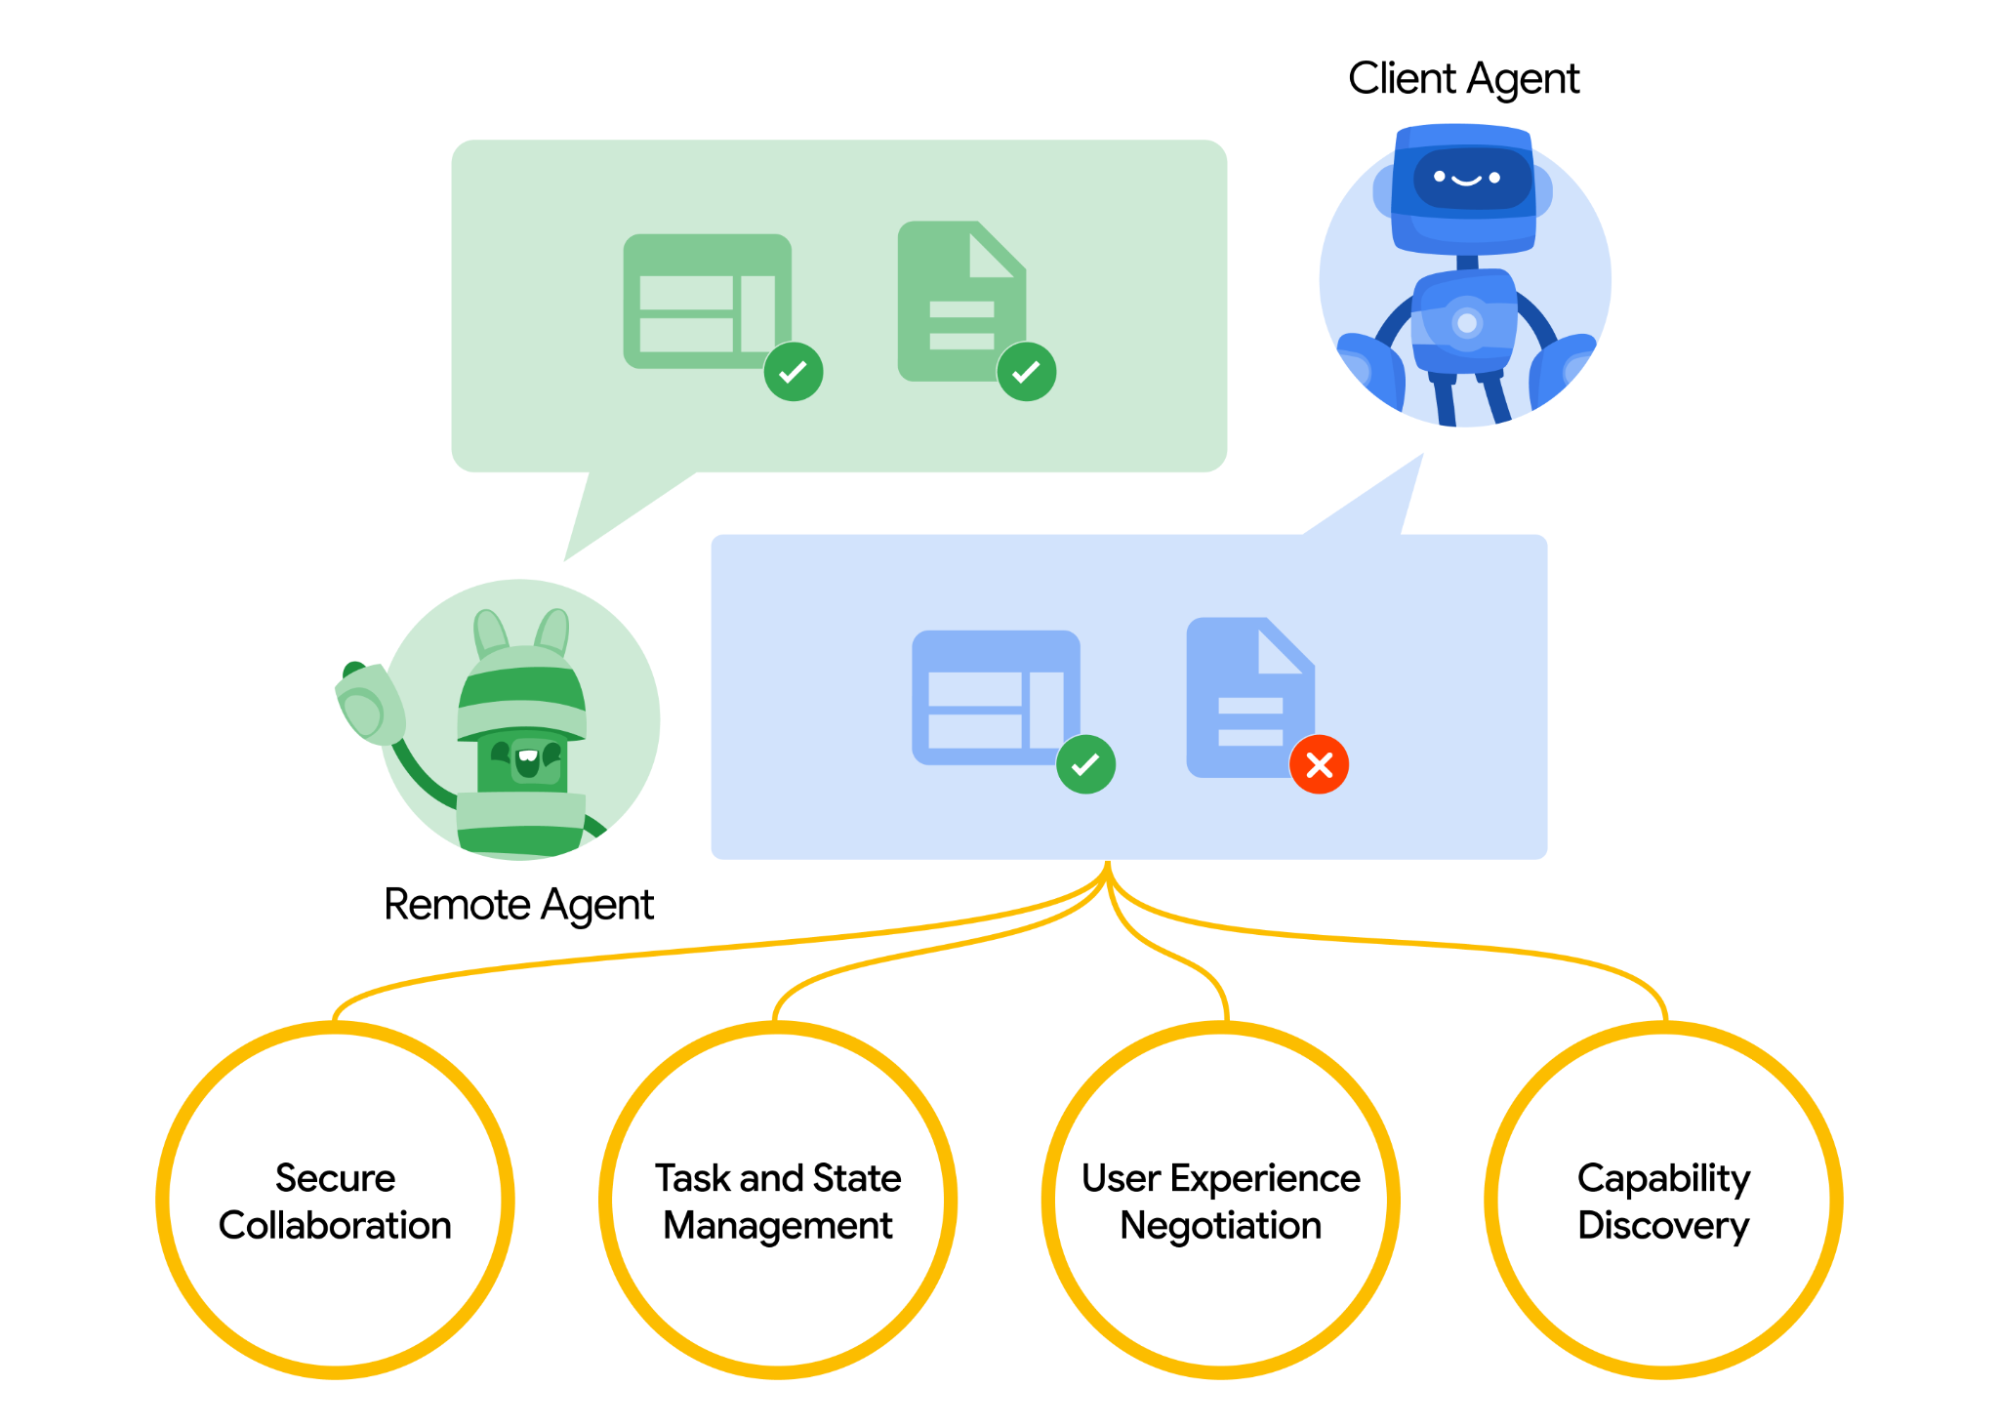
A2A 促进“客户端”代理和“远程”代理之间的通信。客户端代理负责制定和传达任务,而远程代理则执行任务,旨在提供准确的信息或采取适当的行动。这种交互涉及几个关键功能:
能力发现:代理可以使用 JSON 格式的
Agent Card暴露其能力。这使得客户端代理能够识别最适合任务的代理,并通过 A2A 与远程代理通信。例如,客户端代理可能会发现另一个专门处理财务数据的代理,并将财务分析任务委托给它。任务管理:客户端和远程代理之间的通信是面向任务的,代理协作以满足最终用户请求。由协议定义的
Task对象具有生命周期。它可以立即完成,或者对于长时间运行的任务,代理可以同步更新。任务的输出称为Artifact。协作:代理可以交换消息以共享上下文、响应、工件或用户指令。这为代理创建了一种结构化的方式来共享完成任务所需的信息。例如,一个代理可能会提供有关用户偏好的上下文,而另一个代理则返回分析结果。
协商:每条消息都包含一个
parts字段,其中包含生成文本或图像等完整内容片段。每个部分都有指定的内容类型,允许客户端和远程代理协商正确的格式。它还明确支持用户 UI 功能的协商,如 iframe、视频、Web 表单等。
核心概念
上面,我们概述了 A2A 的基本工作原理。该协议涉及一系列核心概念,这些概念定义了代理之间的交互。
参与者
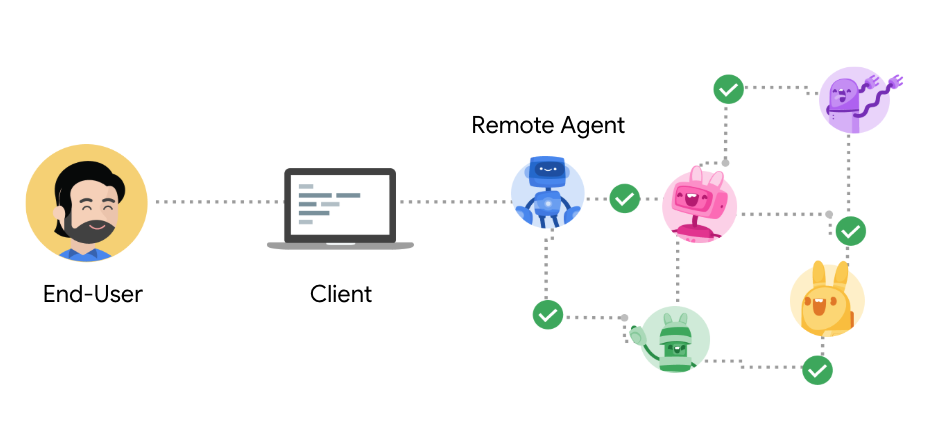
首先,我们需要澄清 A2A 协议中的参与者,包括用户、客户端和服务器:
- 用户:发起请求或目标需要代理协助的最终用户(人类或自动化服务)。
- A2A 客户端(Client Agent):代表用户向远程代理请求操作或信息的应用程序、服务或其他 AI 代理。客户端使用 A2A 协议发起通信。
- A2A 服务器(Remote Agent):实现 A2A 协议的 HTTP 端点的 AI 代理或代理系统。它接收来自客户端的请求,处理任务,并返回结果或状态更新。对于客户端来说,远程代理作为一个“不可见”的系统运行,客户端无需了解其内部实现。
通信要素
确定参与者后,下一个重点是通信协议——这些参与者如何互动。
代理卡(Agent Card)
- 一个 JSON 元数据文档,通常可以通过 URL
/.well-known/agent.json发现,它描述了 A2A 服务器。 - 它详细说明了代理的身份(名称、描述)、服务端点 URL、版本、支持的 A2A 功能(例如,流式传输或推送通知)、提供的特定技能、默认输入/输出方法以及身份验证要求。
- 客户端使用代理卡来发现代理并了解如何安全有效地与之交互。
任务
- 当客户端向代理发送消息时,代理可能会确定要完成请求需要完成一项任务(例如,“生成报告”、“预订航班”、“回答问题”)。
- 每个任务都有代理分配的唯一 ID,并按定义的生命周期(例如,
submitted、working、input-required、completed、failed)进行。 - 任务是有状态的,可能涉及客户端和服务器之间的多次交换(消息)。
消息(Message)
- 表示客户端和代理之间的一次单一回合或通信单元。
- 消息具有
role(客户端发送的消息标记为user,而服务器发送的消息标记为agent),并包含一个或多个承载实际内容的Part对象。messageId字段是发送方为每条消息设置的唯一标识符。 - 用于传递指令、上下文、问题、答案或状态更新,这些不一定是正式的
Artifacts。
部分(Part)
- 消息或
Artifact中的基本内容单元。每个部分都有特定的type,并且可以携带不同类型的数据:TextPart:包含纯文本内容。FilePart:表示一个文件,可以作为内联 Base64 编码的字节传输,也可以通过 URI 引用。包括文件名和媒体类型等元数据。DataPart:携带结构化 JSON 数据,适用于表单、参数或任何机器可读信息。
工件(Artifact)
- 表示远程代理在任务处理过程中生成的输出结果。
- 示例包括生成的文档、图像、电子表格、结构化数据或任何其他直接源自任务的自包含信息片段。
Artifact由一个或多个Part对象组成,并且可以增量流式传输。
交互机制
请求/响应(轮询)
- 客户端发送请求(例如,使用
message/sendRPC 方法),并从服务器接收响应。 - 如果交互涉及有状态的、长时间运行的任务,服务器最初可能会以
working状态响应。客户端然后通过调用tasks/get进行定期轮询,直到任务达到最终状态(例如,completed、failed)。
流式传输 (SSE)
- 用于增量生成结果或提供实时进度更新的任务。
- 客户端使用
message/stream与服务器启动交互。 - 服务器通过打开 HTTP 连接响应,发送服务器发送事件(SSE)流。
- 这些事件可以是
Task、Message、TaskStatusUpdateEvent(用于状态更改)或TaskArtifactUpdateEvent(用于新建或更新的工件)。 - 这要求服务器在其代理卡中声明
streaming能力。
推送通知
- 对于非常耗时的任务或维护持久连接(例如,SSE)不切实际的场景。
- 客户端在启动任务时(或通过调用
tasks/pushNotificationConfig/set)可以提供一个 webhook URL。 - 当发生重要的任务状态更改(例如,
completed、failed或input-required)时,服务器可以向客户端提供的 webhook 发送异步通知(HTTP POST 请求)。 - 这要求服务器在其代理卡中声明
pushNotifications能力。
其他概念
- 上下文 (contextId):服务器生成的标识符,用于逻辑上分组相关的任务对象,为一系列交互提供上下文。
- 传输和格式:A2A 通信通过 HTTP(S) 进行,所有请求和响应负载均使用 JSON-RPC 2.0 格式。
- 身份验证与授权:A2A 依赖于标准网络安全实践。身份验证要求在代理卡中声明,凭证(例如,OAuth 令牌、API 密钥)通常通过 HTTP 标头传递,与 A2A 协议消息本身分开。
- 代理发现:客户端定位代理卡以识别可用 A2A 服务器及其能力的过程。
- 扩展:A2A 允许代理在其代理卡中声明自定义协议扩展。
通过理解这些核心组件和机制,开发人员可以有效地设计、实现和利用 A2A 来构建可互操作和协作的 AI 代理系统。
用户案例
这里是一个 A2A 在企业场景中的实际示例。公司新入职一名员工,入职流程涉及多个系统和部门:
- 人力资源部需要创建档案并发送欢迎邮件。
- IT 部门需要提供笔记本电脑和公司账户。
- 设施团队需要准备办公桌和门禁卡。
传统上,这些步骤是手动处理的,或通过内部系统之间紧密耦合的集成来处理的。现在,如果每个部门都使用 A2A 协议暴露自己的代理:
| 代理 | 职责 |
|---|---|
hr-agent.company.com |
创建员工档案,发送文档 |
it-agent.company.com |
设置电子邮件账户,订购笔记本电脑 |
facilities-agent.company.com |
分配办公桌,打印门禁卡 |
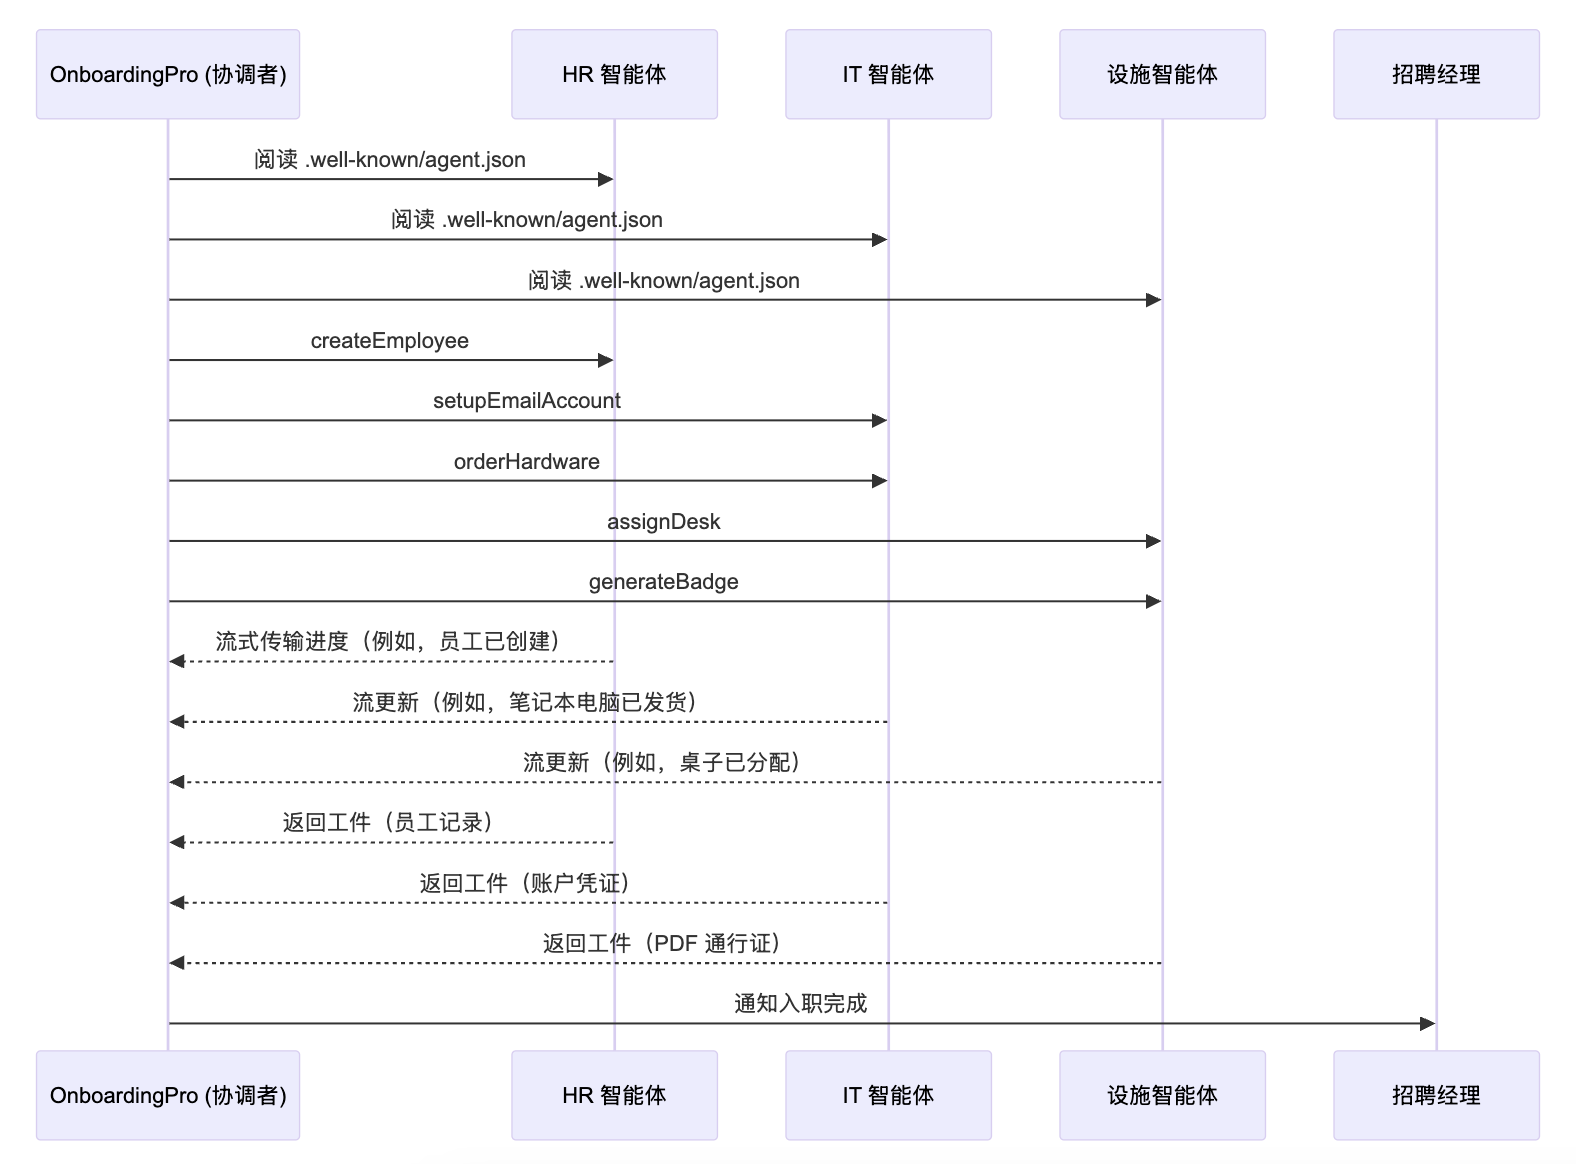
假设我们有一个多代理系统,OnboardingPro(例如,onboarding-agent.company.com),它编排整个入职工作流。
- 发现:它读取每个代理的
.well-known/agent.json以了解其能力和身份验证。 - 任务委托:
- 将
createEmployee任务发送给 HR 代理。 - 将
setupEmailAccount和orderHardware任务发送给 IT 代理。 - 将
assignDesk和generateBadge任务发送给设施代理。
- 将
- 持续更新:代理通过服务器发送事件流式传输进度更新(例如,“笔记本电脑已发货”、“办公桌已分配”)。
- 工件收集:最终输出(例如,PDF 门禁卡、确认邮件、账户凭证)作为 A2A 工件返回。
- 完成:
OnboardingPro通知招聘经理入职已完成。
A2A 与 MCP
正如我们之前在 MCP 协议中详细介绍的那样,有些人可能会认为 A2A 协议是 MCP 的替代品。然而,事实并非如此——两者是互补的。MCP 协议主要侧重于使 AI 模型能够动态访问外部数据源,调用外部工具,并获取实时信息以执行任务。如果说 MCP 是一个套筒扳手(用于工具),那么 A2A 则是机械师之间的对话(用于协作)。这两个协议在功能上完美互补。我们建议将 MCP 用于工具,将 A2A 用于代理。
- MCP:侧重于将单个 AI 模型与外部工具和数据源连接(模型到数据/工具)。
- A2A:侧重于多个 AI 代理之间的通信和协作(代理到代理)。
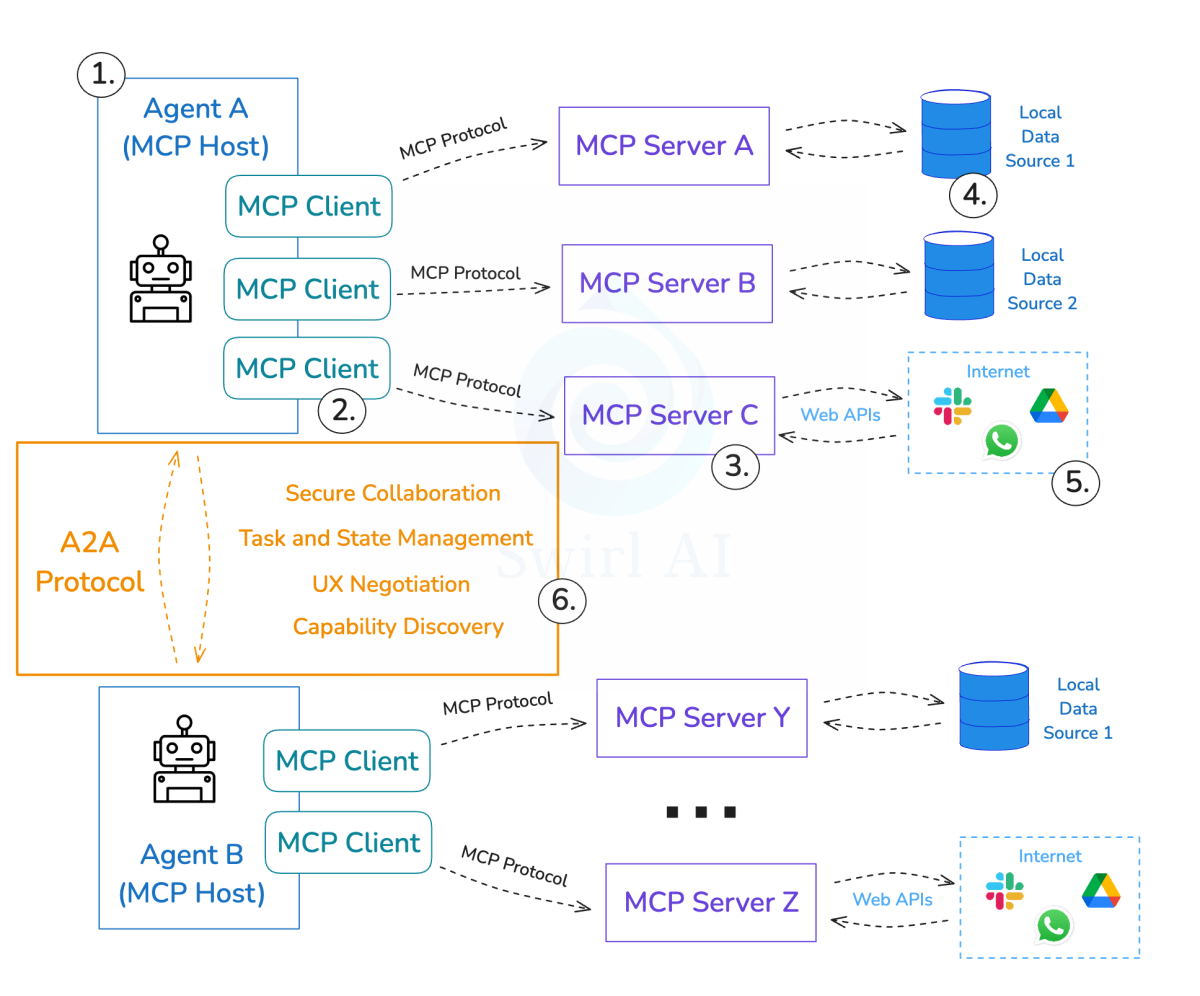
一个代理应用程序可能会使用 A2A 与其他代理通信,而每个代理内部则使用 MCP 与其特定的工具和资源交互。
A2A 协议
了解 A2A 的一些基本概念后,我们来深入探讨具体的 A2A 协议如何定义(版本 0.2.2)。
A2A 通信必须通过 HTTP(S) 进行,所有请求和响应负载都使用 JSON-RPC 2.0 格式。A2A 服务器在其 AgentCard 中定义的 URL 处提供服务。
Agent 发现
A2A 服务器必须提供一个代理卡。代理卡是一个 JSON 文档,描述了服务器的身份、能力、技能、服务终点 URL 以及客户端如何进行身份验证和交互。客户端使用这些信息来发现合适的代理并配置其交互。
客户端可以通过多种方法定位代理卡,包括:
- URI 策略:访问代理域上预定义的路径。代理卡的推荐路径是
https://{server_domain}/.well-known/agent.json,这也是首选方法。 - 注册表/目录:代理目录或注册表。
- 直接配置:客户端可以预先配置代理卡的 URL 或卡内容本身。
代理卡本身可能包含敏感信息。
- 如果代理卡包含敏感信息,则提供该卡的端点必须受到适当访问控制的保护(例如,mTLS、网络限制或需要身份验证才能检索该卡)。
- 通常不建议将明文密钥(例如静态 API 密钥)直接包含在代理卡中。
AgentCard 对象结构
AgentCard 的结构如下:
/**
 * An AgentCard conveys key information:
 * - General details (version, name, description, purpose)
 * - Skills: A set of capabilities the agent can perform
 * - Default modality/content type support
 * - Authentication requirements
 */
export interface AgentCard {
  /**
   * A human-readable name for the agent.
   * @example "Recipe Agent"
   */
  name: string;
  /**
   * A human-readable description of the agent. Helps users and other agents understand its capabilities.
   * @example "Agent that helps users with recipes and cooking."
   */
  description: string;
  /** The URL where the agent is hosted. */
  url: string;
  /** The URL of the agent's icon. */
  iconUrl?: string;
  /** The service provider of the agent. */
  provider?: AgentProvider;
  /**
   * The version of the agent—format determined by the provider.
   * @example "1.0.0"
   */
  version: string;
  /** The URL of the agent's documentation. */
  documentationUrl?: string;
  /** Optional capabilities supported by the agent. */
  capabilities: AgentCapabilities;
  /** Security scheme details for authentication. */
  securitySchemes?: { [scheme: string]: SecurityScheme };
  /** Security requirements for accessing the agent. */
  security?: { [scheme: string]: string[] }[];
  /**
   * The interaction modes supported by the agent for all skills. This can be overridden per skill.
   * Supported input media types.
   */
  defaultInputModes: string[];
  /** Supported output media types. */
  defaultOutputModes: string[];
  /** Skills represent units of capability the agent can perform. */
  skills: AgentSkill[];
  /**
   * If true, the agent supports providing an extended AgentCard upon user authentication.
   * Defaults to false if unspecified.
   */
  supportsAuthenticatedExtendedCard?: boolean;
}
Python SDK
在上一节中,我们详细探讨了 A2A 协议。现在,让我们通过使用官方的 Python SDK 在特定场景中实现它。
在这里,我们将使用 Python SDK 构建一个简单的“回显”A2A 服务器,这将帮助我们理解 A2A 服务器的基本概念和组件。
初始化
首先,确保您的 Python 版本为 3.10 或更高。我们将继续使用 uv 进行项目管理。
初始化项目
uv init a2a-demo
cd a2a-demo
然后安装 A2A Python SDK 依赖项
uv add a2a-sdk uvicorn
项目目录结构现在应该如下所示:
$ tree .
.
├── README.md
├── main.py
├── pyproject.toml
└── uv.lock

0 directories, 4 files
服务端实现
接下来,我们将在 main.py 文件中实现一个 A2A 服务器(即远程代理)。我们可以利用 a2a-sdk 提供的组件来实现。核心代码如下:
import uvicorn

from a2a.server.apps import A2AStarletteApplication
from a2a.server.request_handlers import DefaultRequestHandler
from a2a.server.tasks import InMemoryTaskStore
from a2a.types import (
    AgentCapabilities,
    AgentCard,
    AgentSkill,
)
from agent_executor import (
    HelloWorldAgentExecutor,  # type: ignore[import-untyped]
)


if __name__ == '__main__':
    # Define a simple skill that returns "hello world"
    skill = AgentSkill(
        id='hello_world',
        name='Returns hello world',
        description='just returns hello world',
        tags=['hello world'],
        examples=['hi', 'hello world'],
    )

    # Define a more complex skill that returns "super hello world"
    extended_skill = AgentSkill(
        id='super_hello_world',
        name='Returns a SUPER Hello World',
        description='A more enthusiastic greeting, only for authenticated users.',
        tags=['hello world', 'super', 'extended'],
        examples=['super hi', 'give me a super hello'],
    )

    # Define a public agent card
    public_agent_card = AgentCard(
        name='Hello World Agent',
        description='Just a hello world agent',
        url='http://0.0.0.0:9999/',
        version='1.0.0',
        defaultInputModes=['text'],
        defaultOutputModes=['text'],
        capabilities=AgentCapabilities(streaming=True),
        skills=[skill],  # Only basic skills for the public card
        supportsAuthenticatedExtendedCard=True,
    )

    # Define an extended agent card that returns "super hello world"
    specific_extended_agent_card = public_agent_card.model_copy(
        update={
            'name': 'Hello World Agent - Extended Edition',  # Different name
            'description': 'The full-featured hello world agent for authenticated users.',
            'version': '1.0.1',  # Can even be a different version
            # Capabilities and other fields like url, defaultInputModes, defaultOutputModes, supportsAuthenticatedExtendedCard, etc.,
            # are inherited from public_agent_card unless specified here.
            'skills': [
                skill,
                extended_skill,
            ],  # Both skills for the extended card
        }
    )

    # Create a default request handler
    request_handler = DefaultRequestHandler(
        agent_executor=HelloWorldAgentExecutor(),
        task_store=InMemoryTaskStore(),
    )

    # Create an A2A server, here we use `A2AStarletteApplication` to create an A2A server
    server = A2AStarletteApplication(
        agent_card=public_agent_card,
        http_handler=request_handler,
        extended_agent_card=specific_extended_agent_card,
    )

    # Run the server, here we use `uvicorn` to run the server
    uvicorn.run(server.build(), host='0.0.0.0', port=9999)
首先,我们使用 AgentSkill 类定义一个简单的技能,它表示代理可以执行的能力单元。然后,我们定义一个更复杂的技能。
接下来,我们使用 AgentCard 类定义代理卡,它代表代理的整体信息。AgentCard 用于传达关键细节:
- 一般信息(版本、名称、描述、用法)
- 技能:代理可以执行的一组能力
- 默认模态/内容类型支持
- 身份验证要求
我们在这里定义的代理卡如下:
public_agent_card = AgentCard(
    name='Hello World Agent',
    description='Just a hello world agent',
    url='http://0.0.0.0:9999/',
    version='1.0.0',
    defaultInputModes=['text'],
    defaultOutputModes=['text'],
    capabilities=AgentCapabilities(streaming=True),
    skills=[skill],  # Only basic skills for the public card
    supportsAuthenticatedExtendedCard=True,
)
我们在此处定义的代理信息包括:
name:代理的名称description:代理的描述url:代理的 URLversion:代理的版本defaultInputModes:输入模式,这里定义为text,表示代理支持文本输入defaultOutputModes:输出模式,这里定义为text,表示代理支持文本输出capabilities:代理的能力,这里定义为streaming,表示代理支持流式输出skills:代理支持的技能,这里定义为skill,表示代理支持的技能supportsAuthenticatedExtendedCard:代理是否支持扩展的认证卡
为了扩展代理卡,我们甚至可以覆盖并创建一个新的 AgentCard,如下所示:
# Define an extended agent card to return "super hello world"
specific_extended_agent_card = public_agent_card.model_copy(
    update={
        'name': 'Hello World Agent - Extended Edition',  # Different name
        'description': 'The full-featured hello world agent for authenticated users.',
        'version': '1.0.1',  # Even a different version
        # Other fields like url, defaultInputModes, defaultOutputModes, supportsAuthenticatedExtendedCard, etc.,
        # unless specified here, will be inherited from public_agent_card.
        'skills': [
            skill,
            extended_skill,
        ],  # Two skills for the extended card
    }
)
在这里,我们在 skills 字段中提供了两个技能对象,允许我们在扩展代理卡中使用这两个技能。
接下来,我们使用 SDK 提供的 DefaultRequestHandler 类创建一个默认请求处理程序,用于处理 A2A 请求:
# Create a default request handler
request_handler = DefaultRequestHandler(
    agent_executor=HelloWorldAgentExecutor(),
    task_store=InMemoryTaskStore(),
)
这要求我们提供一个 AgentExecutor 对象的实例,它负责执行代理的核心逻辑。我们需要自己继承 AgentExecutor 类。此外,我们还需要提供一个 TaskStore 对象的实例,用于存储任务。在这里,我们使用 InMemoryTaskStore 类来实现,表示任务存储在内存中。
这里的重点是 AgentExecutor 基类,其基本定义如下:
from abc import ABC, abstractmethod

from a2a.server.agent_execution.context import RequestContext
from a2a.server.events.event_queue import EventQueue


class AgentExecutor(ABC):
    """Agent executor interface.

    Classes implementing this interface contain the core logic of an agent, executing tasks based on requests and publishing updates to the event queue.
    """

    @abstractmethod
    async def execute(
        self, context: RequestContext, event_queue: EventQueue
    ) -> None:
        """Execute the agent's logic, performing tasks based on the request and publishing updates to the event queue.
        Args:
            context: Request context containing messages, task IDs, etc.
            event_queue: Queue for publishing events
        """

    @abstractmethod
    async def cancel(
        self, context: RequestContext, event_queue: EventQueue
    ) -> None:
        """Request the agent to cancel an ongoing task.
        Args:
            context: Request context containing the task ID to be canceled
            event_queue: Queue for publishing cancellation status update events
        """
execute 方法用于执行代理的逻辑。代理应该从 context 中读取必要的信息,并发布 Task 或 Message 事件,或者 TaskStatusUpdateEvent / TaskArtifactUpdateEvent 到事件队列。事件队列作为 A2A 响应代理的缓冲区,桥接异步执行和响应处理(例如,通过 SSE 流)。
cancel 方法用于取消正在进行的任务。代理应该尝试停止在上下文中标识的任务,并向事件队列发布状态为 TaskState.canceled 的 TaskStatusUpdateEvent。
接下来,我们创建一个名为 agent_executor.py 的文件来实现 AgentExecutor 接口,如下所示:
# agent_executor.py
from a2a.server.agent_execution import AgentExecutor, RequestContext
from a2a.server.events import EventQueue
from a2a.utils import new_agent_text_message


class HelloWorldAgent:
    """Hello World agent."""
    async def invoke(self) -> str:
        return 'Hello World'


class HelloWorldAgentExecutor(AgentExecutor):
    """AgentExecutor implementation."""

    def __init__(self):
        self.agent = HelloWorldAgent()

    async def execute(
        self,
        context: RequestContext,
        event_queue: EventQueue,
    ) -> None:
        # Execute the agent's logic—here, we directly return "Hello World"
        result = await self.agent.invoke()
        # Publish a text message to the event queue
        await event_queue.enqueue_event(new_agent_text_message(result))

    async def cancel(
        self, context: RequestContext, event_queue: EventQueue
    ) -> None:
        # Cancel logic for the agent—here, we raise an exception as cancellation is not supported
        raise Exception('cancel not supported')
如上代码所示,我们实现了 AgentExecutor 接口,包括 execute 和 cancel 方法。execute 方法执行代理的逻辑,而 cancel 方法取消正在进行的任务。
在 execute 方法中,我们直接调用 HelloWorldAgent 的 invoke 方法,它代表了代理逻辑的实际执行。例如,我们可以集成一个 LLM 模型,调用它来执行代理的逻辑,然后返回结果(这里我们返回一个固定的字符串)。结果随后发布到事件队列。
我们使用 new_agent_text_message 函数将代理的执行结果转换为文本消息对象,这对应于协议中前面提到的 Message 对象:
def new_agent_text_message(
    text: str,
    context_id: str | None = None,
    task_id: str | None = None,
) -> Message:
    """Create a new agent message containing a single TextPart.

    Args:
        text: The text content of the message
        context_id: The context ID of the message
        task_id: The task ID of the message

    Returns:
        A new `Message` object with the 'agent' role
    """
    return Message(
        role=Role.agent,
        parts=[Part(root=TextPart(text=text))],
        messageId=str(uuid.uuid4()),
        taskId=task_id,
        contextId=context_id,
    )
一旦所有准备工作完成,我们使用 A2AStarletteApplication 类创建一个 A2A 服务器,并使用 uvicorn 运行它:
# Create an A2A server using `A2AStarletteApplication`
server = A2AStarletteApplication(
    agent_card=public_agent_card,
    http_handler=request_handler,
    extended_agent_card=specific_extended_agent_card,
)

# Run the server using `uvicorn`
uvicorn.run(server.build(), host='0.0.0.0', port=9999)
最后,启动服务
$ python main.py
INFO:     Started server process [98132]
INFO:     Waiting for application startup.
INFO:     Application startup complete.
INFO:     Uvicorn running on http://0.0.0.0:9999 (Press CTRL+C to quit)
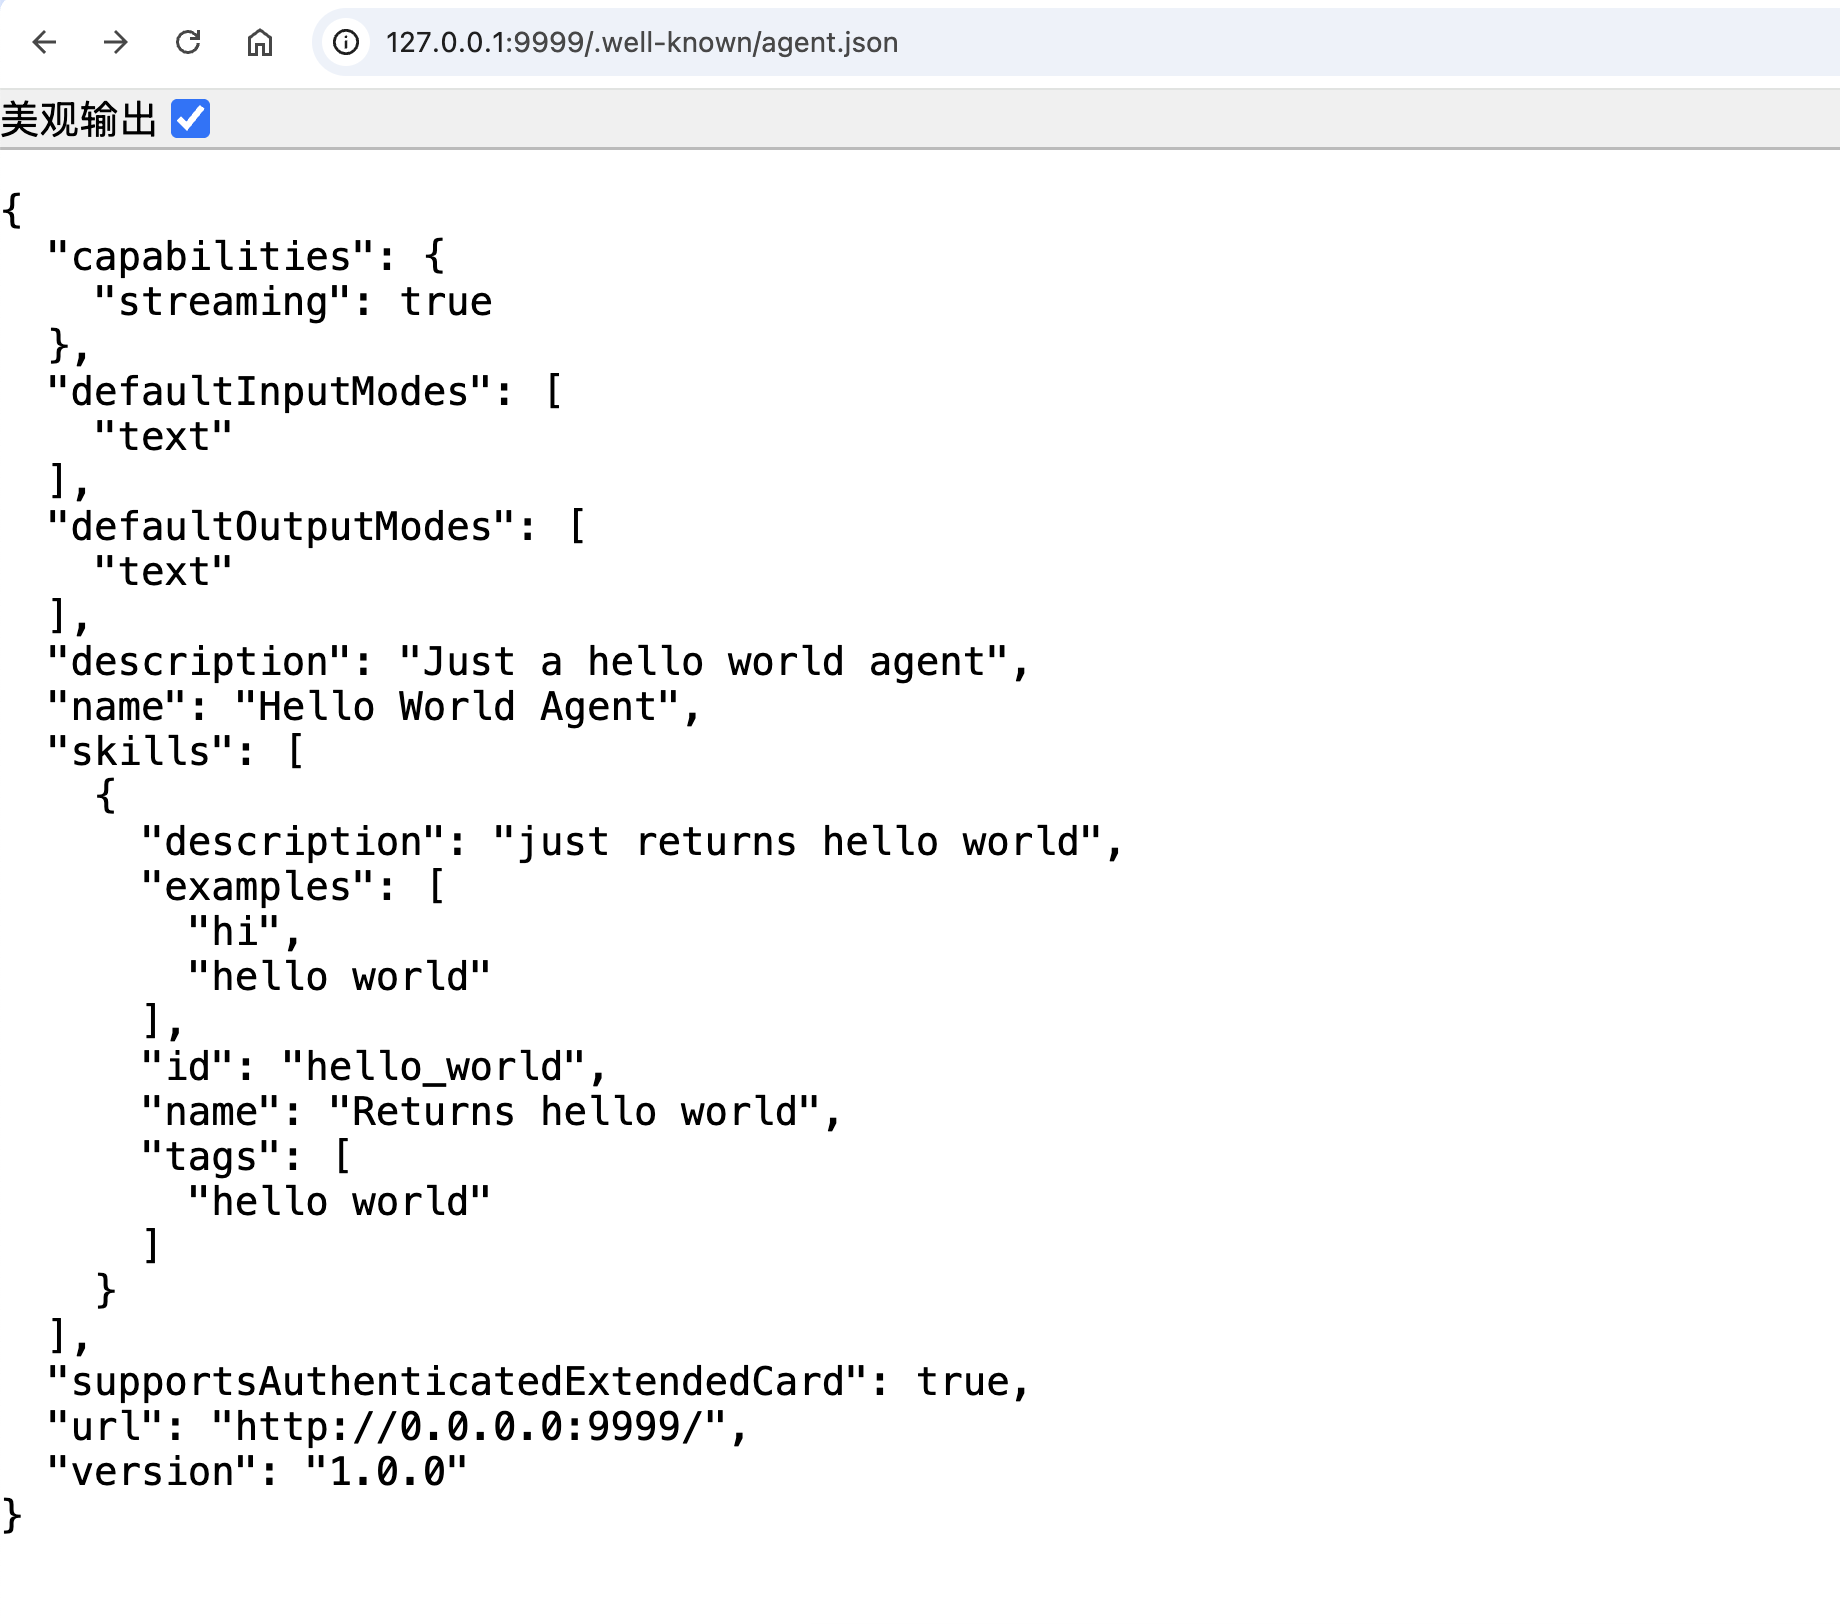
运行后,您可以在浏览器中访问 https://:9999/.well-known/agent.json 以检索代理的卡片信息。
同样,您可以访问 https://:9999/agent/authenticatedExtendedCard 来检索扩展代理卡信息:
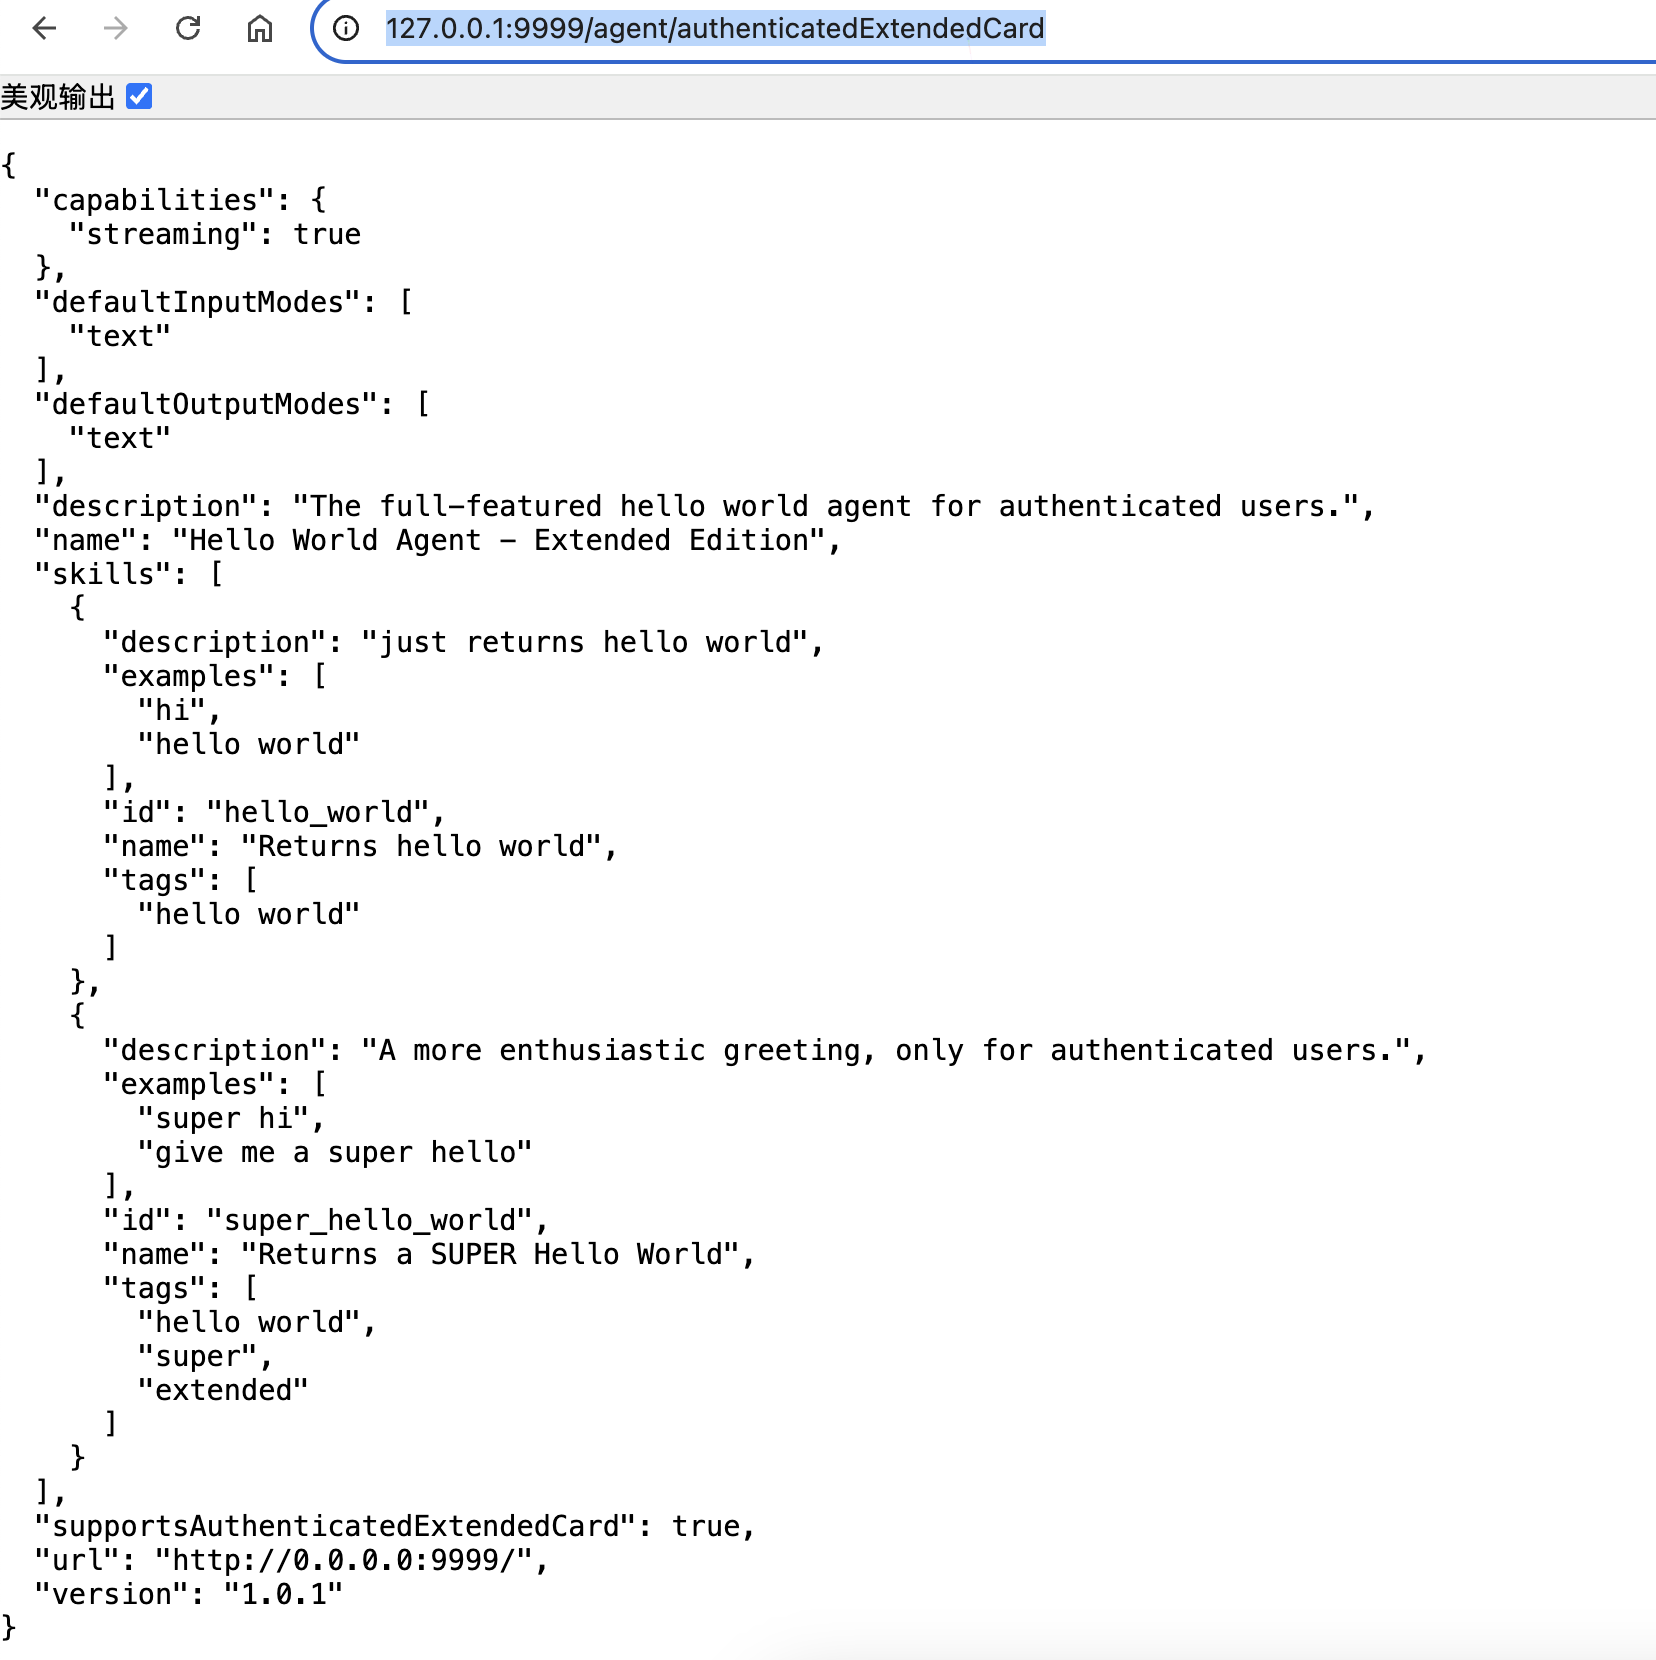
至此,我们已经实现了最简单的 A2A 服务器程序。
客户端
接下来,我们将实现一个 A2A 客户端,利用服务器提供的代理卡信息来调用远程代理的功能。同样,我们将使用 Python SDK 来实现这一点。核心代码如下:
# client.py
# client.py
import logging

from typing import Any
from uuid import uuid4

import httpx

from a2a.client import A2ACardResolver, A2AClient
from a2a.types import (
    AgentCard,
    MessageSendParams,
    SendMessageRequest,
    SendStreamingMessageRequest,
)


async def main() -> None:
    PUBLIC_AGENT_CARD_PATH = '/.well-known/agent.json'
    EXTENDED_AGENT_CARD_PATH = '/agent/authenticatedExtendedCard'

    logging.basicConfig(level=logging.INFO)
    logger = logging.getLogger(__name__)

    base_url = 'https://:9999'

    async with httpx.AsyncClient() as httpx_client:
        # Initialize A2ACardResolver
        resolver = A2ACardResolver(
            httpx_client=httpx_client,
            base_url=base_url,
            # agent_card_path uses default value, extended_agent_card_path also uses default value
        )

        # Fetch public agent card and initialize the client
        final_agent_card_to_use: AgentCard | None = None

        try:
            logger.info(
                f'Attempting to fetch public agent card from: {base_url}{PUBLIC_AGENT_CARD_PATH}'
            )
            _public_card = (
                await resolver.get_agent_card()
            )  # Fetch from the default public path
            logger.info('Successfully fetched public agent card:')
            logger.info(
                _public_card.model_dump_json(indent=2, exclude_none=True)
            )
            final_agent_card_to_use = _public_card
            logger.info(
                '\nUsing PUBLIC agent card for client initialization (default).'
            )

            if _public_card.supportsAuthenticatedExtendedCard:
                try:
                    logger.info(
                        f'\nPublic card supports authenticated extended card. Attempting to fetch from: {base_url}{EXTENDED_AGENT_CARD_PATH}'
                    )
                    auth_headers_dict = {
                        'Authorization': 'Bearer dummy-token-for-extended-card'
                    }
                    _extended_card = await resolver.get_agent_card(
                        relative_card_path=EXTENDED_AGENT_CARD_PATH,
                        http_kwargs={'headers': auth_headers_dict},
                    )
                    logger.info(
                        'Successfully fetched authenticated extended agent card:'
                    )
                    logger.info(
                        _extended_card.model_dump_json(
                            indent=2, exclude_none=True
                        )
                    )
                    final_agent_card_to_use = (
                        _extended_card  # Update to use the extended agent card
                    )
                    logger.info(
                        '\nUsing AUTHENTICATED EXTENDED agent card for client initialization.'
                    )
                except Exception as e_extended:
                    logger.warning(
                        f'Failed to fetch extended agent card: {e_extended}. Will proceed with public card.',
                        exc_info=True,
                    )
            elif (
                _public_card
            ):  # supportsAuthenticatedExtendedCard is False or None
                logger.info(
                    '\nPublic card does not indicate support for an extended card. Using public card.'
                )

        except Exception as e:
            logger.error(
                f'Critical error fetching public agent card: {e}', exc_info=True
            )
            raise RuntimeError(
                'Failed to fetch the public agent card. Cannot continue.'
            ) from e

        # Initialize A2AClient object
        client = A2AClient(
            httpx_client=httpx_client, agent_card=final_agent_card_to_use
        )
        logger.info('A2AClient initialized.')

        send_message_payload: dict[str, Any] = {
            'message': {
                'role': 'user',
                'parts': [
                    {'kind': 'text', 'text': 'how much is 10 USD in INR?'}
                ],
                'messageId': uuid4().hex,
            },
        }
        # Construct a send message request object
        request = SendMessageRequest(
            id=str(uuid4()), params=MessageSendParams(**send_message_payload)
        )
        # Send the message
        response = await client.send_message(request)
        # Print the response
        print(response.model_dump(mode='json', exclude_none=True))

        # Construct a streaming send message request object
        streaming_request = SendStreamingMessageRequest(
            id=str(uuid4()), params=MessageSendParams(**send_message_payload)
        )

        # Send the streaming message
        stream_response = client.send_message_streaming(streaming_request)

        # Print the streaming message response
        async for chunk in stream_response:
            print(chunk.model_dump(mode='json', exclude_none=True))


if __name__ == '__main__':
    import asyncio

    asyncio.run(main())
首先,我们从 A2A 服务器请求代理卡信息(通过 /.well-known/agent.json 路径)。然后,我们检查服务器是否支持在用户身份验证后提供扩展代理卡。如果支持,我们则请求扩展代理卡信息(通过 /agent/authenticatedExtendedCard 路径)。
一旦我们有了代理卡数据,我们只需初始化一个 A2AClient 对象即可开始调用代理的功能。例如,我们可以构造一个发送消息请求对象 SendMessageRequest,然后调用 send_message 方法来发送消息并接收远程代理的响应。要构造一个流式消息请求,我们创建一个 SendStreamingMessageRequest 对象并调用 send_message_streaming 方法来发送消息并接收流式响应数据。
最后,我们直接运行客户端程序进行测试:
$ python client.py
INFO:__main__:Attempting to fetch public agent card from: https://:9999/.well-known/agent.json
INFO:httpx:HTTP Request: GET https://:9999/.well-known/agent.json "HTTP/1.1 200 OK"
INFO:a2a.client.client:Successfully fetched agent card data from https://:9999/.well-known/agent.json: {'capabilities': {'streaming': True}, 'defaultInputModes': ['text'], 'defaultOutputModes': ['text'], 'description': 'Just a hello world agent', 'name': 'Hello World Agent', 'skills': [{'description': 'just returns hello world', 'examples': ['hi', 'hello world'], 'id': 'hello_world', 'name': 'Returns hello world', 'tags': ['hello world']}], 'supportsAuthenticatedExtendedCard': True, 'url': 'http://0.0.0.0:9999/', 'version': '1.0.0'}
INFO:__main__:Successfully fetched public agent card:
INFO:__main__:{
  "capabilities": {
    "streaming": true
  },
  "defaultInputModes": [
    "text"
  ],
  "defaultOutputModes": [
    "text"
  ],
  "description": "Just a hello world agent",
  "name": "Hello World Agent",
  "skills": [
    {
      "description": "just returns hello world",
      "examples": [
        "hi",
        "hello world"
      ],
      "id": "hello_world",
      "name": "Returns hello world",
      "tags": [
        "hello world"
      ]
    }
  ],
  "supportsAuthenticatedExtendedCard": true,
  "url": "http://0.0.0.0:9999/",
  "version": "1.0.0"
}
INFO:__main__:
Using PUBLIC agent card for client initialization (default).
INFO:__main__:
Public card supports authenticated extended card. Attempting to fetch from: https://:9999/agent/authenticatedExtendedCard
INFO:httpx:HTTP Request: GET https://:9999/agent/authenticatedExtendedCard "HTTP/1.1 200 OK"
INFO:a2a.client.client:Successfully fetched agent card data from https://:9999/agent/authenticatedExtendedCard: {'capabilities': {'streaming': True}, 'defaultInputModes': ['text'], 'defaultOutputModes': ['text'], 'description': 'The full-featured hello world agent for authenticated users.', 'name': 'Hello World Agent - Extended Edition', 'skills': [{'description': 'just returns hello world', 'examples': ['hi', 'hello world'], 'id': 'hello_world', 'name': 'Returns hello world', 'tags': ['hello world']}, {'description': 'A more enthusiastic greeting, only for authenticated users.', 'examples': ['super hi', 'give me a super hello'], 'id': 'super_hello_world', 'name': 'Returns a SUPER Hello World', 'tags': ['hello world', 'super', 'extended']}], 'supportsAuthenticatedExtendedCard': True, 'url': 'http://0.0.0.0:9999/', 'version': '1.0.1'}
INFO:__main__:Successfully fetched authenticated extended agent card:
INFO:__main__:{
  "capabilities": {
    "streaming": true
  },
  "defaultInputModes": [
    "text"
  ],
  "defaultOutputModes": [
    "text"
  ],
  "description": "The full-featured hello world agent for authenticated users.",
  "name": "Hello World Agent - Extended Edition",
  "skills": [
    {
      "description": "just returns hello world",
      "examples": [
        "hi",
        "hello world"
      ],
      "id": "hello_world",
      "name": "Returns hello world",
      "tags": [
        "hello world"
      ]
    },
    {
      "description": "A more enthusiastic greeting, only for authenticated users.",
      "examples": [
        "super hi",
        "give me a super hello"
      ],
      "id": "super_hello_world",
      "name": "Returns a SUPER Hello World",
      "tags": [
        "hello world",
        "super",
        "extended"
      ]
    }
  ],
  "supportsAuthenticatedExtendedCard": true,
  "url": "http://0.0.0.0:9999/",
  "version": "1.0.1"
}
INFO:__main__:
Using AUTHENTICATED EXTENDED agent card for client initialization.
INFO:__main__:A2AClient initialized.
INFO:httpx:HTTP Request: POST http://0.0.0.0:9999/ "HTTP/1.1 200 OK"
{'id': 'c8c2b71f-89bf-4a31-a660-0c6a1b50f7ea', 'jsonrpc': '2.0', 'result': {'kind': 'message', 'messageId': 'b50b5c2d-10b9-4800-80a4-4f38f25f1556', 'parts': [{'kind': 'text', 'text': 'Hello World'}], 'role': 'agent'}}
INFO:httpx:HTTP Request: POST http://0.0.0.0:9999/ "HTTP/1.1 200 OK"
{'id': 'a2a6316d-7aef-4b51-b7d1-535bbc1362eb', 'jsonrpc': '2.0', 'result': {'kind': 'message', 'messageId': 'f6904b90-7e3a-4596-b5e8-5c14920443f6', 'parts': [{'kind': 'text', 'text': 'Hello World'}], 'role': 'agent'}}
在上面的输出中,我们首先请求了公共代理卡信息,然后获取了扩展代理卡信息,最后向远程代理发送了一条消息,并接收到了它的响应。
至此,我们已经实现了最简单的 A2A 服务器和客户端程序。
在这里,我们仅仅展示了 A2A 的基本机制。在实际场景中,我们的代理将更加复杂,支持流式传输、任务状态管理和 LLM 驱动的多轮对话等高级功能。不同的代理也可以使用各种框架实现。我们甚至可以在代理内部集成 MCP 以增强功能。此外,我们可以开发一个聚合平台,用户可以在该平台配置各种代理提供的卡片地址,从而通过该平台调用这些代理的功能。这些更复杂的功能将在后续文章中介绍。