将基准集成到LM评估工具中


量化大型语言模型的性能对于评估新技术和验证新方法至关重要,以便能够客观地比较不同版本的模型。LLM通常在多个基准数据集上进行评估并获得分数,这些分数是比较不同模型的数值量。
LM Evaluation Harness 是由 EleutherAI 开发的一个基于 Python 的框架,用于评估语言模型在各种 NLP 基准测试上的性能。它支持多种任务,例如多项选择、问答和分类,并且与本地模型和基于 API 的模型(如 OpenAI 的 GPT 或 Hugging Face 模型)兼容。该工具提供了一种标准化方式,用于比较模型在 MMLU、HellaSwag、ARC 等数据集上的性能。它具有模块化、可扩展性,并在研究社区中广泛用于评估语言模型的能力。
将自定义基准从本地数据集集成到 lm evaluation harness 需要几个步骤,本博客将介绍如何以多项选择题的方式集成您的自定义数据集,遵循标准的 MMLU 方法和 MMLU-Var 方法。
标准的 MMLU 基准测试采用多项选择格式。模型会收到一个问题和一系列可能的答案(A、B、C、D),并被提示选择正确答案。例如,在关于阿联酋首都的问题中,模型会在输入中看到问题和所有四个答案选项。例如,提示将如下所示:
Question: What is the Capital of UAE ?
A. Ras Al Khaimah
B. Abu Dhabi
C. Dubai
D. Al Sharjah
Annswer:
MMLU-Var 采用基于续写的方法。模型只收到问题,然后是提示“Answer:”,不提供任何答案选项。然后,系统评估模型为每个可能的答案(作为单独的续写)分配的概率,并选择对数概率最高的那个。例如,提示将如下所示:
Question: What is the Capital of UAE ?
Annswer:
因此,在评估过程中,评估器会使用这些选项来根据以下简化公式计算每个输出令牌的每个选项的概率:
Log-Probability(candidate) = log P(t₁ | prompt) + log P(t₂ | prompt, t₁) + ... + log P(tₖ | prompt, t₁,...,tₖ₋₁)
然后,评估器选择对数概率总和最高的候选者。如果选定的候选者与正确答案匹配,则模型被判断为正确。
当使用续写模式时,通常概率之和会导致错误结果,因为我们正在对每个令牌的概率求和。因此,归一化准确度为多令牌答案场景中的模型行为提供了更好的解释。
归一化准确度遵循以下公式

让我们举之前的例子
"Abu Dhabi" → 2 个令牌 (["Abu", " Dhabi"])
"Dubai" → 1 个令牌 (["Dubai"])
不进行归一化 (acc):多令牌答案会面临概率惩罚,因为
- P(多令牌) = P(t₁) × P(t₂|t₁) × ...
- (概率乘积≤1 → 令牌越多,乘积越小)
假设情景:如果模型对两个答案的了解程度相同
- P("Dubai") = 0.5 → 对数概率 = -0.30
- P("Abu Dhabi") = P("Abu")=0.7 × P(" Dhabi"|"Abu")=0.6 ≈ 0.42 → 对数概率 = -0.37 → 尽管了解程度相同,模型仍错误地选择了“Dubai”。
进行归一化 (acc_norm)
- "Dubai": -0.30 / 1 = -0.30
- "Abu Dhabi": -0.37 / 2 = -0.185 → 这将使正确答案“Abu Dhabi”优于“Dubai”。
将您的基准集成到框架中
环境搭建
首先克隆 EleutherAI 的官方仓库,为了简单起见,您可以以开发模式安装 Python 包,以便轻松尝试新添加的基准。
https://github.com/EleutherAI/lm-evaluation-harness.git
cd lm-evaluation-harness
pip install -e ".[dev]"
现在我们准备进入下一步。
准备数据集:
现在我们来谈谈数据集的创建。建议使用jsonl格式,以便于处理,但json格式也可以。我将以我自己的数据集为例:该数据集和论文可以在以下链接中找到 数据集 该数据集采用多项选择题格式(类似于前面的例子)。但我将把数据集转换为jsonl格式,并准备好使其适合集成到我们的框架中。
所以如果我们检查数据集,我们可以看到所有问题都在 **questions** 对象键中
{
    "dataset": "DFIR-Metric Dataset (Module I MCQ challenges)",
    "authors": ""
    "sources": "https://github.com/DFIR-Metric",
    "number_of_questions": 713,
    "questions":
[
  {
    "question": "You work as a penetration tester for Hammond Security Consultants. You are currently working on a contract for the state government of California. Your next step is to initiate a DoS attack on their network. Why would you want to initiate a DoS attack on a system you are testing?",
    "options": {
      "A": "Demonstrate that no system can be protected against DoS attacks",
      "B": "List weak points on their network",
      "C": "Use attack as a launching point to penetrate deeper into the network",
      "D": "Show outdated equipment so it can be replaced"
    },
    "answer": "B"
  },
  {
    "question": "What will the following command produce on a website login page? SELECT email, passwd, login\\_id, full\\_name FROM members WHERE email = 'someone@somehwere.com'; DROP TABLE members; --'",
    "options": {
      "A": "Retrieves the password for the first user in the members table",
      "B": "Deletes the entire members table",
      "C": "This command will not produce anything since the syntax is incorrect",
      "D": "Inserts the Error! Reference source not found.email address into the members table"
    },
    "answer": "B"
  },

........
  }
}
我们可以使用以下脚本将数据集保存为jsonl格式
import json

with open("DFIR-Metric-MCQ.json", "r", encoding="utf-8") as infile:
    data = json.load(infile)  # Load entire JSON array

with open("validation.jsonl", "w", encoding="utf-8") as outfile:
    for item in data["questions"]:
        json.dump(item, outfile)
        outfile.write("\n")
所以到此为止,我们将拥有只包含MCQ问题的 **validation.jsonl** 文件。最终我们将得到以下文件:
{"question": "You work as a penetration tester for Hammond Security Consultants. You are currently working on a contract for the state government of California. Your next step is to initiate a DoS attack on their network. Why would you want to initiate a DoS attack on a system you are testing?", "options": {"A": "Demonstrate that no system can be protected against DoS attacks", "B": "List weak points on their network", "C": "Use attack as a launching point to penetrate deeper into the network", "D": "Show outdated equipment so it can be replaced"}, "answer": "B"}
{"question": "What will the following command produce on a website login page? SELECT email, passwd, login\\_id, full\\_name FROM members WHERE email = 'someone@somehwere.com'; DROP TABLE members; --'", "options": {"A": "Retrieves the password for the first user in the members table", "B": "Deletes the entire members table", "C": "This command will not produce anything since the syntax is incorrect", "D": "Inserts the Error! Reference source not found.email address into the members table"}, "answer": "B"}
{"question": "What is the first step that needs to be carried out to crack the password?", "options": {"A": "If it matches, that password has been cracked and the password cracker displays the unencrypted version of the password", "B": "The list of dictionary words is hashed or encrypted", "C": "The hashed wordlist is compared against the target hashed password, generally one word at a time", "D": "A word list is created using a dictionary generator program or dictionaries"}, "answer": "D"}
{"question": "What does the 'Prefetch' folder in Windows store?", "options": {"A": "Temporary internet files", "B": "System restore points", "C": "Application execution information", "D": "User documents"}, "answer": "C"}
........
到目前为止,我们需要记住,每个提示问题的键是**question**,答案选项集的键是**options**,正确答案的键是**answer**。我们需要保存所有这些信息,以便稍后编写我们的基准任务文件。
编写任务YAML文件:
现在我们可以创建任务目录并开始填充不同的文件:任务文件夹结构应该类似于以下内容(我以我的 difir 基准为例)
| lm-evaluation-harness
|____ lm_eval
      |____ tasks
            |____ dfir
                  |____ dataset
                  |      |____ validation.jsonl
                  |____ dfir.yaml
现在我们需要在 YAML 文件(即任务配置文件)中定义几个参数。让我们从指定基准任务名称和数据路径(即我们之前生成的 jsonl 文件)开始
task: dfir_mcq_mod
output_type: multiple_choice
dataset_path: json
dataset_name: null
dataset_kwargs:
  data_files: "lm_eval/tasks/dfir/dataset/validation.jsonl"
num_fewshot: 5
validation_split: train
正如你所见,我们将任务名称定义为 **dfir_mcq_mod**,因为我们使用的是 json 格式的本地数据集,所以我们将 **dataset_path** 指定为 **json**,因为这些参数会传递给 hf 包 **datasets** 中的 **load_dataset** 函数,快速查看 文档 显示我们可以向函数传递一个参数列表,其中包含一个名为 **data_files** 的参数,该参数指定 json 或 jsonl 格式的数据集路径。因此,我们定义了一个 **dataset_kwargs** 参数,其中包含一个名为 **dataset_files** 的元素,其值为 jsonl 文件的相对路径。最后,我们定义了另外两个参数,**output_type**,正如您可能已经猜到的那样,我们将使用 **multiple_choice** 类型,我们还可以使用参数 **num_fewshots** 指定基准任务的样本数量,让我们在任务中使用 5 个样本。由于我们的数据集中没有任何拆分,我们只将 **validation_split** 指向默认拆分,即 **train** 拆分。有关这些参数的更多详细信息可以在官方仓库 文档 中找到
指定问答格式
根据规范,必须定义三个参数来指导我们处理基准数据的正确方式
- doc_to_text (Union[Callable, str], optional) — Jinja2 模板、字符串或函数,用于将样本处理为模型相应的输入。
- doc_to_target (Union[Callable, str], optional) — Jinja2 模板、字符串或函数,用于将样本处理为模型相应的目标输出。对于多项选择任务,这应该返回正确答案在答案选项列表中的索引。
- doc_to_choice (Union[Callable, str], optional) — Jinja2 模板、字符串或函数,用于将样本处理为多项选择任务的可能字符串选项列表。对于 generate_until 任务,则未定义。
在我们的案例中,我们将按照 Jinja 风格进行定义
doc_to_text: "Answer the following question only by providing the letter corresponding to the right option only.\n{{question.strip()}} \nA. {{options['A']}}\nB. {{options['B']}}\nC. {{options['C']}}\nD. {{options['D']}}\nAnswer:"
doc_to_choice: ["A", "B", "C", "D"]
doc_to_target: "{{ ['A', 'B', 'C', 'D'].index(answer)}}"
如 **YAML** 片段所示,对于 doc_to_text 参数,我们只定义了问题提示的格式,如前所述,我们的问题保存在 **question** 键的值中,答案选项保存在 **options** 键的值中。对于 **doc_to_choice**,由于我们需要答案是其中一个选项,我们只需提供一个包含我们拥有的四个答案选项的数组。最后,在 **doc_to_target** 参数中,我们只提供一个 Jinja 模板,通过提供正确答案在选项数组中的索引来选择正确答案。
定义指标
对于指标,多项选择题可以定义一些自定义指标或使用预定义指标。在我们的案例中,我们将使用最简单的方法,只需使用预定义的准确度和归一化准确度指标。因此,我们只需定义一个指标列表,如以下代码片段所示,我们只需定义一个 **metrics_list**。对于每个指标,我们必须指定一个聚合方法。由于我们使用的样本数量等于五,我们将根据不同答案的平均值来对模型进行评分。
metric_list:
  - metric: acc
    aggregation: mean
  - metric: acc_norm
    aggregation: mean
更高级的指标参数可以在文档中找到。
完整的任务定义文件
到这里,我们的任务配置就完成了,我们可以测试我们的任务了。但作为额外一步,我们将添加一个元数据部分。这个部分将在以后使用同一模型的多个检查点或具有多个配置的模型时,帮助我们评估性能差异。完整的 YAML 文件将如下所示:
task: dfir_mcq_mod
dataset_path: json
dataset_name: null
dataset_kwargs:
  data_files: "lm_eval/tasks/dfir/dataset/validation.jsonl"
validation_split: train
output_type: multiple_choice
num_fewshot: 5
doc_to_text: "Answer the following question only by providng the letter corresponding to the right option only.\n{{question.strip()}} \nA. {{options['A']}}\nB. {{options['B']}}\nC. {{options['C']}}\nD. {{options['D']}}\nAnswer:"
doc_to_choice: ["A", "B", "C", "D"]
doc_to_target: "{{ ['A', 'B', 'C', 'D'].index(answer)}}"

metric_list:
  - metric: acc
    aggregation: mean
  - metric: acc_norm
    aggregation: mean

metadata:
  version: 1.0
  revision: "{{model_args['revision']}}"
现在让我们首先检查任务是否正确识别,我们可以运行以下命令
python3 lm_eval/__main__.py --tasks list | grep dfir_mcq_mod
如果在 shell 输出中看到任务,则表示到目前为止一切顺利

现在让我们运行任务,我们将只使用来自Hugging Face的SmolLM2,但为了更有趣,我们将评估多个检查点,以查看模型在训练过程中的表现。让我们从使用以下命令评估早期检查点开始:
NCCL_P2P_DISABLE=1 NCCL_IB_DISABLE=1 python3 ./lm_eval/__main__.py --model hf --model_args pretrained=HuggingFaceTB/SmolLM2-1.7B-intermediate-checkpoints,dtype=bfloat16,revision=step-125000 --tasks dfir_mcq_mod --batch_size auto --output_path results_mod/
该命令不言自明,您必须传递一些参数来指定模型、任务和结果输出文件夹。如果一切顺利,您将获得类似输出,其中包含根据指定指标的模型得分。

现在我们可以通过更改 `revision=step-125000` 参数并指向多个检查点来评估多个检查点。这些检查点可以在 Hugging Face 仓库中找到:检查点
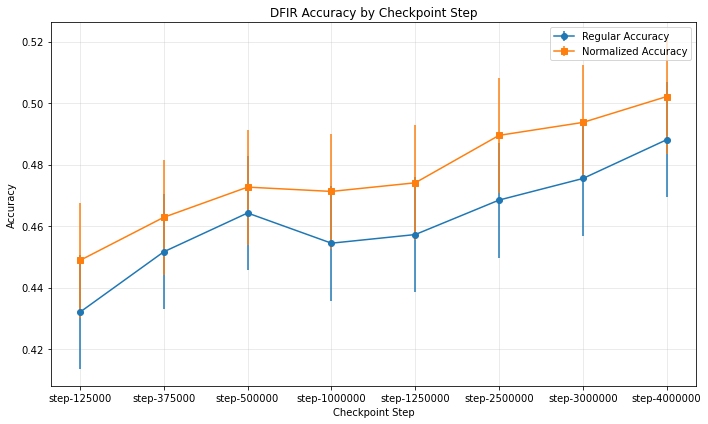
每次评估都会在输出目录中生成一个 JSON 文件,其中存储了关于我们评估的所有信息。让我们让事情变得更有趣,并绘制从不同评估 JSON 文件中提取的数据。这是我们在任务文件中添加的 **revision** 标签将用于识别每个输出属于哪个检查点的地方。我们可以使用以下 Python 代码来绘制从不同评估 JSON 文件中提取的数据:
from pathlib import Path
import json
import matplotlib.pyplot as plt
import numpy as np

results = []
for json_file in sorted(Path("./results_mod/HuggingFaceTB__SmolLM2-1.7B-intermediate-checkpoints/").glob("**/*.json")):
    with json_file.open() as f:
        results.append(json.load(f))

import matplotlib.pyplot as plt
import numpy as np

steps = []
accuracies = []
accuracies_norm = []
error_bars = []
error_bars_norm = []

# Extract data from the results list
for checkpoint_data in results:
    step = checkpoint_data["configs"]["dfir_mcq_mod"]["metadata"]["revision"]
    steps.append(step)

    # Extract the accuracy data
    result_data = list(checkpoint_data['results'].values())[0]  # Get the first (and only) subject
    accuracies.append(result_data['acc,none'])
    accuracies_norm.append(result_data['acc_norm,none'])
    error_bars.append(result_data['acc_stderr,none'])
    error_bars_norm.append(result_data['acc_norm_stderr,none'])

# Create a figure and axis
fig, ax = plt.subplots(figsize=(10, 6))

# Plot both regular and normalized accuracy
ax.errorbar(steps, accuracies, yerr=error_bars, fmt='o-', label='Regular Accuracy')
ax.errorbar(steps, accuracies_norm, yerr=error_bars_norm, fmt='s-', label='Normalized Accuracy')

# Add labels and title
ax.set_xlabel('Checkpoint Step')
ax.set_ylabel('Accuracy')
ax.set_title('DFIR Accuracy by Checkpoint Step')
ax.legend()
ax.grid(True, alpha=0.3)

# If steps are not evenly spaced, you might want to adjust x-ticks
if len(steps) > 0:
    plt.xticks(steps)

# Show the plot
plt.tight_layout()
plt.show()
如果一切顺利,我们将得到一个类似的图表,我们可以清楚地看到模型的性能随着检查点的增加而提高,训练中看到的令牌越多,模型在我们的基准测试任务上的表现就越好。
将var方法引入我们的基准
如前所述,MMLU-Var 将多项选择题基准转换为一个完成任务,通过计算模型生成正确答案令牌的对数概率来评估模型的生成能力。让我们为 dfir-var 模式编写一个配置并检查差异。任务配置可以按照相同的方法添加,但我们只需从之前的 **doc_to_text** 选项中删除选项。
task: dfir_mcq_mod_var
dataset_path: json
dataset_name: null
dataset_kwargs:
  data_files: "lm_eval/tasks/dfir/dataset/validation.jsonl"
validation_split: train
output_type: multiple_choice
num_fewshot: 5
doc_to_text: "{{question.strip()}}\nAnswer:"
doc_to_choice: "{{options.values() | list}}"
doc_to_target: "{{ ['A', 'B', 'C', 'D'].index(answer) }}"

metric_list:
  - metric: acc
    aggregation: mean
  - metric: acc_norm
    aggregation: mean


metadata:
  version: 1.0
  revision: "{{model_args['revision']}}"
现在我们可以使用相同的命令,但更改任务名称和输出文件夹名称
NCCL_P2P_DISABLE=1 NCCL_IB_DISABLE=1 python3 ./lm_eval/__main__.py --model hf --model_args pretrained=HuggingFaceTB/SmolLM2-1.7B-intermediate-checkpoints,dtype=bfloat16,revision=step-125000 --tasks dfir_mcq_mod_var --batch_size auto --output_path results_mod_var/
在模型的多个检查点上运行命令将得到以下图:
这次就到这里,提供更多细节可能会让这篇文章更长,所以我们保持简单。希望你玩得开心!