使用扩散模型进行图像合成


有人问我如何使用扩散模型实现一些复杂的功能。具体来说,就是将背景图像和主体图像(本例中是一辆汽车)合成在一起,并使其看起来可信。
我将在本指南中写下我的全部思考过程,但如果您只想要代码,可以在末尾找到它。
图像合成
图像合成是大多数设计师在其职业生涯中都需要做的事情。他们学习如何进行合成,以及如何添加所需的细微细节,以使作品更具说服力。
不寻常之处在于,我需要保持两张图片原样,尽量不改变它们。除非两者之间存在一些特殊的巧合,或者图片是为此目的特意拍摄的,否则这种方法行不通。
- 照片角度
- 光照
- 透视
除非这两张图片中的这三项完全相同,否则合成它们需要您更改其中一张图片,有时甚至两张都更改。
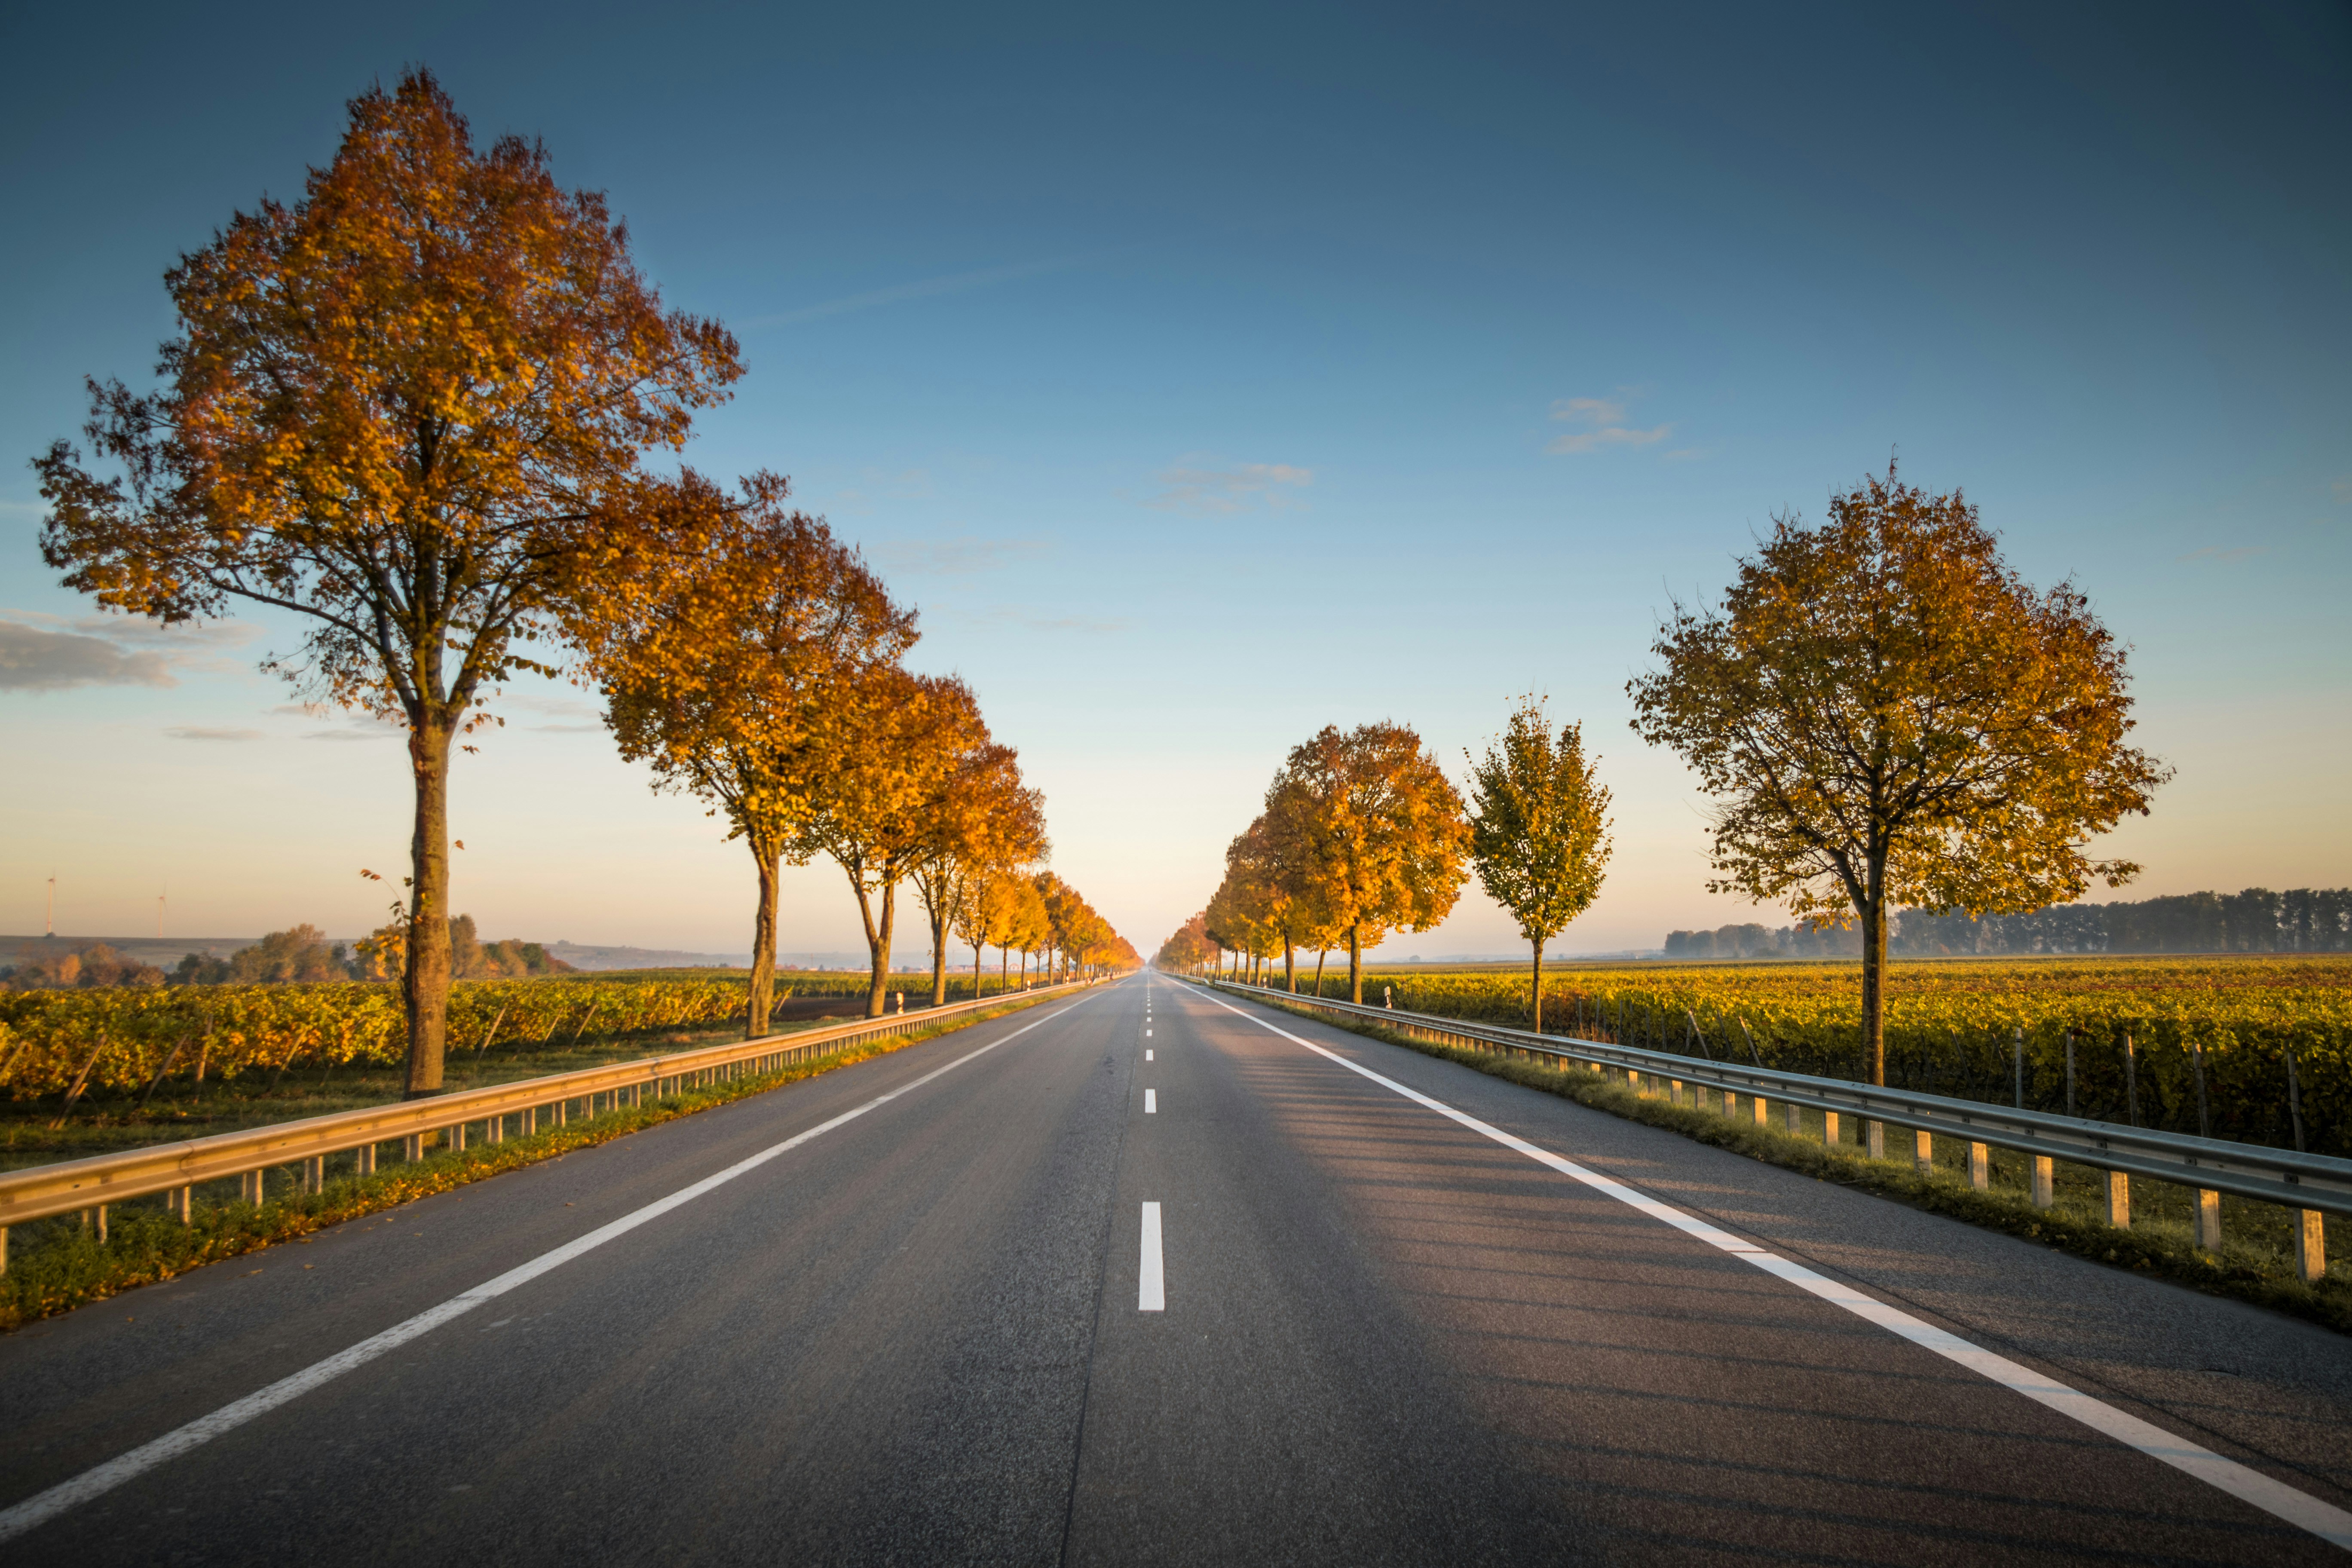
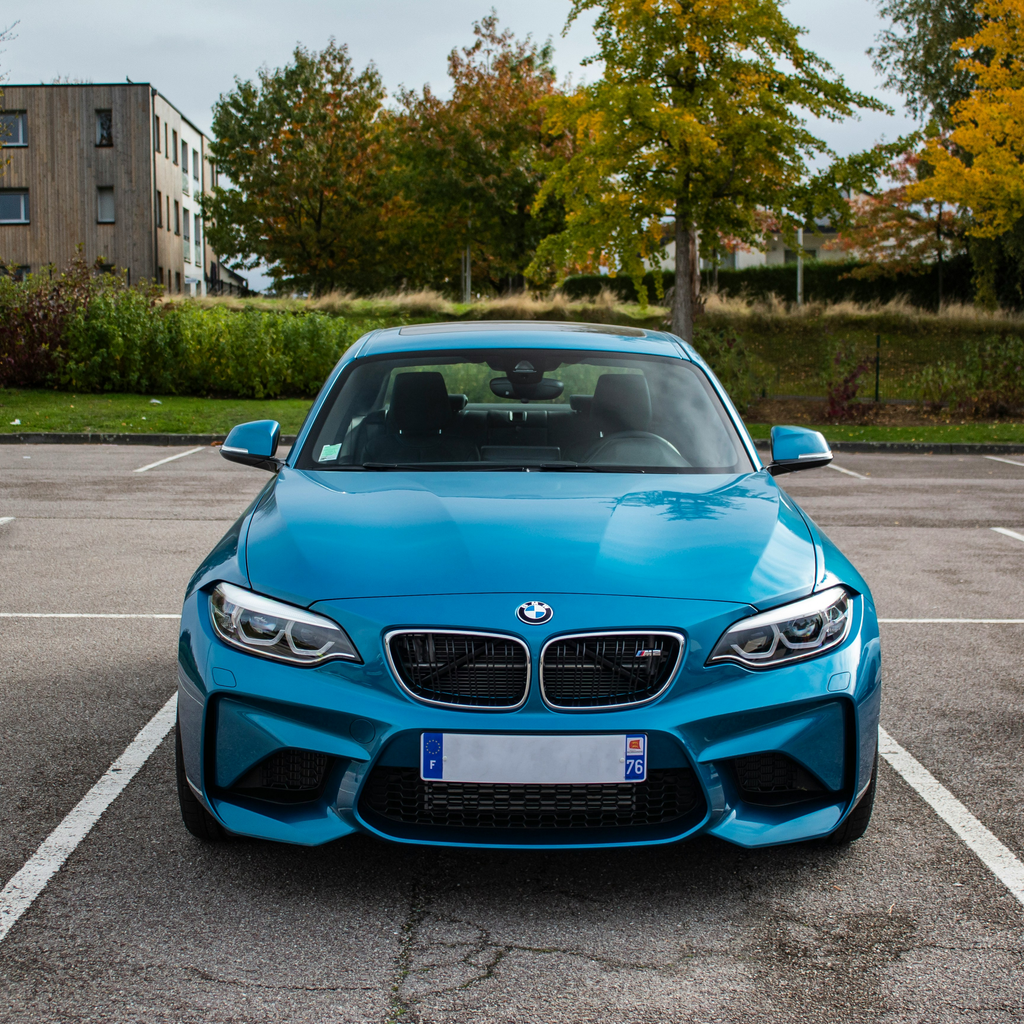
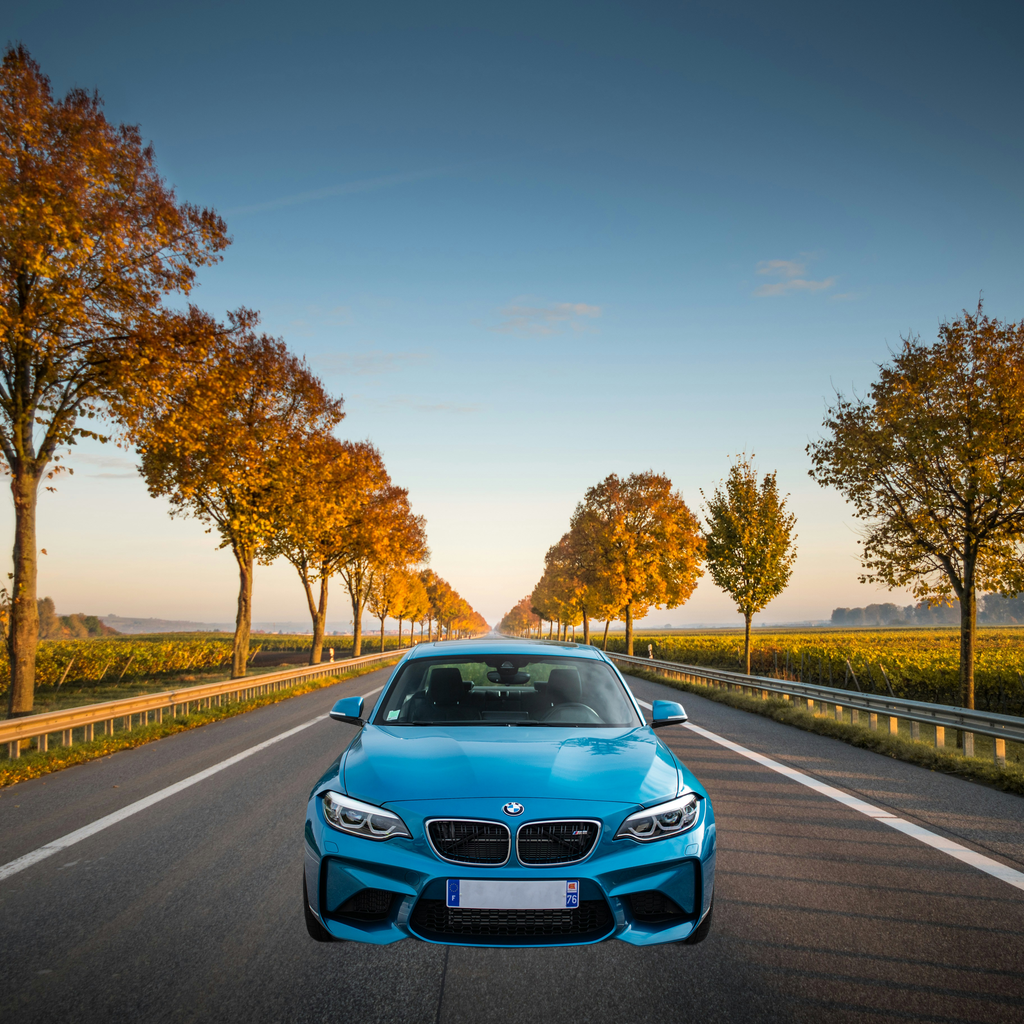
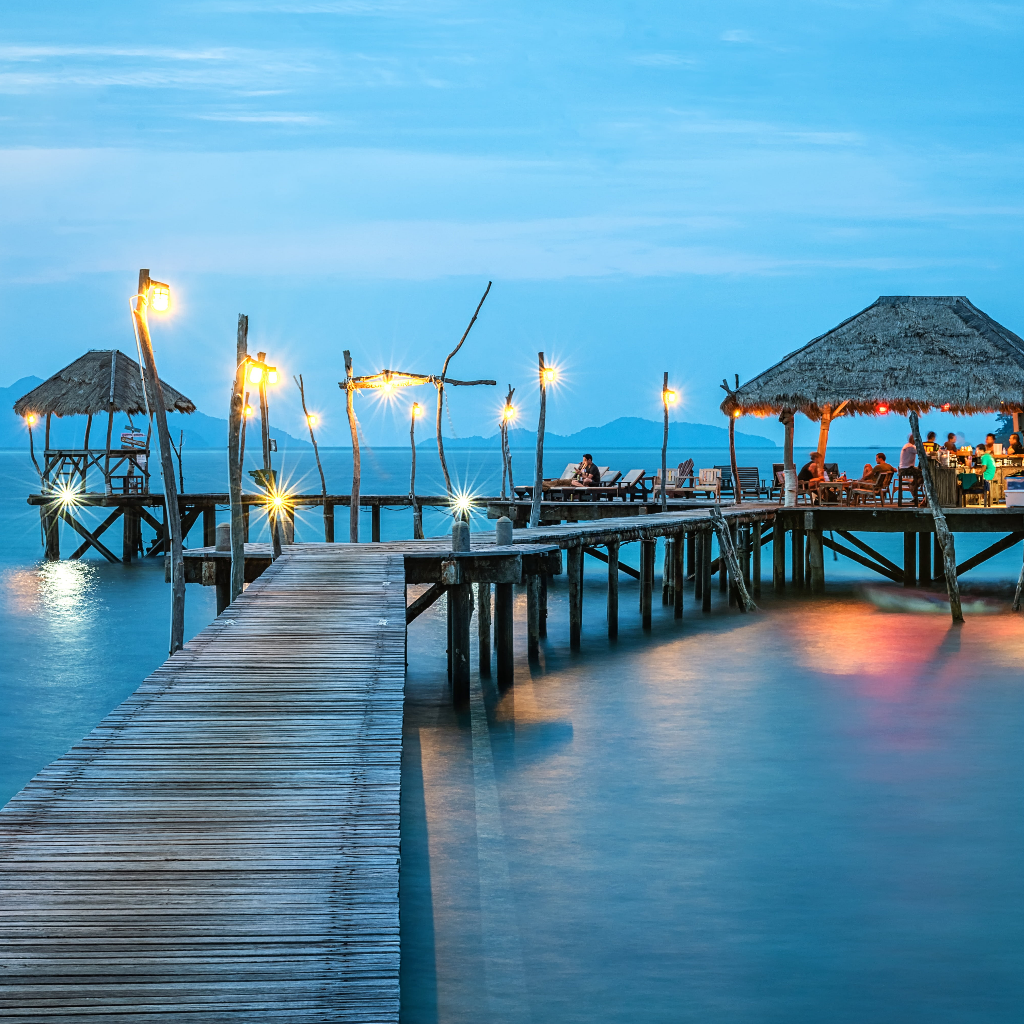
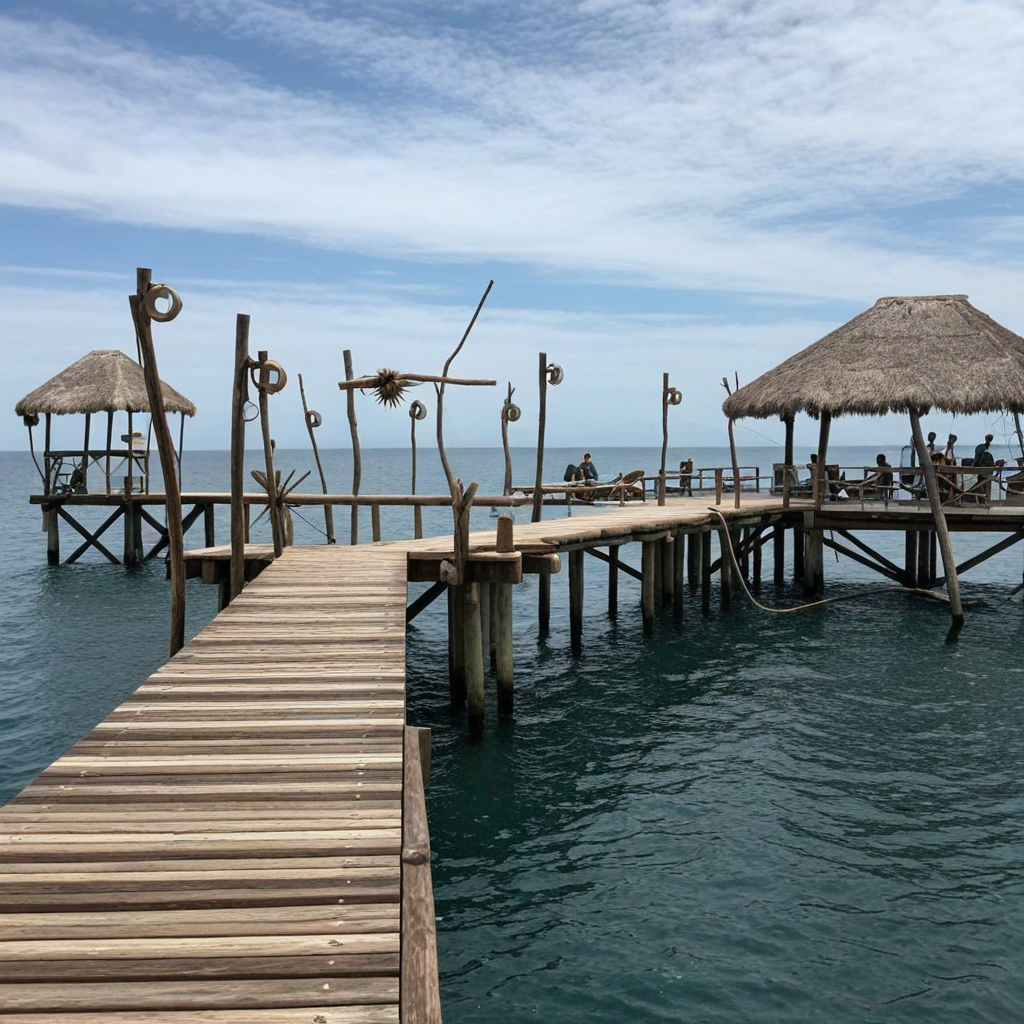
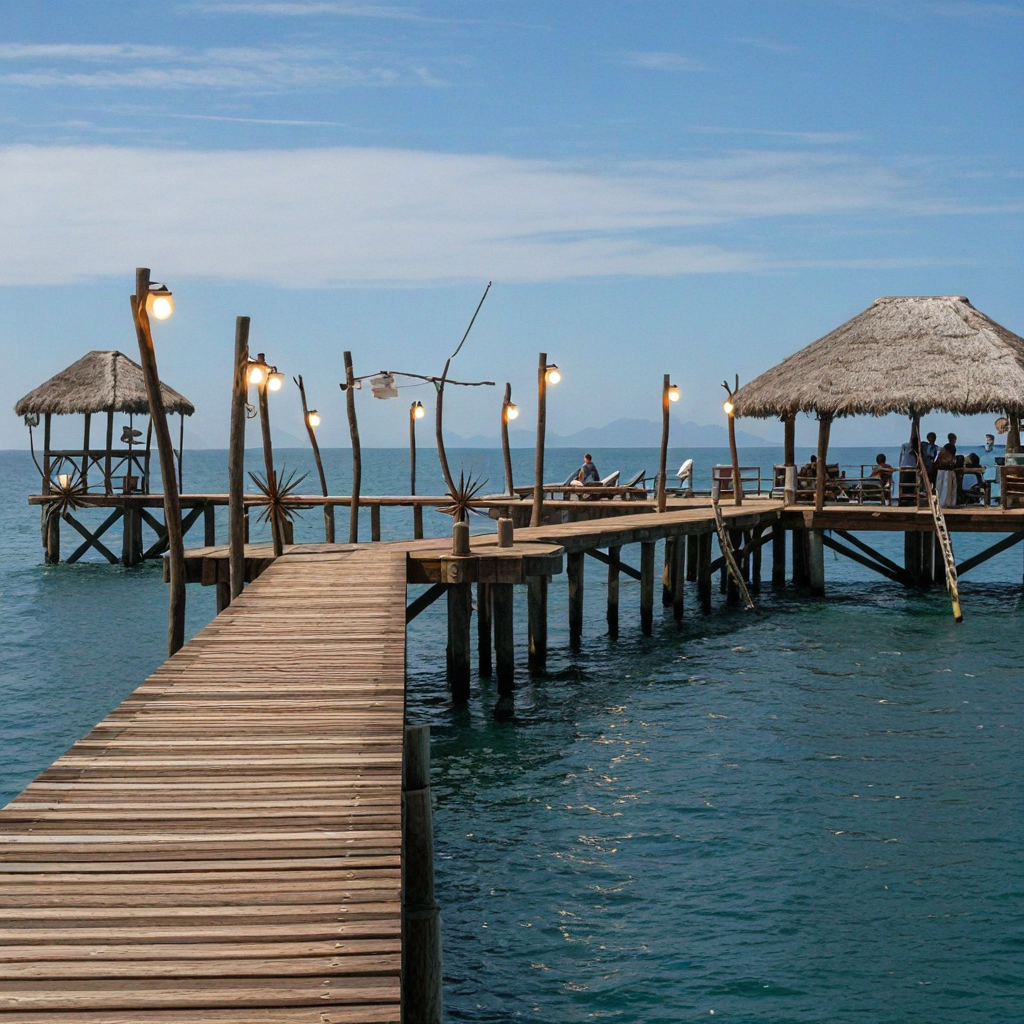
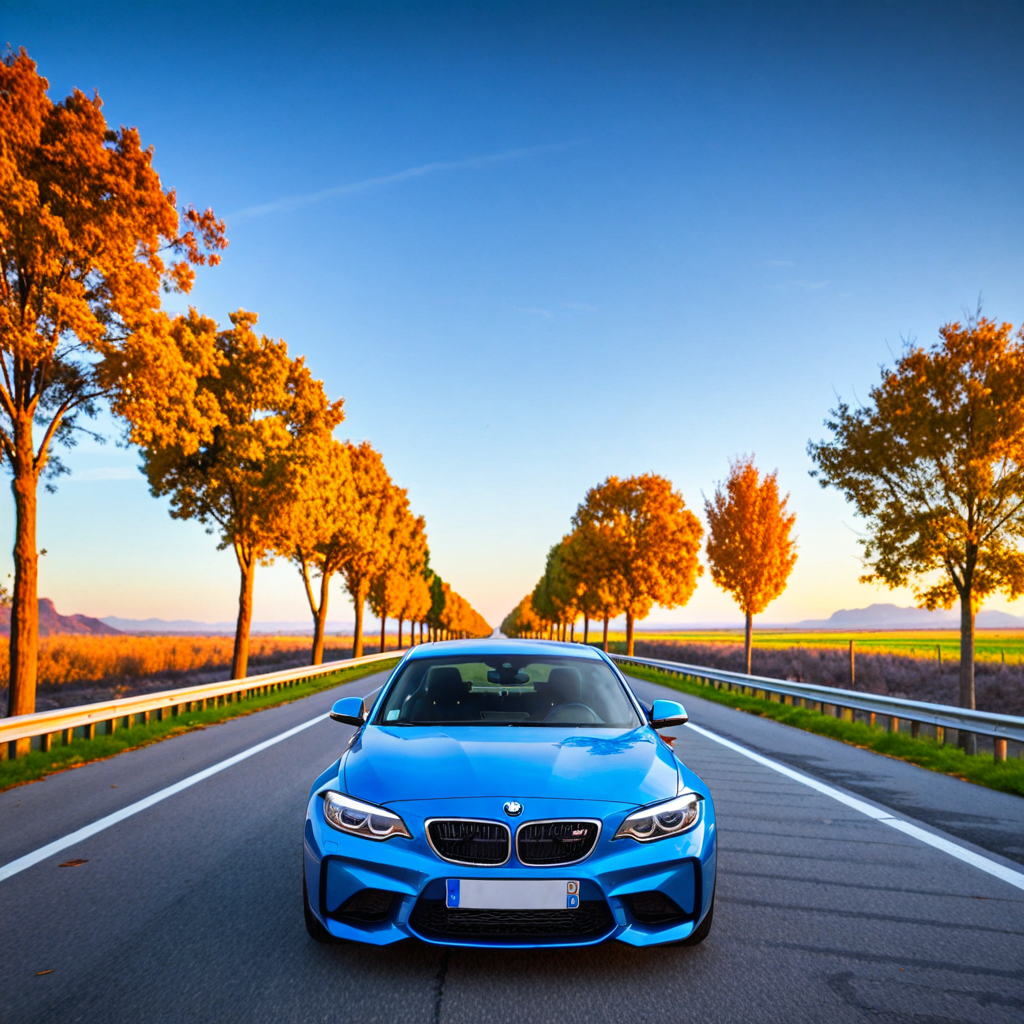
在本指南中,我将使用这两张图片,它们的合成难度远高于常见用例。
| 照片由 Mathieu Renier 在 Unsplash 上拍摄 | 照片由 Karsten Würth 在 Unsplash 上拍摄 |
|---|---|
 |
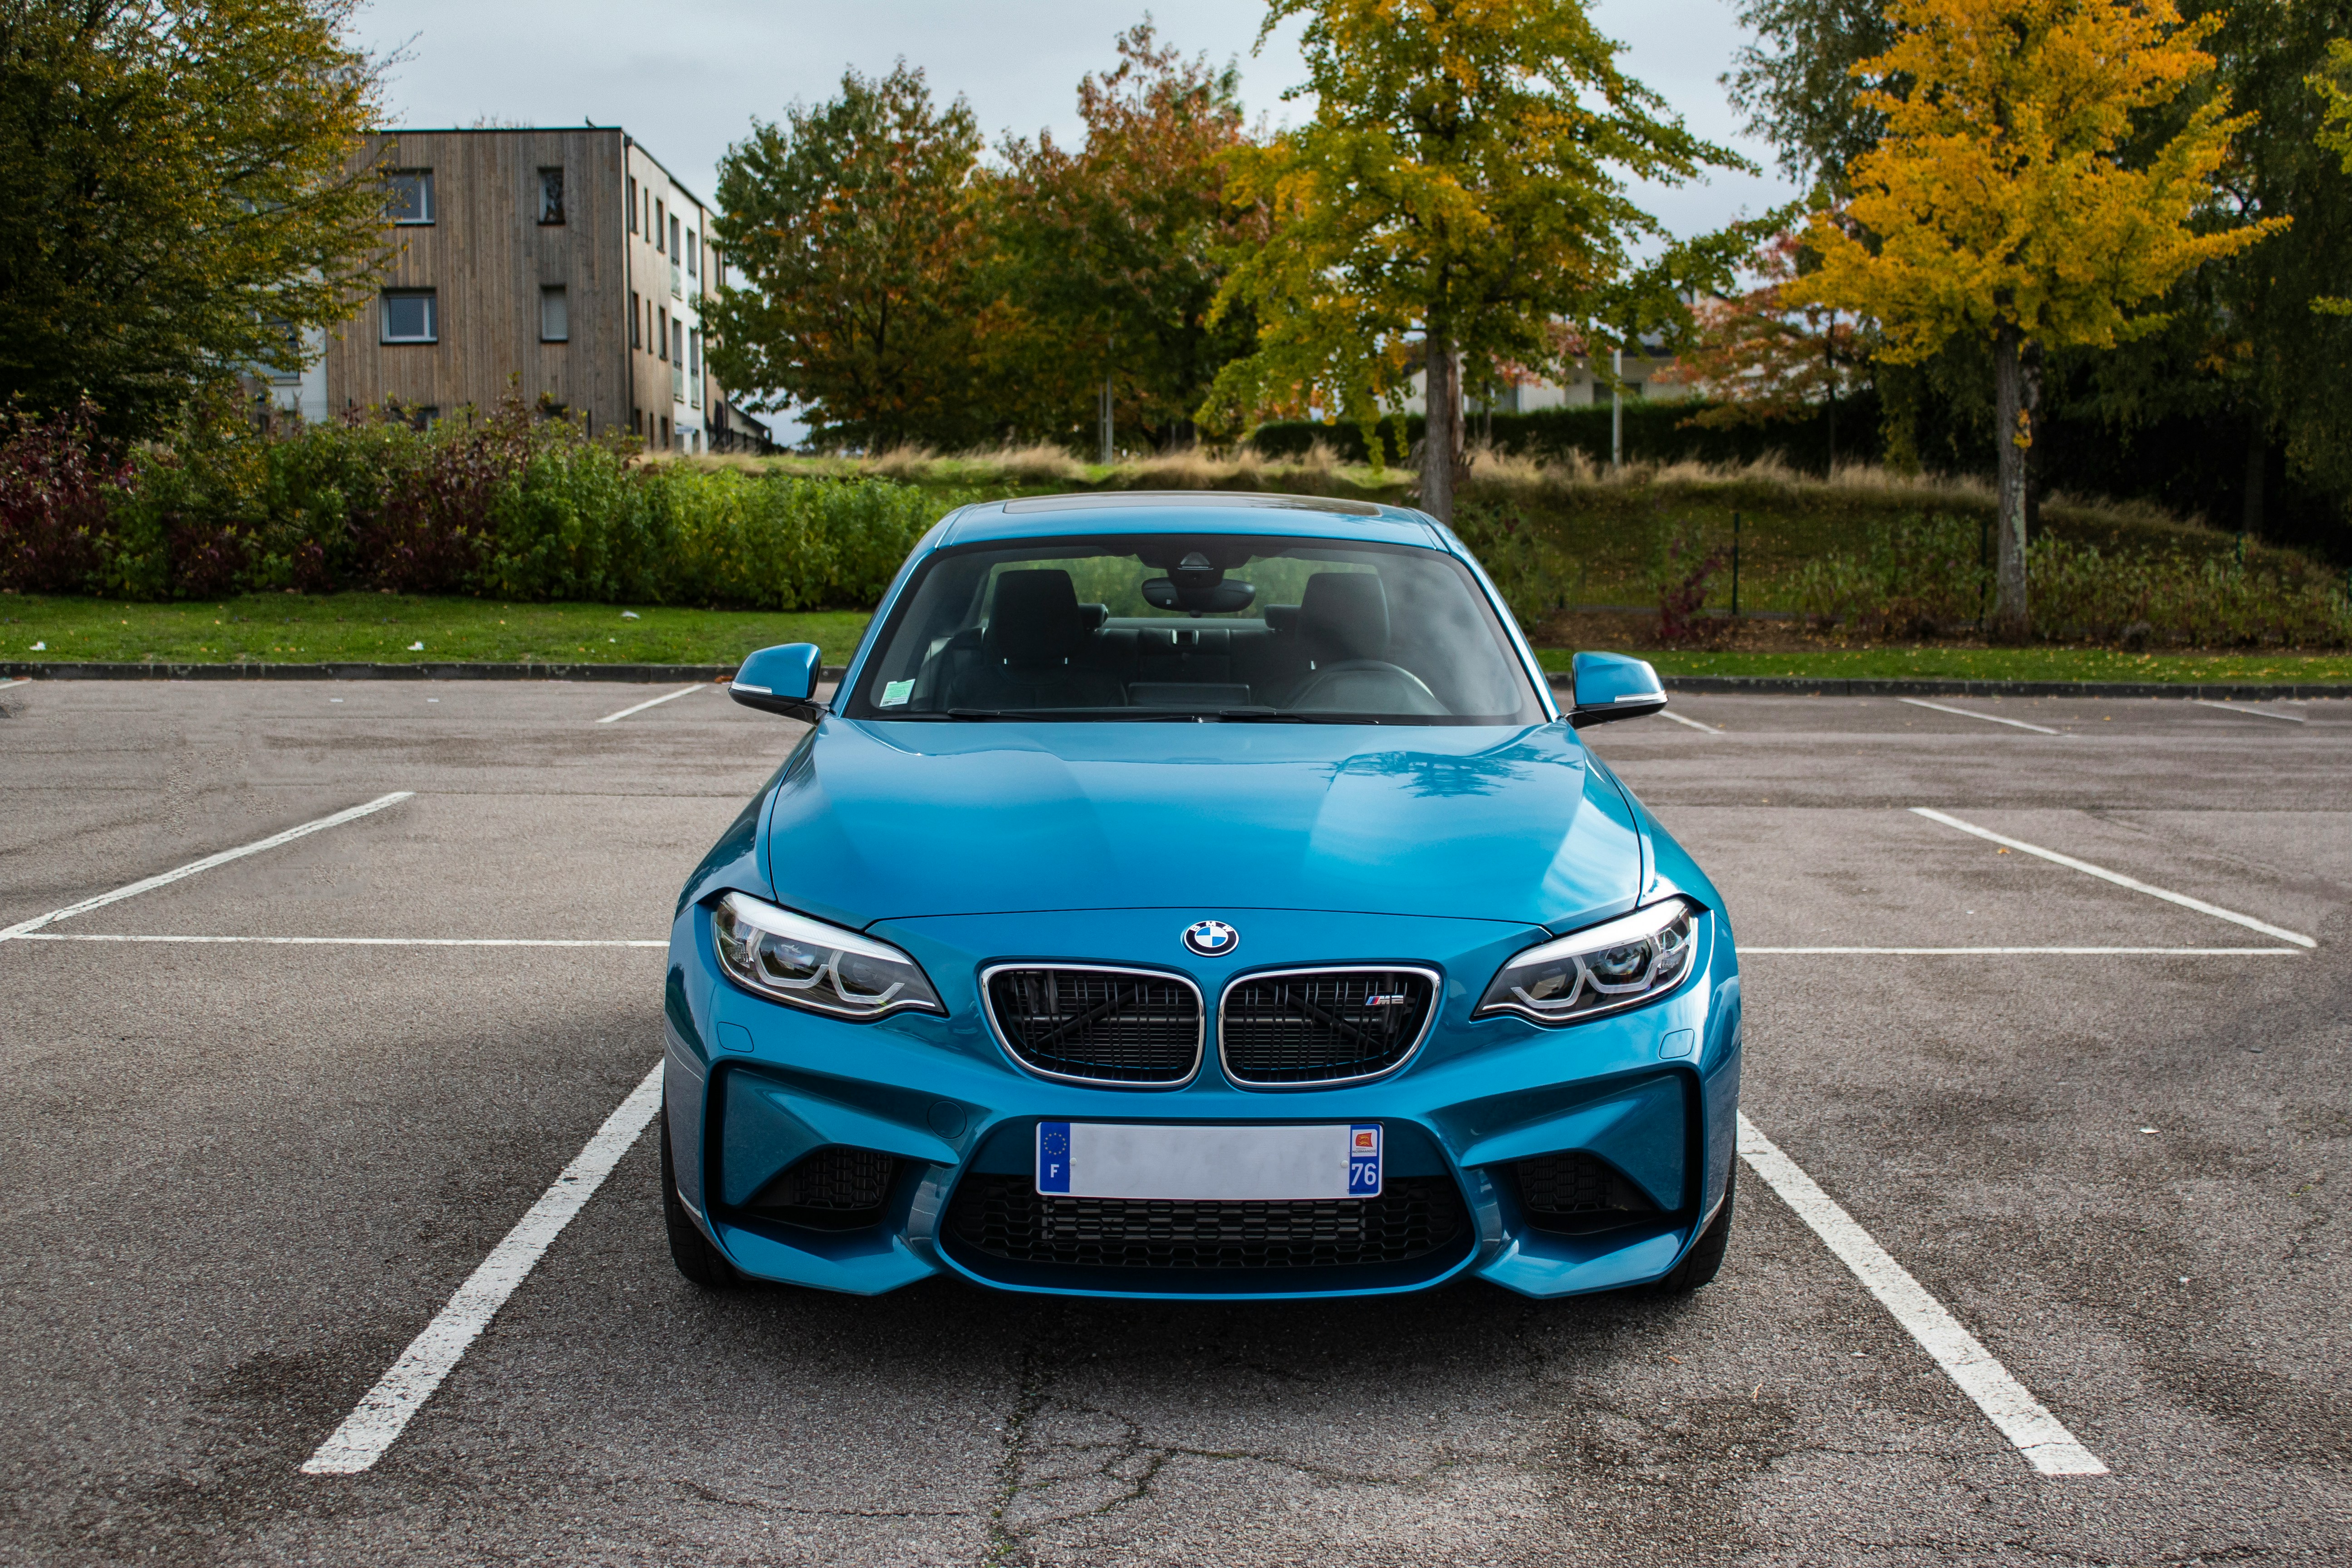 |
这些图像没有相同的长宽比,也不共享相同的透视或光照,但它们共享相同的角度,这会使操作更容易。我不会详细介绍如何做到这一点,但本质上我们需要使它们共享相同的透视(匹配它们的水平线),然后我们需要处理光照问题。
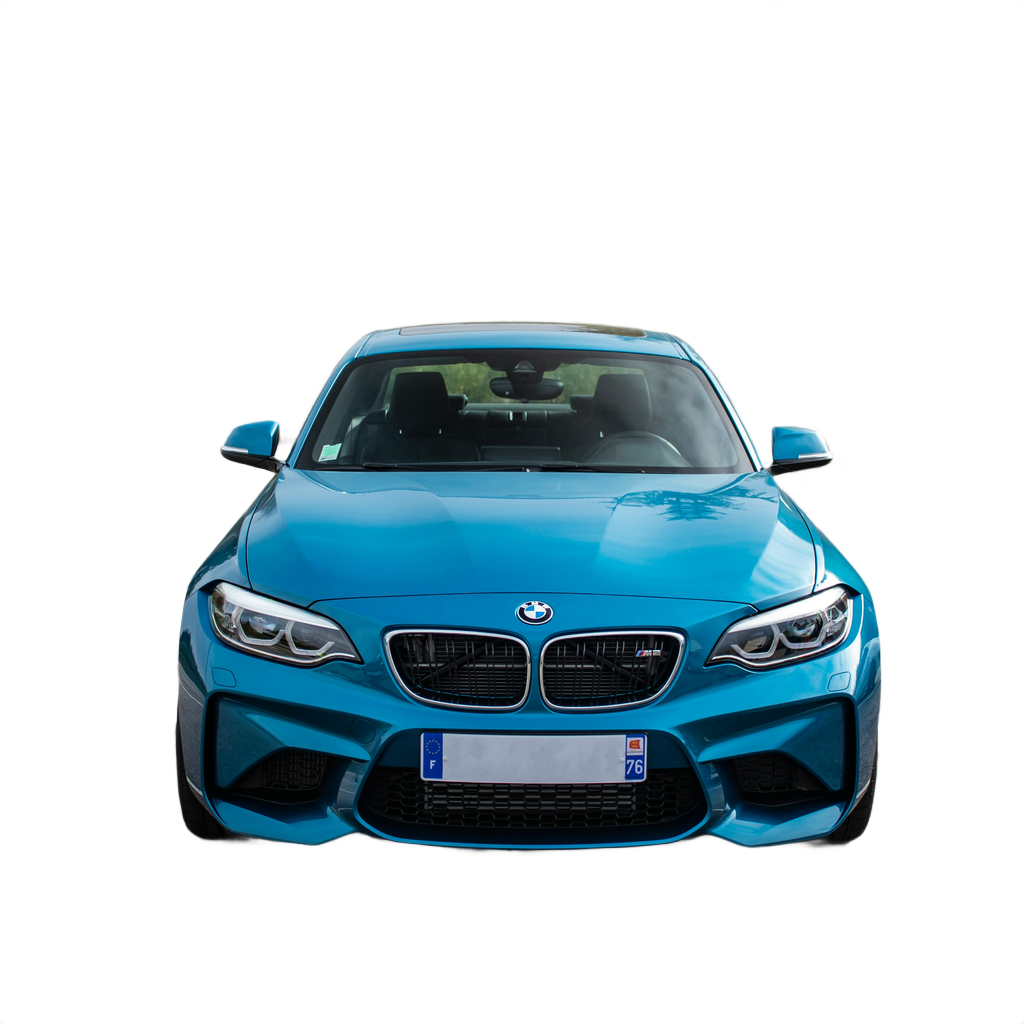
调整图片大小和裁剪
第一步,让我们调整图片大小并裁剪它们,使它们具有相同的宽高比。这对于前景来说并不是那么重要,但为了简单起见,我们将同时处理它们。
def resize_and_crop(image: Image.Image, target_size):
    original_width, original_height = image.size

    # Depending on which side is the smallest, resize the image while maintaing the aspect ratio
    if original_width < original_height:
        new_width = target_size
        new_height = int(original_width * (target_size / original_width))
    else:
        new_height = target_size
        new_width = int(original_width * (target_size / original_height))

    resized_image = image.resize((new_width, new_height), resample=Image.Resampling.LANCZOS)

    # calculate the cropping coordenates
    left = (new_width - target_size) // 2
    top = (new_height - target_size) // 2
    right = left + target_size
    bottom = top + target_size

    # crop the image
    cropped_image = resized_image.crop((left, top, right, bottom))

    return cropped_image

original_bg = load_image(
    "https://huggingface.co/datasets/OzzyGT/testing-resources/resolve/main/image_compositing/karsten-wurth-rafblRbne3o-unsplash.jpg"
)

background = resize_and_crop(original_bg, 1024)

original_fg = load_image(
    "https://huggingface.co/datasets/OzzyGT/testing-resources/resolve/main/image_compositing/mathieu-renier-4WBvCqeMaDE-unsplash.jpg"
)
foreground = resize_and_crop(original_fg, 1024)
最终图片如下:
| 背景 | 前景 |
|---|---|
 |
 |
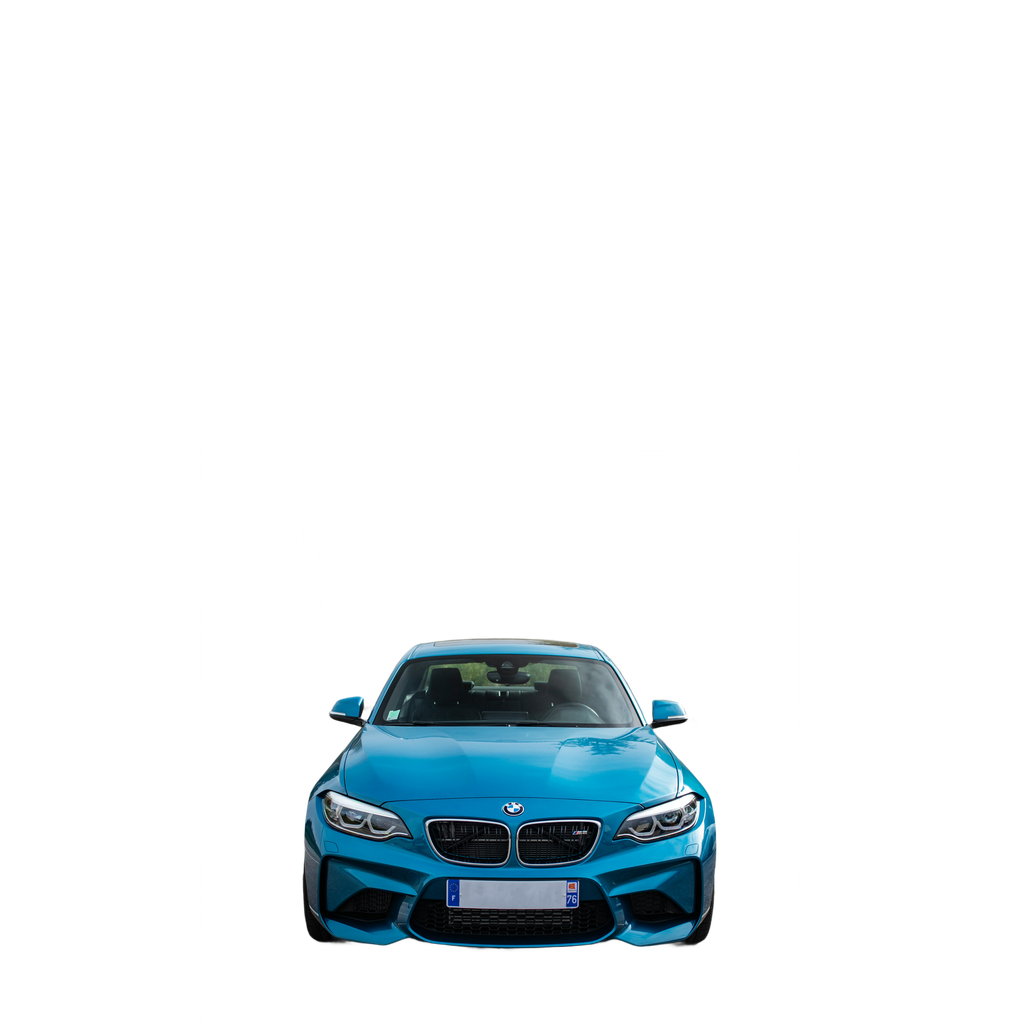
移除背景
第二步是移除前景中的背景。这部分非常重要,背景移除器应该移除所有背景。如果残留了一些部分,则此方法将不起作用。您可以使用任何您想要的工具,但为了可重现性,我将使用 BEN2,我最近将其添加到了 `image_gen_aux` 库中。
使用此命令在您的环境中安装库:
pip install git+https://github.com/huggingface/image_gen_aux
现在我们可以使用这个简单的代码来移除背景了
from image_gen_aux import BEN2BackgroundRemover

bg_remover = BEN2BackgroundRemover.from_pretrained("PramaLLC/BEN2").to("cuda")
foreground = bg_remover(foreground)[0]
请注意,前轮下方有一些背景的痕迹,但对于本例来说并不重要。模型会认为这些是它需要添加的阴影。此外,后车窗后面有一些植物。我不认为任何背景移除器能处理那部分,所以如果你想要完美,那部分将需要手动擦除或之后进行修复。
合成
为了合成,我们需要再次调整汽车的大小并将其移动到合适的位置。我们将需要两张图像:一张只有汽车用于 inpainting ControlNet,另一张是汽车粘贴在背景上。
通过这段代码,我们可以生成这两张图片
# make the foreground image smaller
foreground_size = (600, 600)
foreground = foreground.resize(foreground_size, resample=Image.Resampling.LANCZOS)

# Create a new image with the same size as the background and paste the foreground onto it
new_foreground = Image.new("RGBA", background.size, (0, 0, 0, 0))
offset = (200, 450)
new_foreground.paste(foreground, offset)

# Combine the background and the new foreground
combined_image = Image.alpha_composite(background.convert("RGBA"), new_foreground)
现在我们将拥有以下两张图片:
| 新前景 | 组合图 |
|---|---|
 |
 |
组合图很难看,但它是我们需要告诉模型我们想做什么的必要条件。
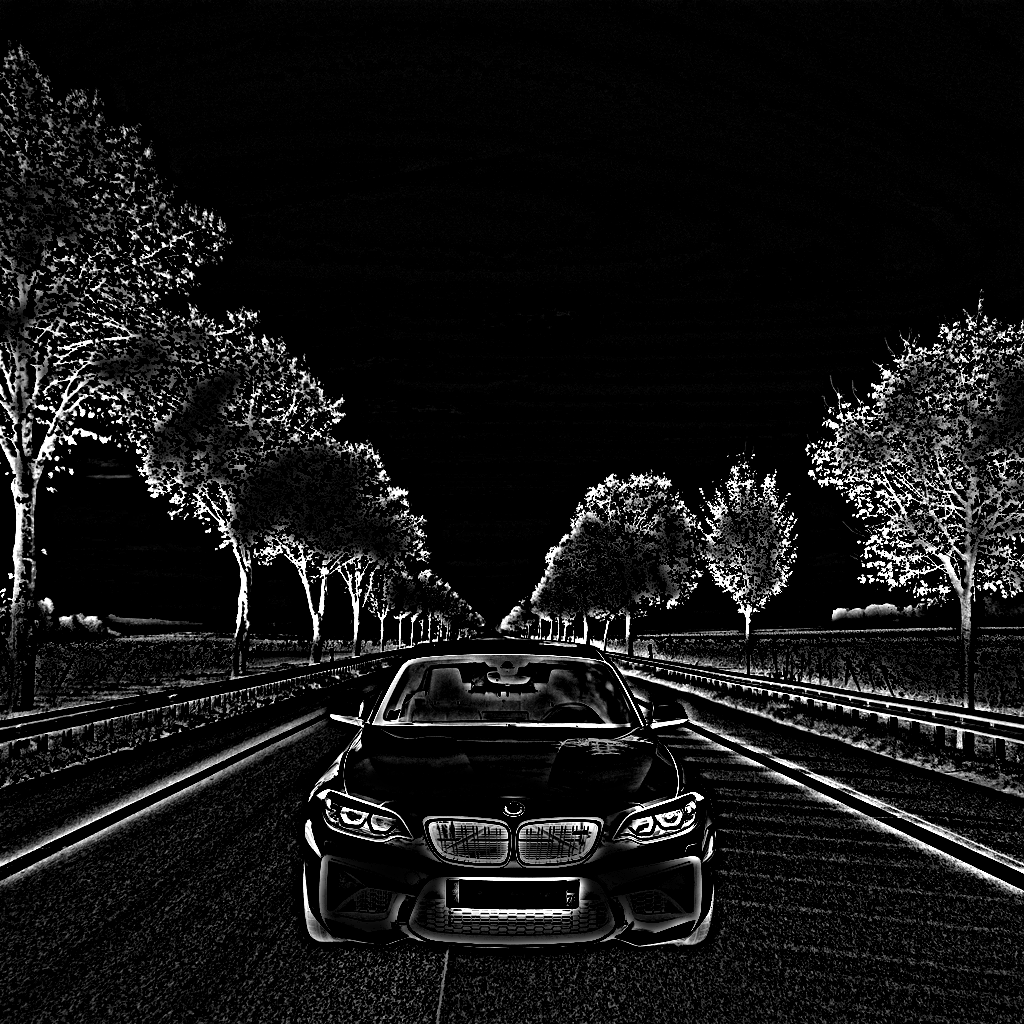
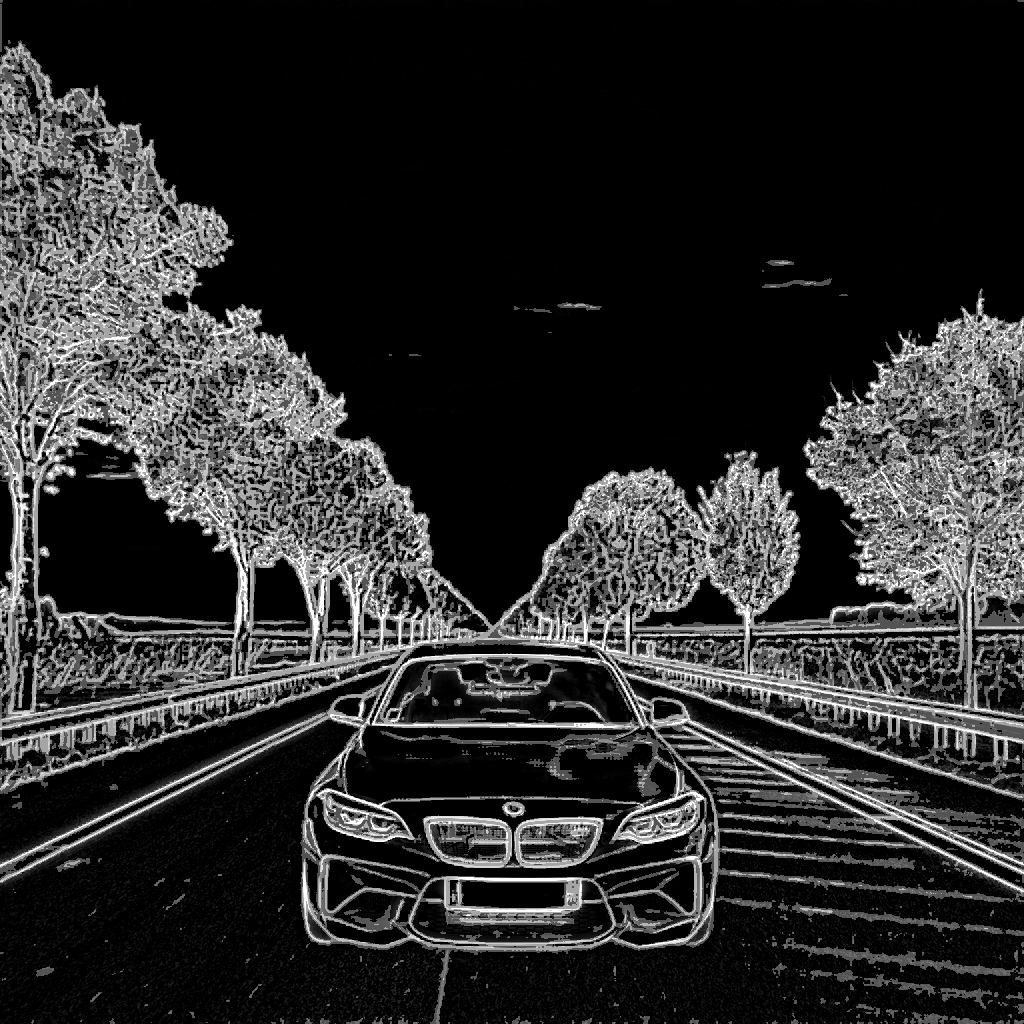
Teed 预处理器与 Controlnet Union 混合使用
原因
我从创建 MistoLine Controlnet 的非常有才华的人那里学到,当我将其与 `controlnet_aux` 集成时,你可以混合使用两个图像预处理器以获得更好的结果。不久前,这需要训练一个 ControlNet,但我们现在有了 `Controlnet Union`,它是在多种条件下训练的,在本例中是边缘检测和线条。
由于这种特殊的训练,`Controlnet Union` 可以在您混合条件图像时工作。例如,您可以将深度图与线条一起使用,也可以将普通图像用作深度图,甚至可以将它们全部混合在一起。
这促使我尝试用 `Controlnet Union` 制作自己的 `MistoLine` 版本,因此我们将使用 Teed 来处理轮廓和较大细节,并使用 Lineart Standard 来处理较小细节。
但用文字很难解释它如何影响生成。我将用这张图片快速举例说明我的意思
| 原始图片 | 仅使用 Teed | Teed 与 Lineart Standard 混合 |
|---|---|---|
 |
 |
 |
结果大相径庭。
| 仅使用 Teed | Teed 与 Lineart Standard 混合 |
|---|---|
 |
 |
你可以看到它是如何将云朵的形状、背景中的岛屿和大部分光线重新带回生成图像中的。如果你想尽可能地保留原始图像,这一点至关重要。
我使用它的方式是通过在 Teed 图像上进行 Lineart Standard 的 Alpha 混合。我没有使用固定的 Alpha 百分比,因为我手动选择对我来说看起来最好的效果,但通常值应该在 30% 到 60% 之间。
这就是我使用的以及帮助我决定混合多少的方法
如果您喜欢其他方法或 ControlNet,请随意使用它们。
使用混合 Teed 技术与扩散模型
对于这个特殊情况,我喜欢用 0.35 的 alpha 值进行混合。我们可以用以下代码实现:
from image_gen_aux import LineArtStandardPreprocessor, TeedPreprocessor
from image_gen_aux.utils import load_image
from PIL import Image


preprocessor = TeedPreprocessor.from_pretrained("OzzyGT/teed").to("cuda")
teed = preprocessor(combined_image)[0]

preprocessor = LineArtStandardPreprocessor()
linear_standard = preprocessor(combined_image)[0]

mixed_teed = Image.blend(teed, linear_standard, alpha=0.35)
结果
| Teed | 线稿标准 | 混合 Teed |
|---|---|---|
 |
 |
 |
生成
对于这次生成,我将使用以下模型:
使用该特定 ControlNet 的原因在于其训练和结果。对于基础模型,我选择 CyberRealistic,因为它是最适合真实图像的安全模型之一,而 DMD2 LoRA 则能使图像更加真实,具有更好的纹理和光照。它还能显著加快生成速度。
所有这些模型都允许此解决方案进行商业使用而无限制,如果您想在您的应用程序或服务中使用此技术。
我们先加载模型
import torch

from diffusers import ControlNetUnionModel, LCMScheduler, StableDiffusionXLControlNetUnionImg2ImgPipeline


# Alternative repository so we don't need special code to load the model
controlnet_model = ControlNetUnionModel.from_pretrained(
    "OzzyGT/controlnet-union-promax-sdxl-1.0",
    torch_dtype=torch.float16,
    variant="fp16",
)

# Diffusers format alternative repository
pipeline = StableDiffusionXLControlNetUnionImg2ImgPipeline.from_pretrained(
    "John6666/cyberrealistic-xl-v60-sdxl",
    controlnet=controlnet_model,
    torch_dtype=torch.float16,
).to("cuda")

# DMD2 lora needs to use the LCM for the best results
pipeline.scheduler = LCMScheduler.from_config(pipeline.scheduler.config)

# original DMD2 lora
pipeline.load_lora_weights("tianweiy/DMD2", weight_name="dmd2_sdxl_4step_lora_fp16.safetensors")
现在让我们做一些基本的推理准备。我进行了一个计算,以始终保持推理步骤的数量相同,只是因为我更喜欢那样,同时还有一个非常基本的提示。
# calculate the inference steps
strength = 0.3
num_inference_steps = math.ceil(8 / strength)

# basic prompt
prompt = "high quality photo, detailed, 4k"
现在我们可以进行第一次推理来测试结果。
# do inference
image = pipeline(
    prompt=prompt,
    guidance_scale=1.0, # no cfg
    num_inference_steps=num_inference_steps,
    image=combined_image, # img2img source
    strength=strength,
    controlnet_conditioning_scale=0.5,
    control_image=controlnet_image, # mixed teed image
    control_mode=2, # edge mode
).images[0]
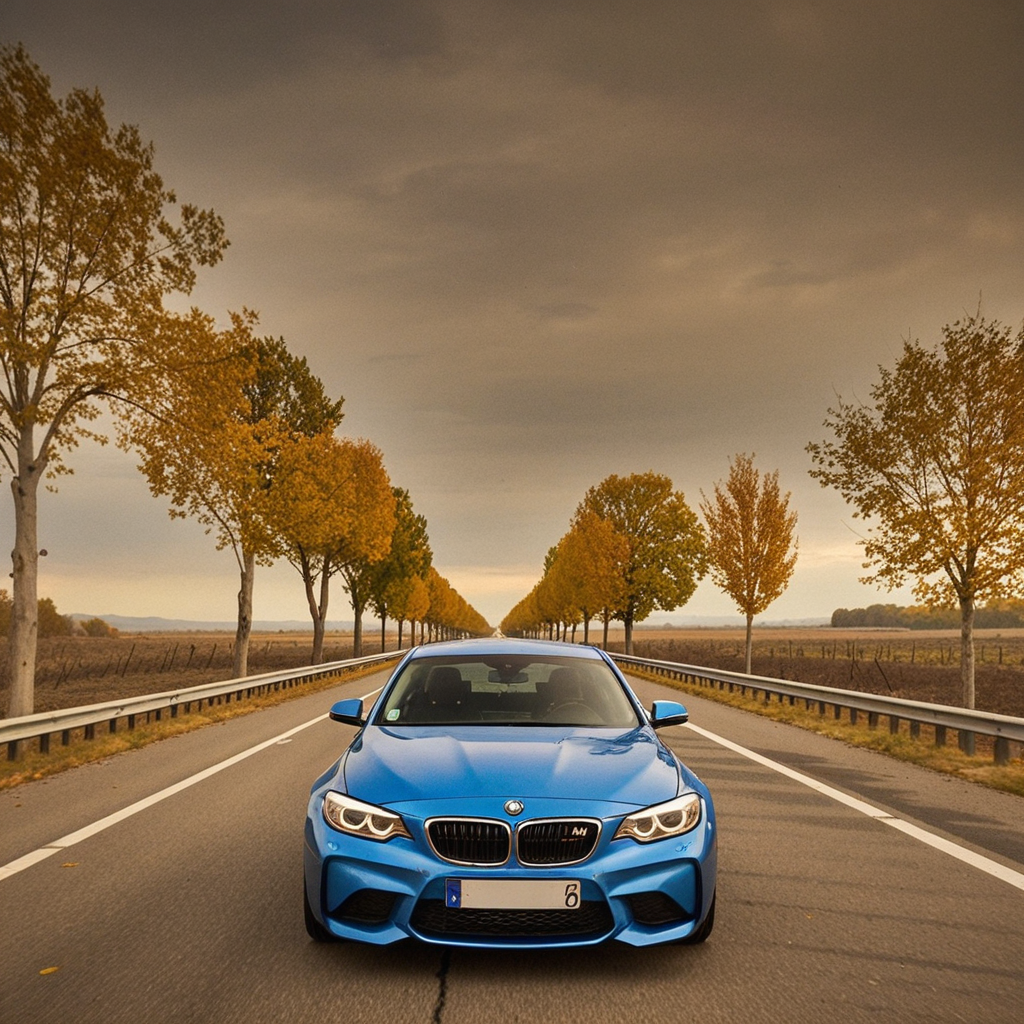
结果如下:
还不错,但看起来仍然像一个糟糕的构图。首先,汽车略有变化并失去了一些细节,而且光线看起来不对。请注意,我特意选择了一个非常难的背景来展示这一点,并展示 SDXL VAE 的一个局限性。我可以修复光线,但树木的细节才是与新模型产生差异的地方。这些树木在 SD 3.5 或 Flux 中会看起来好得多。
改进
我们先修好车。为此,我们将使用之前准备好的图像,并使用修复模式。这里有一个小问题:如果只使用一个 ControlNet 和多个条件,结果图像会在修复处周围出现一个边框,并且质量显著降低。我总是使用多个 ControlNet,所以我不太清楚这是否是预期行为,但为了获得最佳结果,我们将使用多个 ControlNet。
# Diffusers format alternative repository
pipeline = StableDiffusionXLControlNetUnionImg2ImgPipeline.from_pretrained(
    "John6666/cyberrealistic-xl-v60-sdxl",
    controlnet=[controlnet_model, controlnet_model], # load multiple controlnets
    torch_dtype=torch.float16,
).to("cuda")

# do inference
image = pipeline(
    prompt=prompt,
    guidance_scale=1.0,  # no cfg
    num_inference_steps=num_inference_steps,
    image=combined_image,  # img2img source
    strength=strength,
    controlnet_conditioning_scale=[0.5, 0.5],
    control_image=[controlnet_image, new_foreground],  # mixed teed image, car
    control_mode=[2, 7],  # edge mode, inpaint mode
).images[0]
| 单个 ControlNet | 多个 ControlNet |
|---|---|
 |
 |
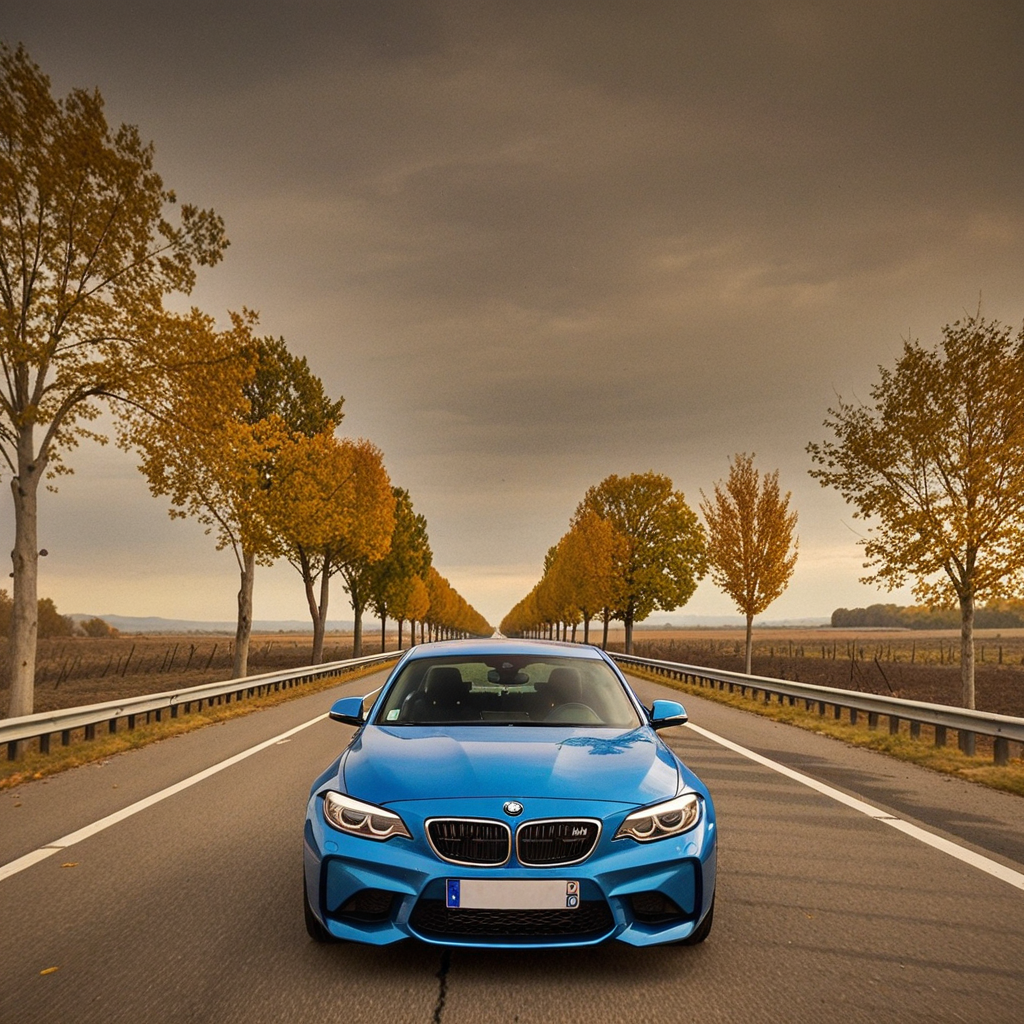
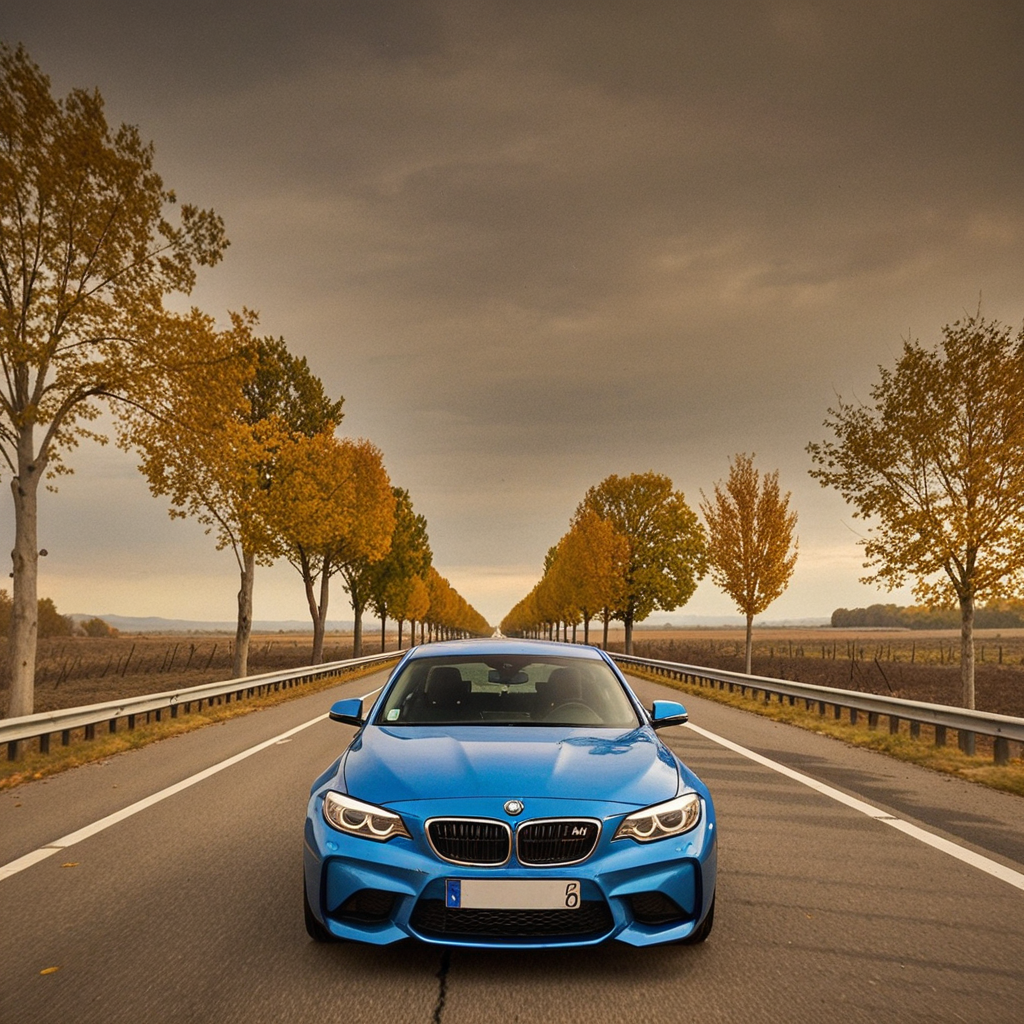
图像现在看起来好多了。如果您希望在此步骤中它看起来更正确,您将需要降低“强度”,以便模型有更大的自由度来更改背景。
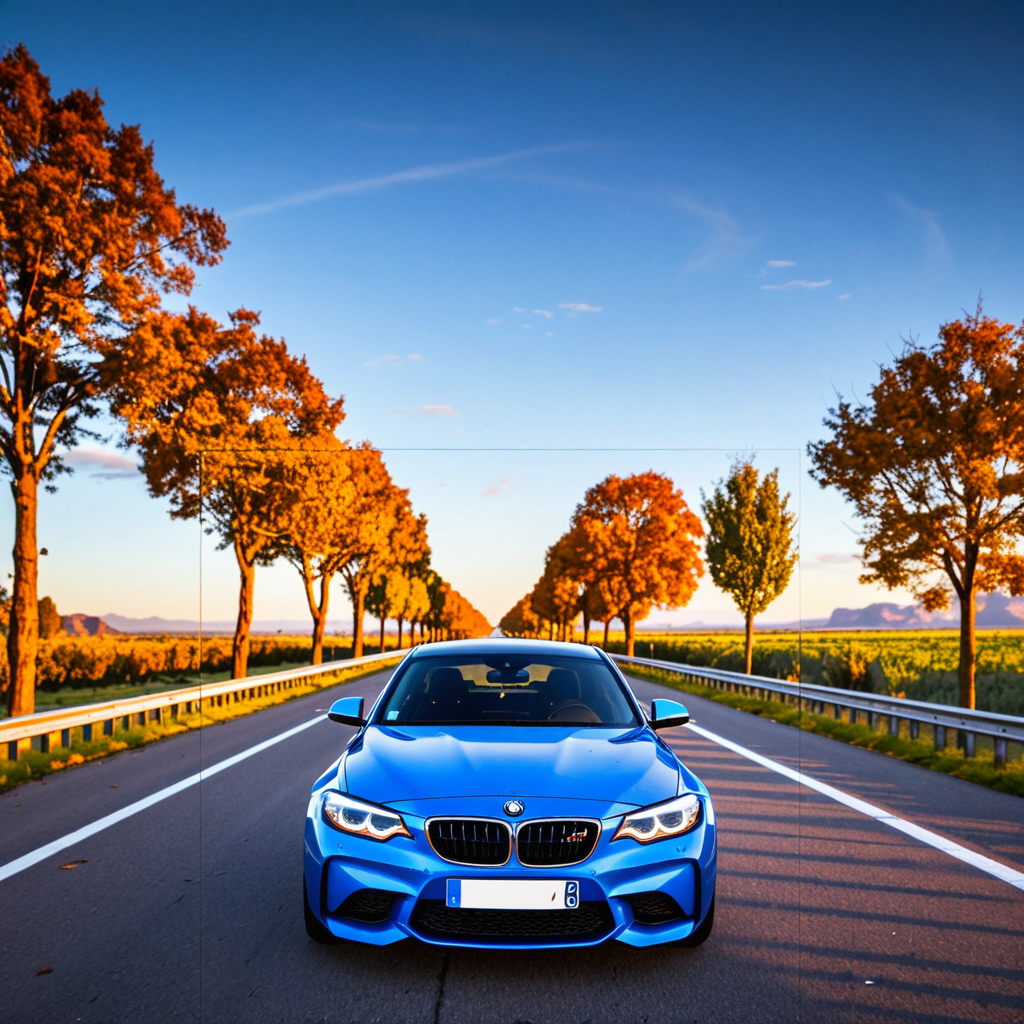
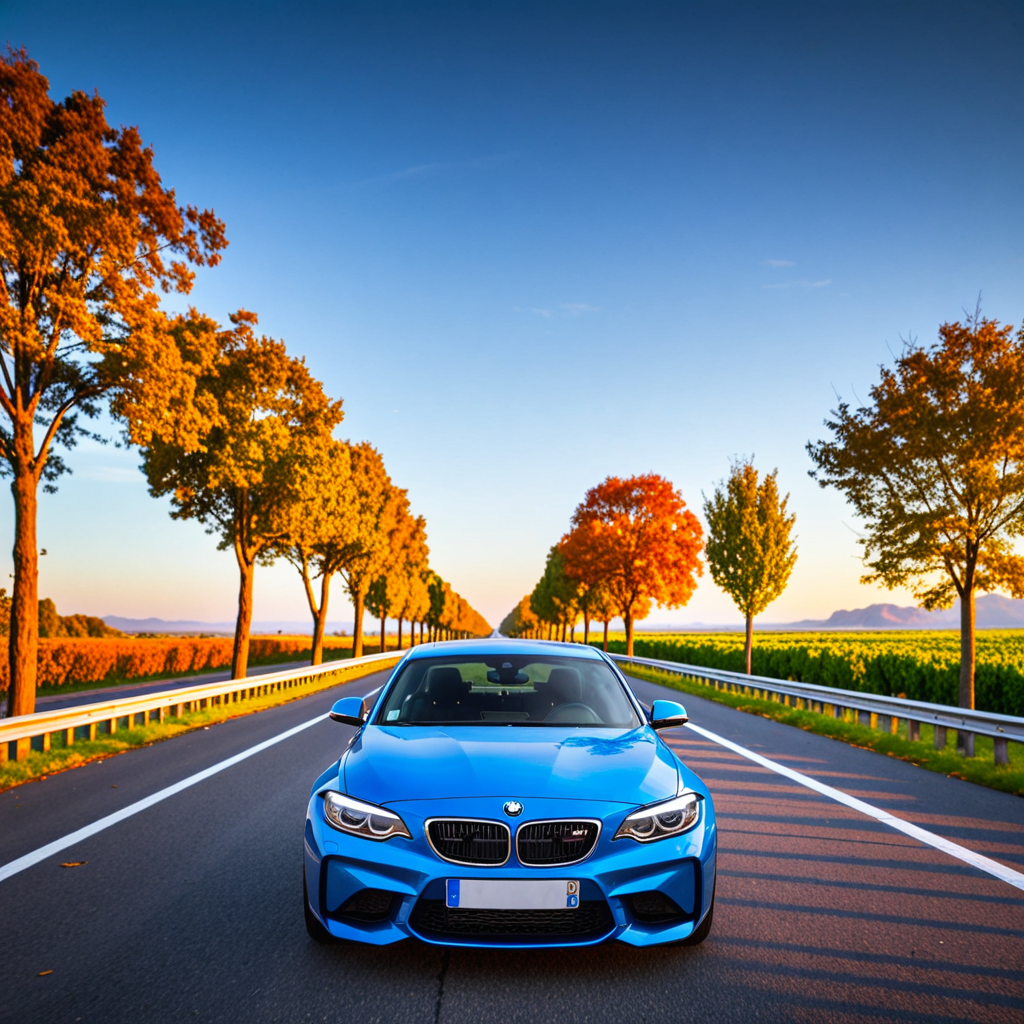
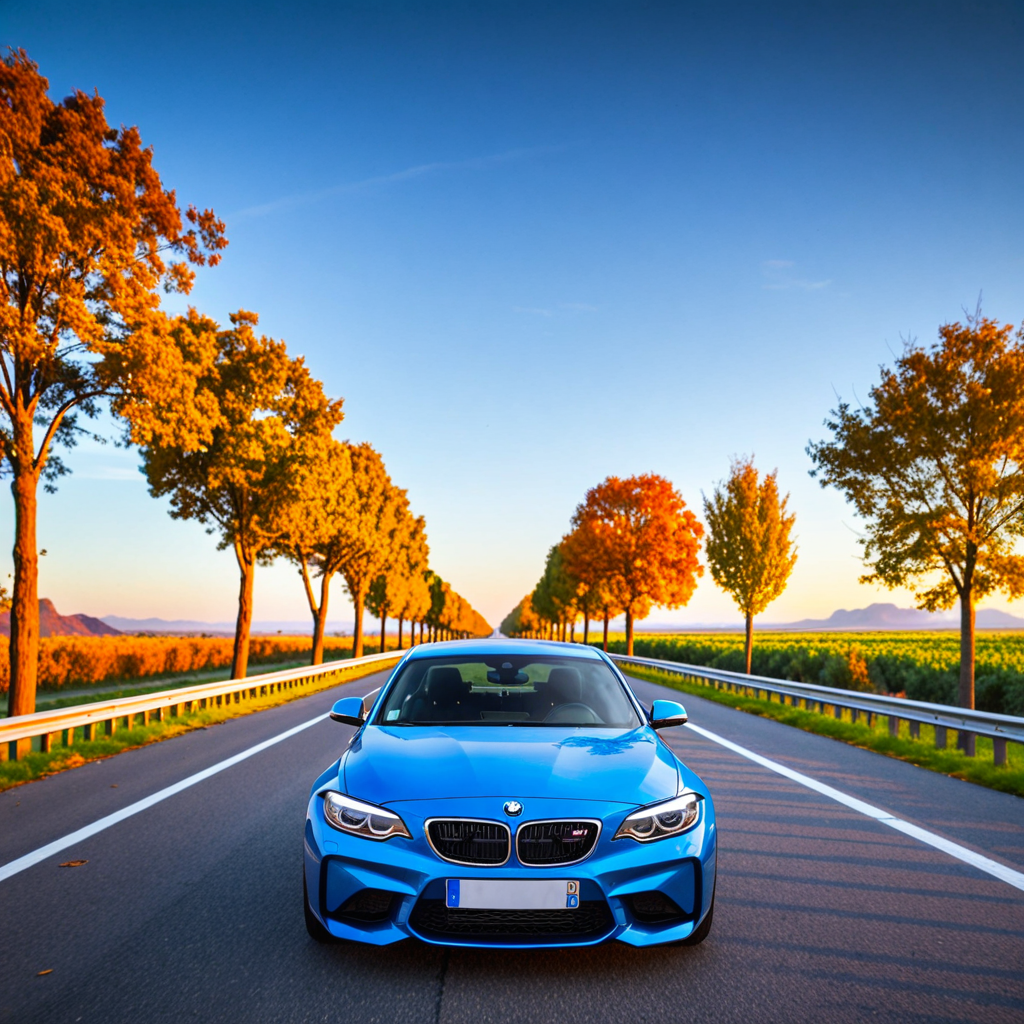
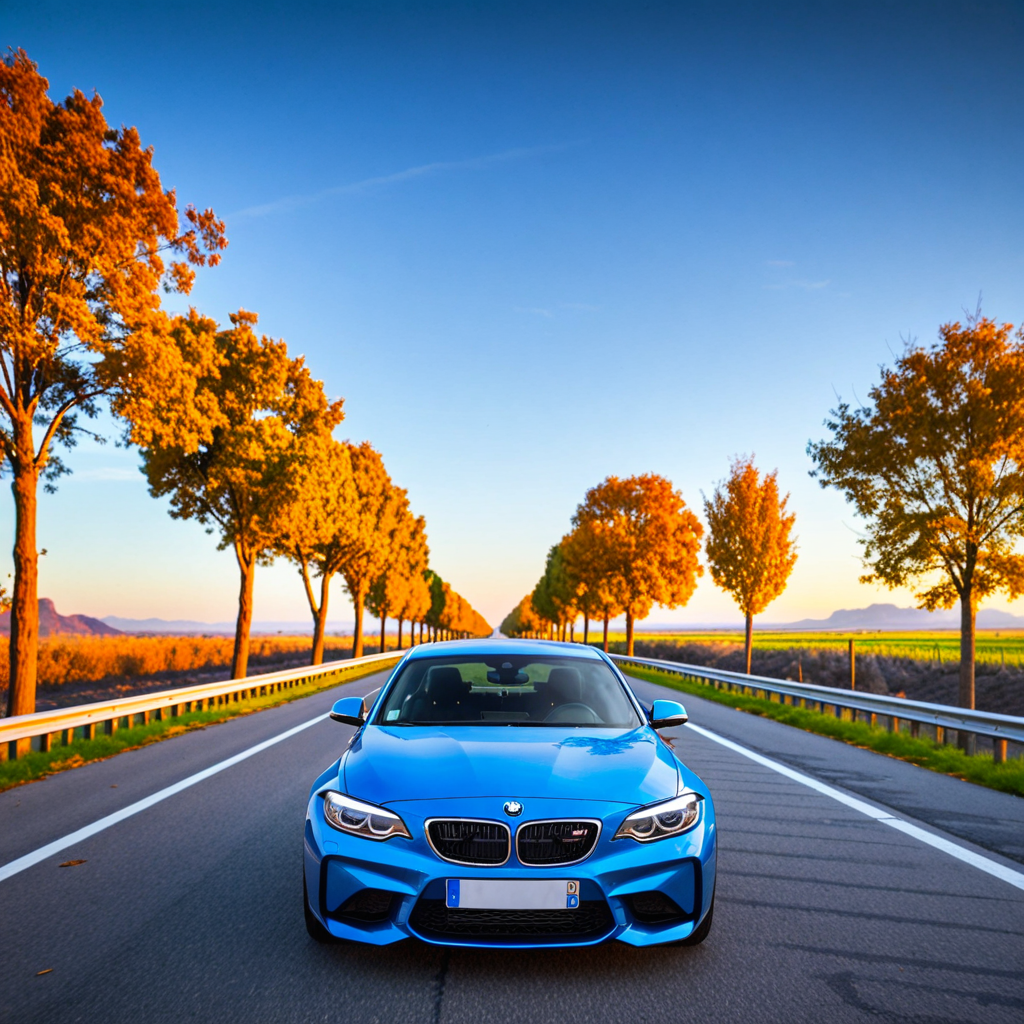
按强度区分的图像
| 0.3 | 0.4 | 0.45 | 0.5 |
|---|---|---|---|
 |
 |
 |
 |
如你所见,在强度达到 0.4 后,背景开始急剧变化。这是因为模型开始将背景的光线与汽车的光线匹配。因此,如果你想保留原始背景,你就必须牺牲这一点。好的方面是,大多数人不会注意到“0.4 强度”图像中的光线是错误的。
更多手动改进
图像的光照是错误的,因为背景中的太阳在右边,而汽车图像中的太阳在上方(我猜)且不那么强烈。背景是一张金色时段暖色调的照片,而汽车来自一张较冷、多云的照片。图像之间的这种对比使得模型难以将它们融合在一起,导致背景烧毁,并且两者的光照都不正确。
解决这个问题的一种方法是手动添加光照。具体方法是在源图像上添加另一个图像层,并设置一定的 alpha 百分比。我在这里不会详细介绍代码,因为那会使事情变得更复杂,但这里有图像来展示它是如何完成的以及结果:
| 彩色图像 | 混合 | 结果 |
|---|---|---|
 |
 |
 |
现在图片看起来好多了,但背景也因此改变了,所以这取决于你的用例是否能接受。我选择了暖色调,但你也可以使用蓝色来获得更冷的图片。
即便如此,我仍然可以看到汽车上的光线不正确。这是因为我们使用了修补并保留了它。唯一解决这个问题的方法是稍微放开原车。这会改变它,所以这取决于你的用例是否能这样做。
我们可以通过 `controlnet_guidance_end` 来控制这一点。
| 1.0 | 0.9 | 0.8 |
|---|---|---|
 |
 |
 |
如您所见,引导结束值越低,汽车与背景融合得越好。
另一个选项,我不会在这里介绍,因为它仅靠代码很难实现,并且不是每个人都能手动完成,那就是在汽车的照明上进行绘制。
此外,另一个选择是使用较新的模型作为精修器,以低强度应用于最终图像。您可以使用 SD 3.5 或 Flux 来完成此操作,但如果您将此用于商业产品,请注意这些模型的许可。
最终代码
正如承诺的那样,这是在没有手动改进的情况下获得结果的完整代码。我希望本指南能作为起点,帮助您了解如何将扩散器和扩散模型用于此特定任务。
import math

import torch
from image_gen_aux import BEN2BackgroundRemover, LineArtStandardPreprocessor, TeedPreprocessor
from PIL import Image

from diffusers import ControlNetUnionModel, LCMScheduler, StableDiffusionXLControlNetUnionImg2ImgPipeline
from diffusers.utils import load_image


def resize_and_crop(image: Image.Image, target_size):
    original_width, original_height = image.size

    # Depending on which side is the smallest, resize the image while maintaing the aspect ratio
    if original_width < original_height:
        new_width = target_size
        new_height = int(original_width * (target_size / original_width))
    else:
        new_height = target_size
        new_width = int(original_width * (target_size / original_height))

    resized_image = image.resize((new_width, new_height), resample=Image.Resampling.LANCZOS)

    # calculate the cropping coordenates
    left = (new_width - target_size) // 2
    top = (new_height - target_size) // 2
    right = left + target_size
    bottom = top + target_size

    # crop the image
    cropped_image = resized_image.crop((left, top, right, bottom))

    return cropped_image


# load images
original_bg = load_image(
    "https://huggingface.co/datasets/OzzyGT/testing-resources/resolve/main/image_compositing/karsten-wurth-rafblRbne3o-unsplash.jpg"
)
original_fg = load_image(
    "https://huggingface.co/datasets/OzzyGT/testing-resources/resolve/main/image_compositing/mathieu-renier-4WBvCqeMaDE-unsplash.jpg"
)

# resize images
background = resize_and_crop(original_bg, 1024)
foreground = resize_and_crop(original_fg, 1024)

# remove background from foreground
bg_remover = BEN2BackgroundRemover.from_pretrained("PramaLLC/BEN2").to("cuda")
foreground_nobg = bg_remover(foreground)[0]

# make the foreground image smaller
foreground_size = (600, 600)
small_foreground_nobg = foreground_nobg.resize(foreground_size, resample=Image.Resampling.LANCZOS)

# Create a new image with the same size as the background and paste the foreground onto it
new_foreground = Image.new("RGBA", background.size, (0, 0, 0, 0))
offset = (200, 450)
new_foreground.paste(small_foreground_nobg, offset)

# Combine the background and the new foreground
combined_image = Image.alpha_composite(background.convert("RGBA"), new_foreground)
combined_image = combined_image.convert("RGB")

# Create the controlnet condition image
preprocessor = TeedPreprocessor.from_pretrained("OzzyGT/teed").to("cuda")
teed = preprocessor(combined_image)[0]

preprocessor = LineArtStandardPreprocessor()
linear_standard = preprocessor(combined_image)[0]

controlnet_image = Image.blend(teed, linear_standard, alpha=0.35)

# Alternative repository so we don't need special code to load the model
controlnet_model = ControlNetUnionModel.from_pretrained(
    "OzzyGT/controlnet-union-promax-sdxl-1.0",
    torch_dtype=torch.float16,
    variant="fp16",
)

# Diffusers format alternative repository
pipeline = StableDiffusionXLControlNetUnionImg2ImgPipeline.from_pretrained(
    "John6666/cyberrealistic-xl-v60-sdxl",
    controlnet=[controlnet_model, controlnet_model],  # load multiple controlnets
    torch_dtype=torch.float16,
).to("cuda")

# DMD2 lora needs to use the LCM for the best results
pipeline.scheduler = LCMScheduler.from_config(pipeline.scheduler.config)

# original DMD2 lora
pipeline.load_lora_weights("tianweiy/DMD2", weight_name="dmd2_sdxl_4step_lora_fp16.safetensors")

# calculate the inference steps
strength = 0.4
num_inference_steps = math.ceil(8 / strength)

# basic prompt
prompt = "high quality photo, detailed, 4k"

# do inference
image = pipeline(
    prompt=prompt,
    guidance_scale=1.0,  # no cfg
    num_inference_steps=num_inference_steps,
    image=combined_image,  # img2img source
    strength=strength,
    controlnet_conditioning_scale=[0.5, 0.5],
    control_image=[controlnet_image, new_foreground],  # mixed teed image, car
    control_mode=[2, 7],  # edge mode, inpaint mode
).images[0]

image.save("final_composition_image.png")