从零开始构建一个AI驱动的搜索引擎


PrAIvateSearch是一个AI驱动的、用户拥有和本地的搜索引擎
2024年7月26日,OpenAI推出了一款新的原型:SearchGPT,这是一个将他们的语言模型与网络资源相结合的应用程序,以创新的方式浏览广阔的互联网世界。SearchGPT最终于2024年10月31日作为ChatGPT的“搜索”扩展面向专业版和团队版用户推出。OpenAI只是冰山一角:许多供应商都添加了用于AI模型的网络浏览插件和扩展,并且创建了多种代理工具和工作流程,以跟上网络搜索AI日益增长的普及(这里有一个非详尽的列表)。
所有这些解决方案都存在一个大问题:用户不拥有它们。这些服务由大型公司(Google、OpenAI、Microsoft、Meta...)提供给用户,这些公司可以保留和后处理用户数据,跟踪用户并将其用于各种目的,包括市场营销、新模型训练和研究。只要在公司的隐私政策中明确说明,这是合法的:有关此类数据管理政策的示例可以在OpenAI的隐私政策、Google Gemini Apps隐私声明和Meta关于隐私和生成式AI的声明中找到。然而,大型科技公司可以保留数据、提示和搜索的事实,突显了对AI驱动的、用户拥有的搜索应用程序的需求,我们现在可以在PrAIvateSearch中找到它,这是一个具有图像和文本搜索功能的本地Gradio应用程序。
应用程序结构和流程
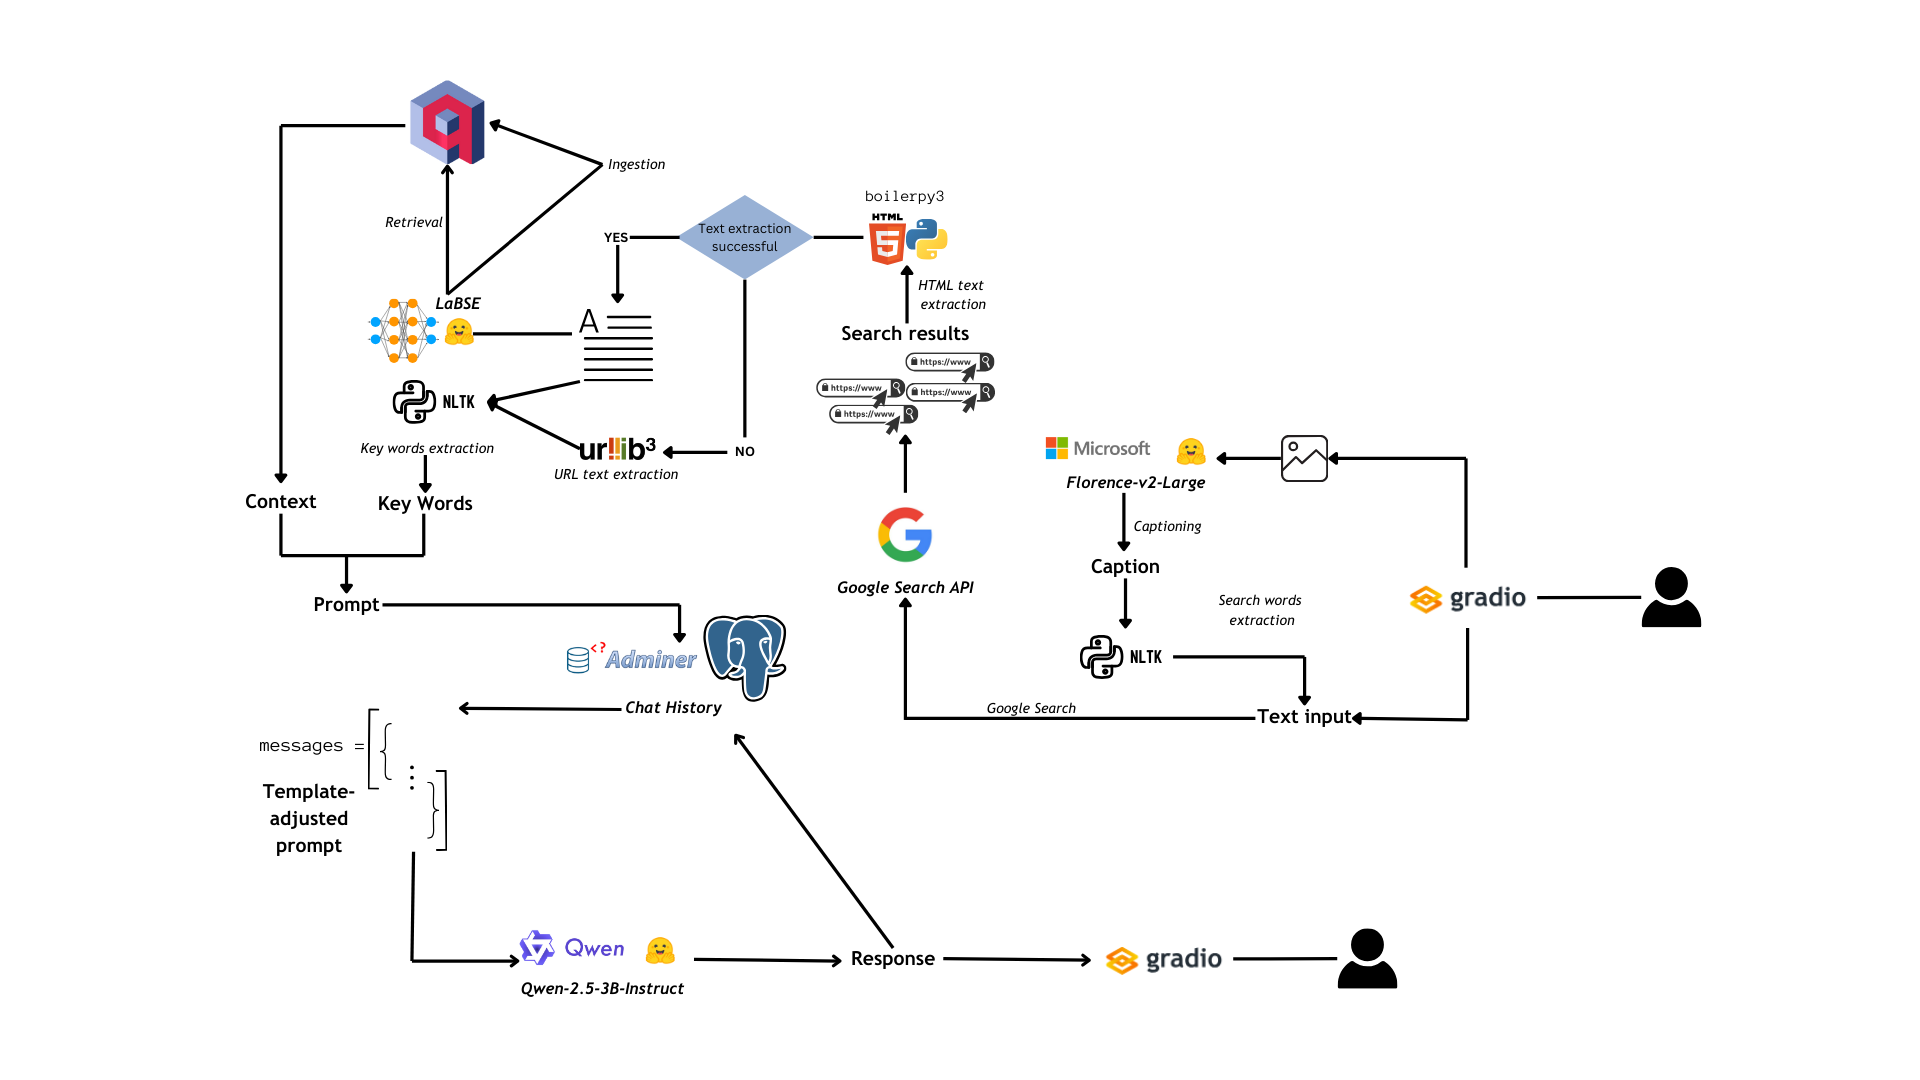
图1:PrAIvateSearch流程图
应用程序的流程如图1所示,可以总结为以下核心步骤:
- 用户可以通过Gradio UI向应用程序提供两种类型的输入:图像和文本。如果输入是文本,则直接用于网页搜索;如果输入是图像,则由Florence-2-large对其进行标题生成,并从标题中提取搜索关键词(使用
rake_nltk,一个基于自然语言工具包官方包的python包),然后将其视为文本输入。 - 一旦我们有了文本输入,就使用
googlesearch-python库进行网页搜索:此操作会生成一个URL列表。 - 使用
boilerpy3提取链接到URL的页面中的文本,当boilerpy3失败时,我们使用urllib3直接提取URL文本。 - 然后将提取的文本简化为关键词,并将其报告到类似于JSON的结构中,该结构将用于提示语言模型(该模型被指示解释JSON结构)。
- 同时,我们使用
LaBSE将从搜索中获得的文本向量化,并将其加载到Qdrant数据库中,以备将来RAG应用程序使用(如果用户启用RAG功能)。如果RAG功能已启用,则在数据摄取之前会有一个检索步骤,然后将根据之前搜索的内容为我们的语言模型提供上下文。 - 上下文、关键词和用户的原始查询被组合成一个提示,该提示作为聊天历史的一部分存储在Postgres数据库中。然后以与我们为语言模型设置的聊天模板兼容的格式检索聊天历史。
- 现在是推理时间:Qwen-2.5-3B-Instruct(通过
bitsandbytes进行4位量化并加载到GPU上)用于生成一个考虑搜索结果和上下文的答案,并用其知识丰富答案。然后将助手的响应添加到聊天历史中。 - 响应通过UI显示给用户。
应用程序分为两个部分
- 前端部分,通过流行的前端框架Gradio渲染
- 后端部分,由两个第三方数据库服务(Postgres和Qdrant)、一个第三方Postgres监控平台(Adminer)以及应用程序本身(用python编写)组成。
让我们深入了解后端,最后再介绍前端。
第三方服务
有三个第三方服务(Postgres、Qdrant和Adminer),可以使用以下compose文件一起启动:
networks:
  mynet:
    driver: bridge

services:
  db:
    image: postgres
    restart: always
    ports:
      - "5432:5432"
    networks:
      - mynet
    environment:
      POSTGRES_DB: $PG_DB
      POSTGRES_USER: $PG_USER
      POSTGRES_PASSWORD: $PG_PASSWORD
    volumes:
      - pgdata:/var/lib/postgresql/data

  semantic_memory:
    image: qdrant/qdrant
    restart: always
    ports:
      - "6333:6333"
      - "6334:6334"
    networks:
      - mynet
    volumes:
      - "./qdrant_storage:/qdrant/storage"

  adminer:
    image: adminer
    restart: always
    ports:
      - "8080:8080"
    networks:
      - mynet

volumes:
  pgdata:
这只需运行
# Add the detach option if you don't want to see the containers logs on your terminal
docker compose up [-d]
让我们看看这些服务能做些什么...
| 服务 | 端口 | 函数 | Python 库 |
|---|---|---|---|
| Postgres | 5432 | 聊天历史管理(聊天机器人内存) | SQLAlchemy |
| Qdrant | 6333, 6334 | 语义内存管理(聊天机器人 RAG 功能) | qdrant_client |
| Adminer | 8080 | 监控 Postgres DB | / |
表1. 三项服务功能汇总
1. Postgres
Postgres用于存储聊天历史,主要作为聊天机器人的内存。
要连接到服务,您应该在.env文件中设置您的Postgres用户、密码和数据库名称。
每当我们启动应用程序时,我们都会创建两个表:**conversations**(存储会话ID、用户ID和开始时间)和**messages**(存储当前会话的消息)。
我们使用SQLAlchemy创建了一个客户端来与Postgres交互。
# https://github.com/AstraBert/PrAIvateSearch/tree/main/lib/scripts/memory.py

from sqlalchemy import MetaData, create_engine, text
from sqlalchemy.orm import sessionmaker
import warnings

class ErrorOccuredWarning(Warning):
    """An error occured but it was handled by try...except"""

class PGClient:
    def __init__(self, connection_string: str):
        """
        Initialize a Client instance.

        Args:
            connection_string (str): A string representing the database connection information.

        Returns:
            None
        """
        self.engine = create_engine(connection_string)
        self.meta = MetaData(schema="public")
        self.Session = sessionmaker(self.engine)

        with self.Session() as sess:
            with sess.begin():
                sess.execute(text("create schema if not exists public;"))
    def execute_query(self, query):
        try:
            with self.Session() as sess:
                with sess.begin():
                    res = sess.execute(text(query))
            return res
        except Exception as e:
            warnings.warn(f"An error occurred: {e}", ErrorOccuredWarning)
            return None
    def disconnect(self) -> None:
        """
        Disconnect the client from the database.

        Returns:
            None
        """
        self.engine.dispose()
        return
然后我们构建了实际的聊天历史类,它允许我们添加消息,指定角色(`user`、`system`或`assistant`)和消息内容,并以与我们为语言模型建立的聊天模板兼容的方式检索消息历史。
# https://github.com/AstraBert/PrAIvateSearch/tree/main/lib/scripts/memory.py

class ConversationHistory:
    def __init__(self, client: PGClient, user_id: int):
        self.client = client
        self.user_id = user_id
        self.client.execute_query("""DROP TABLE IF EXISTS conversations;""")
        self.client.execute_query("""DROP TABLE IF EXISTS messages;""")
        self.client.execute_query("""CREATE TABLE conversations (
            id SERIAL PRIMARY KEY,
            user_id INTEGER NOT NULL,
            created_at TIMESTAMP DEFAULT CURRENT_TIMESTAMP
        );""")
        self.client.execute_query("""CREATE TABLE messages (
            id SERIAL PRIMARY KEY,
            conversation_id INTEGER REFERENCES conversations(id),
            role VARCHAR(10) NOT NULL,
            content TEXT NOT NULL,
            timestamp TIMESTAMP DEFAULT CURRENT_TIMESTAMP
        );""")
        conv_id = self.client.execute_query(f"INSERT INTO conversations (user_id) VALUES ({self.user_id}) RETURNING id")
        conversation_id = conv_id.fetchone()[0]
        self.conversation_id = conversation_id
    def add_message(self, role, content):
        content = content.replace("'","''")
        self.client.execute_query(f"INSERT INTO messages (conversation_id, role, content) VALUES ({self.conversation_id}, '{role}', '{content}')")
    def get_conversation_history(self):
        res = self.client.execute_query(f"SELECT role, content FROM messages WHERE conversation_id = {self.conversation_id} ORDER BY timestamp ASC")
        messages = res.fetchall()
        return [{"role": role, "content": content} for role, content in messages]
2. Qdrant
Qdrant使我们能够用来自先前搜索的上下文来丰富呈现给语言模型的提示。每次搜索时,搜索生成的文章中的文本都会被分块,通过LaBSE(一个文本嵌入模型)向量化,并上传到Qdrant集合中。如果用户启用了RAG功能,那么LaBSE将向量化查询和搜索结果,在集合内部执行向量搜索,并检索将提供给语言模型的上下文。
让我们看看我们如何在应用程序中实现这一点
- 我们首先定义了一个`upload_to_qdrant`函数,该函数使用`langchain`文本分割功能,通过`sentence-transformers`进行LaBSE嵌入,并使用`qdrant_client`进行数据点更新。
# https://github.com/AstraBert/PrAIvateSearch/tree/main/lib/scripts/websearching.py

from langchain.text_splitter import CharacterTextSplitter
from qdrant_client import QdrantClient, models
from sentence_transformers import SentenceTransformer


encoder = SentenceTransformer("sentence-transformers/LaBSE")
splitter = CharacterTextSplitter(chunk_size=1000, chunk_overlap=0)
collection_name = f"cute_kitty_{r.randint(1,10000)}"
qdrant_client = QdrantClient("https://:6333")

qdrant_client.recreate_collection(
    collection_name=collection_name,
    vectors_config=models.VectorParams(
        size=encoder.get_sentence_embedding_dimension(), # Vector size is defined by used model
        distance=models.Distance.COSINE,
    ),
)

def upload_to_qdrant(client: QdrantClient, collection_name: str, encoder: SentenceTransformer, text: str):
    try:
        chunks = splitter.split_text(text)
        docs = []
        for chunk in chunks:
            docs.append({"text": chunk})
        client.upload_points(
            collection_name=collection_name,
            points=[
                models.PointStruct(
                    id=idx,
                    vector=encoder.encode(doc["text"]).tolist(),
                    payload=doc,
                )
                for idx, doc in enumerate(docs)
            ],
        )
        return True
    except Exception as e:
        return False
- 然后我们继续创建类以执行密集检索
# https://github.com/AstraBert/PrAIvateSearch/tree/main/lib/scripts/rag.py

from qdrant_client import QdrantClient
from sentence_transformers import SentenceTransformer

class NeuralSearcher:
        # Convert text query into vector
        vector = self.model.encode(text).tolist()

        # Use `vector` for search for closest vectors in the collection
        search_result = self.qdrant_client.search(
            collection_name=self.collection_name,
            query_vector=vector,
            query_filter=None, # If you don't want any filters for now
            limit=limit,
        )
        payloads = [hit.payload for hit in search_result]
        return payloads
3. Adminer
Adminer是一个用于监控您的PostgreSQL数据库的工具。您可以通过将服务类型设置为`PostgreSQL`来访问该服务,然后您可以使用在您的`.env`文件中设置的凭据登录(此处查找示例)。
您将能够检查 `conversations` 表和 `messages` 表。
其他后端组件
1. 图像字幕生成和搜索词提取
正如我们所说,PrAIvateSearch支持用于搜索目的的基于图像的输入。这之所以可能,是因为在内部,图像通过最先进的图像字幕模型(Microsoft的Florence-2-large)转换为文本输入。然而,图像字幕通常包含对搜索具有误导性的信息,例如:“此图像显示”或“在此图像中您可以看到”。在这种情况下,我们使用NLTK的RAKE(快速关键词提取算法)实现进行关键词提取,然后排除所有包含“image*”的单词和表达式。
我们通过以下脚本来实现这一点
# https://github.com/AstraBert/PrAIvateSearch/tree/main/lib/script/image_gen.py

import warnings
warnings.filterwarnings("ignore")

import einops
import timm

import torch
from transformers import AutoProcessor, AutoModelForCausalLM
from rake_nltk import Metric, Rake

device = "cuda:0" if torch.cuda.is_available() else "cpu"
torch_dtype = torch.float16 if torch.cuda.is_available() else torch.float32

model = AutoModelForCausalLM.from_pretrained("microsoft/Florence-2-large", torch_dtype=torch_dtype, trust_remote_code=True).to(device)
processor = AutoProcessor.from_pretrained("microsoft/Florence-2-large", trust_remote_code=True)

task_prompt = "<DETAILED_CAPTION>"
raker = Rake(include_repeated_phrases=False, ranking_metric=Metric.WORD_DEGREE)

def extract_keywords_from_caption(caption: str) -> str:
    raker.extract_keywords_from_text(caption)
    keywords = raker.get_ranked_phrases()[:5]
    fnl = []
    for keyword in keywords:
      if "image" in keyword:
        continue
      else:
        fnl.append(keyword)
    return " ".join(fnl)

def caption_image(image):
    global task_prompt
    prompt = task_prompt
    inputs = processor(text=prompt, images=image, return_tensors="pt").to(device, torch_dtype)
    generated_ids = model.generate(
      input_ids=inputs["input_ids"],
      pixel_values=inputs["pixel_values"],
      max_new_tokens=1024,
      num_beams=3
    )
    generated_text = processor.batch_decode(generated_ids, skip_special_tokens=False)[0]

    parsed_answer = processor.post_process_generation(generated_text, task=task_prompt, image_size=(image.width, image.height))

    caption = parsed_answer["<DETAILED_CAPTION>"]
    search_words = extract_keywords_from_caption(caption)
    return search_words
正如您所见,Florence也被加载到GPU上以加快推理速度。
提取的关键词被视为文本输入并发送到Google搜索作为查询。
2. 网页搜索、RAG和提示构建
我们通过Google Search Python包执行搜索(用户可以设置检索结果的最大数量从1到10):这会产生一个URL列表,然后我们使用`boilerpy3`读取其内容(如果失败,我们直接使用`urllib3`从URL提取文本)。然后,每个获得的文本都被映射到一个字典,其中包含其最重要的20个(最多)关键词(使用RAKE提取),然后将该字典转储为JSON字符串,并在最终提示的“KEYWORDS”部分下报告。如果搜索没有产生关键词,则在JSON结构中明确设置此项。
如果启用了RAG,则检索三个最重要的上下文并将其打包在一起,以在提示的“CONTEXT”部分中形成提示。在提示的开头,在“QUERY”部分中,我们报告用户原始文本查询/从图像输入中提取的查询。然而,在返回提示之前,我们会将从搜索中检索到的内容分块、向量化并发送到我们的Qdrant集合。
我们的`websearching.py`现在将完成并如下所示
# https://github.com/AstraBert/PrAIvateSearch/tree/main/lib/scripts/websearching.py

import warnings
warnings.filterwarnings("ignore")

from googlesearch import search
from rake_nltk import Rake
from boilerpy3 import extractors
import json
from langchain.text_splitter import CharacterTextSplitter
from qdrant_client import QdrantClient, models
from sentence_transformers import SentenceTransformer
from rag import NeuralSearcher
import random as r
from datetime import datetime
from urllib.parse import urlparse


encoder = SentenceTransformer("sentence-transformers/LaBSE")
splitter = CharacterTextSplitter(chunk_size=1000, chunk_overlap=0)
extractor = extractors.ArticleExtractor()
collection_name = f"cute_kitty_{r.randint(1,10000)}"
qdrant_client = QdrantClient("https://:6333")
searcher = NeuralSearcher(collection_name, qdrant_client, encoder)
r = Rake()

qdrant_client.recreate_collection(
    collection_name=collection_name,
    vectors_config=models.VectorParams(
        size=encoder.get_sentence_embedding_dimension(), # Vector size is defined by used model
        distance=models.Distance.COSINE,
    ),
)

def extract_corpus(url):
    # Parse the URL to get its components
    parsed_url = urlparse(url)
    # Extract the domain name without subdomains or TLD
    domain = parsed_url.netloc.split('.')
    # Return the main word (corpus)
    if len(domain) > 2: # Handle subdomains
        return domain[-2]
    return domain[0]

def upload_to_qdrant(client: QdrantClient, collection_name: str, encoder: SentenceTransformer, text: str):
    try:
        chunks = splitter.split_text(text)
        docs = []
        for chunk in chunks:
            docs.append({"text": chunk})
        client.upload_points(
            collection_name=collection_name,
            points=[
                models.PointStruct(
                    id=idx,
                    vector=encoder.encode(doc["text"]).tolist(),
                    payload=doc,
                )
                for idx, doc in enumerate(docs)
            ],
        )
        return True
    except Exception as e:
        return False


def date_for_debug():
    date = datetime.now()
    s = f"{date.year}-{date.month}-{date.day} {date.hour}:{date.minute}:{date.second}"
    return s

# Function to perform web search
def web_search(query, num_results=5, enable_rag=False, debug = True):
    global qdrant_client, encoder, collection_name
    search_results = []
    for url in search(query, num_results=num_results):
        search_results.append(url)
    urls = list(set(search_results))
    jsonlike = {}
    finalcont = ""
    if len(urls) > 0:
        for url in urls:
            try:
                content = extractor.get_content_from_url(url)
                r.extract_keywords_from_text(content)
                keywords = r.get_ranked_phrases()[:20]
                jsonlike.update({url: {"keywords": keywords}})
                finalcont+=content+"\n\n"
            except Exception as e:
                if debug:
                    print(f"[{date_for_debug()}] WARNING! {e}")
                content = extract_corpus(url) + " " + " ".join(url.split("/")[3:])
                r.extract_keywords_from_text(content)
                keywords = r.get_ranked_phrases()[:20]
                jsonlike.update({url: {"keywords": keywords}})
                finalcont += content
                continue
    else:
        jsonlike = {"keywords": "THE SEARCH DID NOT PRODUCE MEANINGFUL RESULTS (base the answer on the context, if given)"}
    context = ""
    if enable_rag:
        res = searcher.search(finalcont, 3)
        for i in range(len(res)):
            context += res[i]["text"]+"\n\n"+"---------------"+"\n\n"
    truth = upload_to_qdrant(qdrant_client, collection_name, encoder, finalcont)
    jsonstr = json.dumps(jsonlike)
    if truth:
        if context:
            return "QUERY:\n\n"+query+"\n\nKEYWORDS:\n\n"+jsonstr+"\n\nCONTEXT:\n\n"+context, f"[{date_for_debug()}] SUCCESS! Semantic memory successfully updated!"
        else:
            return "QUERY:\n\n"+query+"\n\nKEYWORDS:\n\n"+jsonstr, f"[{date_for_debug()}] SUCCESS! Semantic memory successfully updated!"
    if context:
        return "QUERY:\n\n"+query+"\n\nKEYWORDS:\n\n"+jsonstr+"\n\nCONTEXT:\n\n"+context, f"[{date_for_debug()}] WARNING! Something went wrong while updating semantic memory"
    return "QUERY:\n\n"+query+"\n\nKEYWORDS:\n\n"+jsonstr, f"[{date_for_debug()}] WARNING! Something went wrong while updating semantic memory"
请注意 RAG 功能!**是的**,Qwen-2.5-3B-Instruct 是一个相对较小的模型,量化后占用约 2GB 的 GPU 显存,**但**如果您提供过长的上下文,它可能需要**数小时**才能处理您的提示并生成响应(尤其是在您的硬件性能不佳的情况下)。
3. 详细调试信息
您可能已经注意到,我们的函数中包含了多个`debug`变量。如果调试选项为真(默认情况下为真),您可以直接在终端上查看多个进程,包括查询处理的开始/结束、语义内存更新和聊天历史日志。这在您遇到问题时,尤其是在了解可能出现的问题以及评估应用程序性能时非常有用。
4. 文本推理
文本推理是后端非常重要的组成部分,它涉及Qwen根据用户的提示生成响应。
正如我们所说,我们首先使用`trl`和`transformers`(HuggingFace的同一款出色库,用于管理所有AI模型加载)创建了一个聊天模板。然后,该聊天模板基本上复制了聊天历史在Postgres数据库中的存储结构,以及`get_chat_history`函数检索它的方式。
整个消息列表用于提示Qwen,Qwen然后根据此生成答案。助手的答案随后上传到Postgres数据库。这是代码实现:
# https://github.com/AstraBert/PrAIvateSearch/blob/main/lib/scripts/text_inference.py

import warnings
warnings.filterwarnings("ignore")

import accelerate

import torch
from transformers import AutoModelForCausalLM, AutoTokenizer, BitsAndBytesConfig
from dotenv import load_dotenv
from memory import ConversationHistory, PGClient
import os
import random as r
from trl import setup_chat_format
from websearching import date_for_debug

load_dotenv()

model_name = "Qwen/Qwen2.5-3B-Instruct"
quantization_config = BitsAndBytesConfig(load_in_4bit=True,
    bnb_4bit_compute_dtype=torch.bfloat16,
    bnb_4bit_use_double_quant=True,
    bnb_4bit_quant_type= "nf4"
)

quantized_model = AutoModelForCausalLM.from_pretrained(model_name, device_map="cuda:0", torch_dtype=torch.bfloat16,quantization_config=quantization_config)
tokenizer = AutoTokenizer.from_pretrained(model_name)
tokenizer.chat_template = None
quantized_model, tokenizer = setup_chat_format(model=quantized_model, tokenizer=tokenizer)


pg_db = os.getenv("PG_DB")
pg_user = os.getenv("PG_USER")
pg_psw = os.getenv("PG_PASSWORD")

pg_conn_str = f"postgresql://{pg_user}:{pg_psw}@localhost:5432/{pg_db}"
pg_client = PGClient(pg_conn_str)

usr_id = r.randint(1,10000)
convo_hist = ConversationHistory(pg_client, usr_id)
convo_hist.add_message(role="system", content="You are a web searching assistant: your task is to create a human-readable content based on a JSON representation of the keywords of several websites related to the search that the user performed and on the context that you are provided with")

def pipe(prompt: str, temperature: float, top_p: float, max_new_tokens: int, repetition_penalty: float):
    tokenized_chat = tokenizer.apply_chat_template(prompt, tokenize=True, add_generation_prompt=True, return_tensors="pt")
    outputs = quantized_model.generate(tokenized_chat, max_new_tokens=max_new_tokens, temperature=temperature, top_p=top_p, repetition_penalty=repetition_penalty)
    results = tokenizer.decode(outputs[0])
    return results

def text_inference(message, debug):
    convo_hist.add_message(role="user", content=message)
    prompt = convo_hist.get_conversation_history()
    if debug:
        print(f"[{date_for_debug()}] CONVERSATIONAL HISTORY")
        print(prompt)
    res = pipe(
        prompt,
        temperature=0.1,
        top_p=1,
        max_new_tokens=512,
        repetition_penalty=1.2
    )
    ret = res.split("<|im_start|>assistant\n")[1]
    convo_hist.add_message(role="assistant", content=ret)
    return ret
前端和用户界面
正如我们所说,前端通过Gradio管理,Gradio是一个流行的Python开发者UI构建框架。界面由用于文本输入的文本框、图像上传小部件和用于选择Google搜索结果数量的滑块构成。我们还有两个复选框选项,用于启用/禁用RAG和调试功能。
输出则包裹在一个Markdown渲染的文本区域内。
这是我们的`app.py`文件的代码
# https://github.com/AstraBert/PrAIvateSearch/blob/main/lib/scripts/app.py

import warnings
warnings.filterwarnings("ignore")

import gradio as gr
from text_inference import text_inference
from image_gen import caption_image
from PIL import Image
from websearching import web_search, date_for_debug

def reply(text_input, image_input=None, max_results=5, enable_rag=False, debug = True):
    if debug:
        print(f"[{date_for_debug()}] Started query processing...")
    if image_input is None:
        prompt, qdrant_success = web_search(text_input, max_results, enable_rag, debug)
        if debug:
            print(qdrant_success)
        results = text_inference(prompt, debug)
        results = results.replace("<|im_end|>","")
        if debug:
            print(f"[{date_for_debug()}] Finished query processing!")
        return results
    else:
        if text_input:
            img = Image.fromarray(image_input)
            caption = caption_image(img)
            full_query = caption +"\n\n"+text_input
            prompt, qdrant_success = web_search(full_query, max_results, enable_rag)
            if debug:
                print(qdrant_success)
            results = text_inference(prompt, debug)
            results = results.replace("<|im_end|>","")
            if debug:
                print(f"[{date_for_debug()}] Finished query processing!")
            return results
        else:
            img = Image.fromarray(image_input)
            caption = caption_image(img)
            prompt, qdrant_success = web_search(caption, max_results, enable_rag)
            if debug:
                print(qdrant_success)
            results = text_inference(prompt, debug)
            results = results.replace("<|im_end|>","")
            if debug:
                print(f"[{date_for_debug()}] Finished query processing!")
            return results


iface = gr.Interface(fn=reply, inputs=[gr.Textbox(value="",label="Search Query"), gr.Image(value=None, label="Image Search Query"), gr.Slider(1,10,value=5,label="Maximum Number of Search Results", step=1), gr.Checkbox(value=False, label="Enable RAG"), gr.Checkbox(value=True, label="Debug")], outputs=[gr.Markdown(value="Your output will be generated here", label="Search Results")], title="PrAIvateSearch")

iface.launch(server_name="0.0.0.0", server_port=7860)
启动并运行应用程序
要启动并运行应用程序,您首先需要安装所有必要的依赖项
# Get the requirements file
wget https://raw.githubusercontent.com/AstraBert/PrAIvateSearch/main/requirements.txt
# Create a virtual environment
python3 -m venv virtualenv
# Activate the virtual environment
source virtualenv/bin/activate
# Install dependencies
python3 -m pip install -r requirements.txt
其次,您应该初始化第三方服务
# Get the requirements file
wget https://raw.githubusercontent.com/AstraBert/PrAIvateSearch/main/compose.yaml
# Run the third-party servicess
docker compose up
最后但同样重要的是,运行应用程序并在加载完成后前往https://:7860
# Clone the repository
wget https://github.com/AstraBert/PrAIvateSearch.git
# Go inside the directory
cd PrAIvateSearch
# Run the app
python3 lib/scripts/app.py
现在您就可以尽情玩耍了!
结论
PrAIvateSearch的目标是提供一个开源、私密且数据安全的替代方案,以取代大型科技公司的解决方案。该应用程序仍处于测试阶段,因此,尽管其工作流程可能看似可靠,但仍可能存在一些问题、未解决的错误和不准确之处。如果您想为该项目做出贡献,报告问题并帮助发展开源AI社区和环境,请随时在GitHub上进行操作,并通过资助来支持它。
谢谢!🤗