使用 Kili 和 HuggingFace AutoTrain 进行意见分类


引言
在任何与用户相关的业务中,了解用户需求都至关重要。但这需要大量的努力和分析,而且成本相当高。那么为什么不利用机器学习呢?通过使用 Auto ML,可以大大减少编码量。
在本文中,我们将利用 HuggingFace AutoTrain 和 Kili 构建一个用于文本分类的主动学习管道。Kili 是一个通过创建高质量训练数据来支持以数据为中心的机器学习方法的平台。它提供协作式数据标注工具和 API,可在可靠的数据集构建和模型训练之间实现快速迭代。主动学习是一个将标注数据添加到数据集,然后迭代重新训练模型的过程。因此,它是无止境的,需要人工标注数据。
作为本文的具体示例用例,我们将使用 Google Play 商店中 Medium 的用户评论来构建我们的管道。之后,我们将使用构建的管道对评论进行分类。最后,我们将对分类后的评论进行情感分析。然后,我们将分析结果,这将使理解用户需求和满意度变得容易得多。
使用 HuggingFace 进行 AutoTrain
自动化机器学习是自动化机器学习管道的一个术语。它还包括数据清洗、模型选择和超参数优化。我们可以使用 🤗 Transformers 进行自动超参数搜索。超参数优化是一个困难且耗时的过程。
虽然我们可以使用 Transformers 和其他强大的 API 自行构建管道,但也可以使用 AutoTrain 完全自动化此过程。AutoTrain 构建在许多强大的 API 上,如 Transformers、Datasets 和 Inference-API。
数据清洗、模型选择和超参数优化步骤在 AutoTrain 中都是完全自动化的。人们可以充分利用这个框架来为特定任务构建生产就绪的 SOTA Transformer 模型。目前,AutoTrain 支持二进制和多标签文本分类、Token 分类、抽取式问答、文本摘要和文本评分。它还支持多种语言,如英语、德语、法语、西班牙语、芬兰语、瑞典语、印地语、荷兰语以及更多。如果您的语言不受 AutoTrain 支持,也可以使用自定义模型和自定义分词器。
Kili
Kili 是一个面向数据中心业务的端到端人工智能训练平台。Kili 提供优化的标注功能和质量管理工具来管理您的数据。您可以快速标注图像、视频、文本、PDF 和语音数据,同时控制数据集的质量。它还具有用于 GraphQL 和 Python 的强大 API,大大简化了数据管理。
它提供在线或本地部署版本,支持计算机视觉、自然语言处理和光学字符识别等现代机器学习技术。它支持文本分类、命名实体识别 (NER)、关系抽取以及更多 NLP/OCR 任务。它还支持对象检测、图像转录、视频分类、语义分割等计算机视觉任务!
Kili 是一款商业工具,但您也可以创建一个免费的开发者账户来试用 Kili 的工具。您可以在定价页面了解更多信息。
项目
我们将以评论分类和情感分析为例,以了解移动应用程序的洞察。
我们从 Google Play 商店提取了大约 4 万条 Medium 的评论。我们将逐步标注此数据集中的评论文本。然后,我们将构建一个评论分类管道。在建模中,第一个模型将使用 AutoTrain 进行准备。然后我们还将构建一个不使用 AutoTrain 的模型。
所有代码和数据集都可以在项目的 GitHub 仓库中找到。
数据集
让我们先看一下原始数据集,
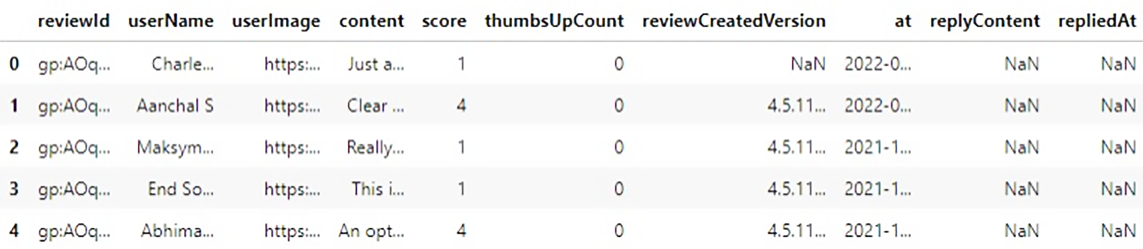
此数据集中有 10 列和 40130 个样本。我们唯一需要的列是 `content`,它是用户的评论。在开始之前,我们需要定义一些类别。
我们定义了 4 个类别,
- 订阅:由于 Medium 有订阅选项,任何与用户对订阅功能的意见相关的内容都应归入此类。
- 内容:Medium 是一个分享平台,有从诗歌到高级人工智能研究的各种文章。用户对各种主题、内容质量的意见都应归入此类。
- 界面:关于用户界面、文章搜索、推荐引擎以及任何与界面相关的问题都应归入此类。这也包括与支付相关的问题。
- 用户体验:用户对应用程序的总体想法和意见。这应该通常是抽象的,不指示其他类别。
对于标签部分,我们首先需要在 Kili 平台中创建一个项目。我们可以使用平台的 Web 界面或 API。让我们看看两者。
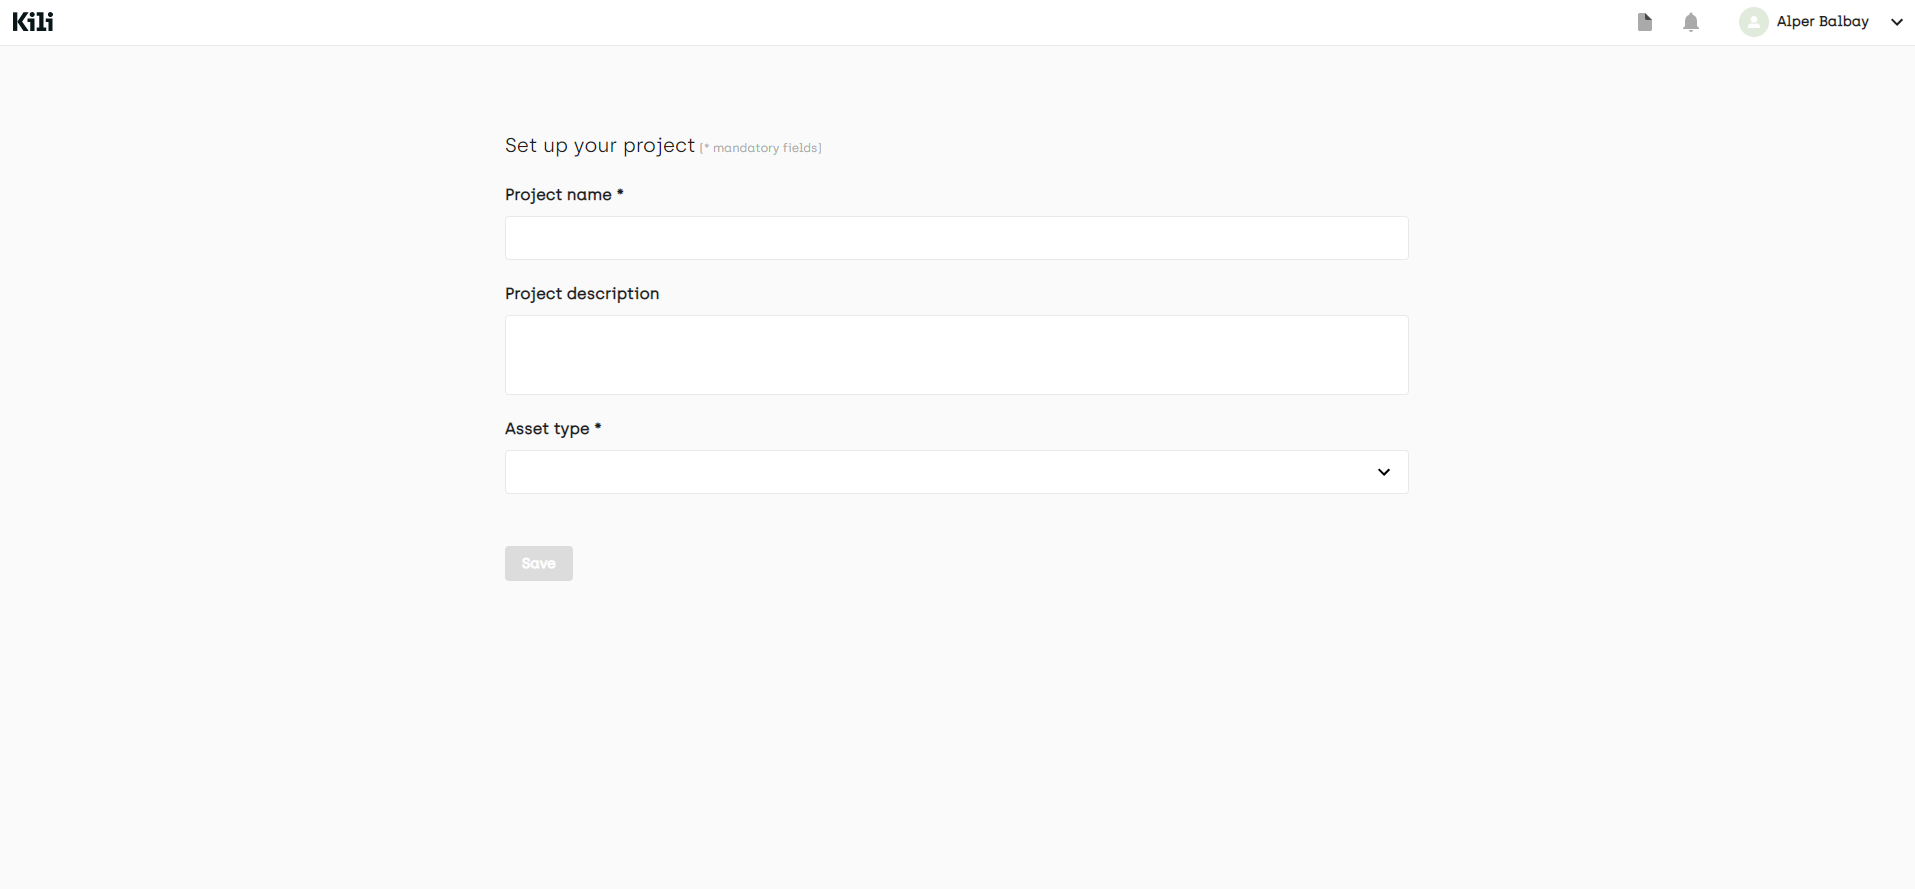
从网页界面
从项目列表页面,我们创建一个多类文本分类项目。
之后,在项目页面上,您可以通过单击“添加资产”按钮添加数据。目前,您最多可以添加 25000 个样本,但如果您联系 Kili 销售团队,可以扩展此限制。
创建项目后,我们需要添加任务。我们可以在“设置”页面准备一个标注界面。
虽然我们定义了 4 个类别,但不可避免地会遇到应该具有多个类别或完全奇怪的评论。我将添加另外两个标签(不用于建模)来捕获这些情况。
在我们的示例中,我们添加了两个额外的标签(“其他”、“多标签”)。我们还添加了一个命名实体识别 (NER) 作业,只是为了指定我们在标注时如何决定一个标签。最终界面如下所示
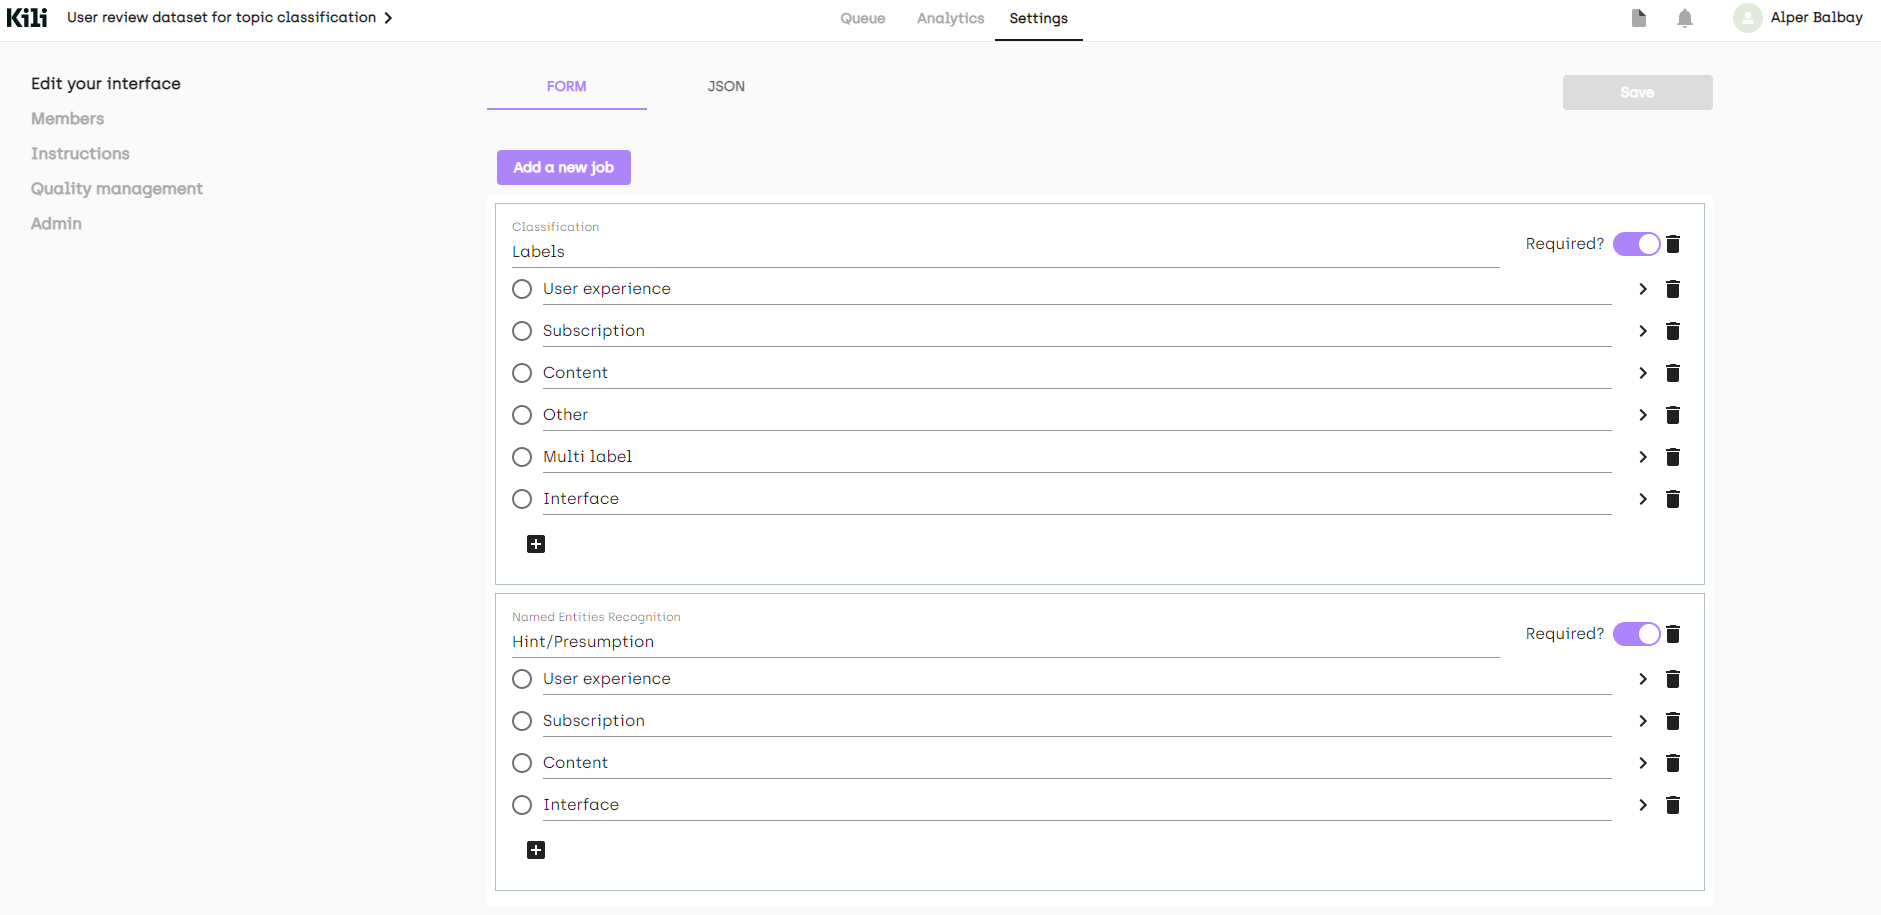
正如您从左侧菜单中看到的,也可以在“说明”页面上放置一个描述您的标签的链接。我们还可以从“成员”添加其他成员到我们的项目,或者从“质量管理”页面添加质量度量。更多信息可以在文档中找到。
现在,让我们使用 Python API 创建我们的项目。
首先,我们需要导入所需的库。
(notebooks/kili_project_management.ipynb)
import os
#we will process the data (which is a csv file)
import pandas as pd

#API client
from kili.client import Kili
#Why not use pretty progress bars?
from tqdm import tqdm

from dotenv import load_dotenv
load_dotenv()
为了访问平台,我们需要验证我们的客户端。
API_KEY = os.getenv('KILI_API_KEY')
# initialize and authenticate the Kili client
kili = Kili(api_key = API_KEY)
现在我们可以开始准备我们的接口,接口在 Python 中只是一个字典。我们将定义我们的作业,然后填充标签。由于所有标签也可以有子标签,我们也会将标签作为字典传递。
labels = ['User experience', 'Subscription', 'Content', 'Other', 'Multi label']
entity_dict = {
    'User experience': '#cc4125',
    'Subscription': '#4543e6',
    'Content': '#3edeb6',
}
project_name = 'User review dataset for topic classification'
project_description = "Medium's app reviews fetched from google play store for topic classification"

interface = {
    'jobs': {
        'JOB_0': {
            'mlTask': 'CLASSIFICATION',
            'instruction': 'Labels',
            'required': 1,
            'content': {
                "categories": {},
                "input": "radio",
            },
        },
        'JOB_1': {
            'mlTask': "NAMED_ENTITIES_RECOGNITION",
            'instruction': 'Entities',
            'required': 1,
            'content': {
                'categories': {},
                "input": "radio"
            },
        },
    }
}

# fill the interface json with jobs
for label in labels:
    # converts labels to uppercase and replaces whitespaces with underscores (_)
    # ex. User experience -> USER_EXPERIENCE
    # this is the preferred way to fill the interface
    label_upper = label.strip().upper().replace(' ', '_')
    #
    content_dict_0 = interface['jobs']['JOB_0']['content']
    categories_0 = content_dict_0['categories']
    category = {'name': label, 'children': []}
    categories_0[label_upper] = category

for label, color in entity_dict.items():
    label_upper = label.strip().upper().replace(' ', '_')
    content_dict_1 = interface['jobs']['JOB_1']['content']
    categories_1 = content_dict_1['categories']
    category = {'name': label, 'children': [], 'color': color}
    categories_1[label_upper] = category

# now we can create our project
# this method returns the created project’s id
project_id = kili.create_project(json_interface=interface,
                            input_type='TEXT',
                            title=project_name,
                            description=project_description)['id']
我们已准备好将数据上传到项目。`append_many_to_dataset` 方法可用于将数据导入平台。通过使用 Python API,我们可以最大批量导入 100 个数据。这是一个上传数据的简单函数。
def import_dataframe(project_id:str, dataset:pd.DataFrame, text_data_column:str, external_id_column:str, subset_size:int=100) -> bool:
    """
    Arguments:
    Inputs
        - project_id (str): specifies the project to load the data, this is also returned when we create our project
        - dataset (pandas DataFrame): Dataset that has proper columns for id and text inputs
        - text_data_column (str): specifies which column has the text input data
        - external_id_column (str): specifies which column has the ids
        - subset_size (int): specifies the number of samples to import at a time. Cannot be higher than 100

    Outputs:
        None

    Returns:
        True or False regards to process succession

    """

    assert subset_size <= 100, "Kili only allows to upload 100 assets at most at a time onto the app"


    L = len(dataset)

    # set 25000 as an upload limit, can be changed
    if L>25000:
        print('Kili Projects currently supports maximum 25000 samples as default. Importing first 25000 samples...')
        L=25000

    i = 0

    while i+subset_size < L:

        subset = dataset.iloc[i:i+subset_size]

        externalIds = subset[external_id_column].astype(str).to_list()
        contents = subset[text_data_column].astype(str).to_list()

        kili.append_many_to_dataset(project_id=project_id,
                                    content_array=contents,
                                    external_id_array=externalIds)

        i += subset_size

    return True
它只是将给定的 `dataset` DataFrame 导入到由 project_id 指定的项目中。
我们可以从 docstring 中看到参数,我们只需要传递我们的数据集以及相应的列名。我们只需使用加载数据时获得的样本索引。然后,瞧,数据上传就完成了!
dataset_path = '../data/processed/lowercase_cleaned_dataset.csv'
df = pd.read_csv(dataset_path).reset_index() # reset index to get the indices

import_dataframe(project_id, df, 'content', 'index')
使用 Python API 并不困难,我们使用的辅助方法解决了许多难题。我们还使用了另一个脚本来检查数据集更新后的新样本。有时模型性能会在数据集更新后下降。这是由于简单的错误,如错误标记和引入数据集偏差。该脚本只是简单地进行身份验证,然后将两个给定数据集版本的不同样本移动到“待审核”。我们可以通过 `update_properties_in_assets` 方法更改样本的属性
(scripts/move_diff_to_review.py)
# Set up the Kili client and arguments
from kili.client import Kili
from dotenv import load_dotenv
import os
import argparse

import pandas as pd

load_dotenv()

parser = argparse.ArgumentParser()
parser.add_argument('--first',
                    required=True,
                    type=str,
                    help='Path to first dataframe')
parser.add_argument('--second',
                    required=True,
                    type=str,
                    help='Path to second dataframe')

args = vars(parser.parse_args())

# set the kili connection up
API_KEY = os.getenv('KILI_API_KEY')
kili = Kili(API_KEY)

# read dataframes
df1 = pd.read_csv(args['first'])
df2 = pd.read_csv(args['second'])

# concating two of them should let us have duplicates of common elements
# then we can drop the duplicated elements without keeping any duplicates to get the different elements across the two dataframes
diff_df = pd.concat((df1, df2)).drop_duplicates(keep=False)
diff_ids = diff_df['id'].to_list()

# The changes should be given as an array that
# contains the change for every single sample.
# That’s why [‘TO_REVIEW’] * len(diff_df) is passed to status_array argument
kili.update_properties_in_assets(diff_ids,
                                 status_array=['TO_REVIEW'] * len(diff_ids))

print('SET %d ENTRIES TO BE REVIEWED!' % len(diff_df))
标注
既然我们已经上传了源数据,平台有一个内置的标注界面,使用起来非常容易。可用的键盘快捷键在标注数据时提供了帮助。我们轻松使用了该界面,有自动定义的快捷键,它简化了标注。我们可以通过点击界面右上角的键盘图标查看快捷键,它们也在标注界面的右侧以下划线字符显示。

有些样本非常奇怪,因此我们在标注时决定跳过它们。总的来说,由于 Kili 的内置平台,整个过程要容易得多。
导出标注数据
使用 Python API 可以轻松导出标注数据。下面的脚本将标注和审核过的样本导出到数据框中,然后以给定名称将其保存为 CSV 文件。
import argparse
import os

import pandas as pd
from dotenv import load_dotenv
from kili.client import Kili

load_dotenv()

parser = argparse.ArgumentParser()
parser.add_argument('--output_name',
                    required=True,
                    type=str,
                    default='dataset.csv')
parser.add_argument('--remove', required=False, type=str)
args = vars(parser.parse_args())

API_KEY = os.getenv('KILI_API_KEY')
dataset_path = '../data/processed/lowercase_cleaned_dataset.csv'
output_path = os.path.join('../data/processed', args['output_name'])


def extract_labels(labels_dict):
    response = labels_dict[-1]  # pick the latest version of the sample
    label_job_dict = response['jsonResponse']['JOB_0']
    categories = label_job_dict['categories']
    # all samples have a label, we can just pick it by its index
    label = categories[0]['name']
    return label


kili = Kili(API_KEY)
print('Authenticated!')
# query will return a list that contains matched elements (projects in this case)
# since we have only one project with this name, we can just pick the first index
project = kili.projects(
    search_query='User review dataset for topic classification')[0]
project_id = project['id']

# we can customize the returned fields
# the fields below are pretty much enough,
# labels.jsonResponse carries the labeling data
returned_fields = [
    'id', 'externalId', 'labels.jsonResponse', 'skipped', 'status'
]
# I read the raw dataset too in order to match the samples with externalId
dataset = pd.read_csv(dataset_path)

# we can fetch the data as a dataframe
df = kili.assets(project_id=project_id,
                 status_in=['LABELED', 'REVIEWED'],
                 fields=returned_fields,
                 format='pandas')

print('Got the samples!')

# we will pass the skipped samples
df_ns = df[~df['skipped']].copy()

# extract the labeled samples
df_ns.loc[:, 'label'] = df_ns['labels'].apply(extract_labels)
# The externalId column is returned as string, let’s convert it to integer
# to use as indices
df_ns.loc[:, 'content'] = dataset.loc[df_ns.externalId.astype(int), 'content']

# we can drop the `labels` column now
df_ns = df_ns.drop(columns=['labels'])

# we'll remove the multi-labeled samples
df_ns = df_ns[df_ns['label'] != 'MULTI_LABEL'].copy()

# also remove the samples with label specified in remove argument if it's given
if args['remove']:
    df_ns = df_ns.drop(index=df_ns[df_ns['label'] == args['remove']].index)

print(‘DATA FETCHING DONE')
print('DATASET HAS %d SAMPLES' % (len(df_ns)))
print('SAVING THE PROCESSED DATASET TO: %s' % os.path.abspath(output_path))

df_ns.to_csv(output_path, index=False)

print('DONE!')
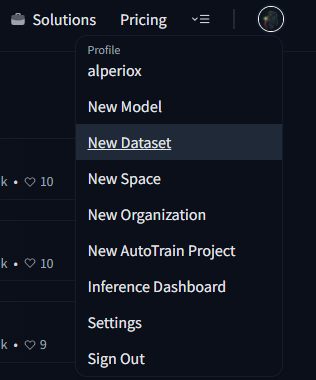
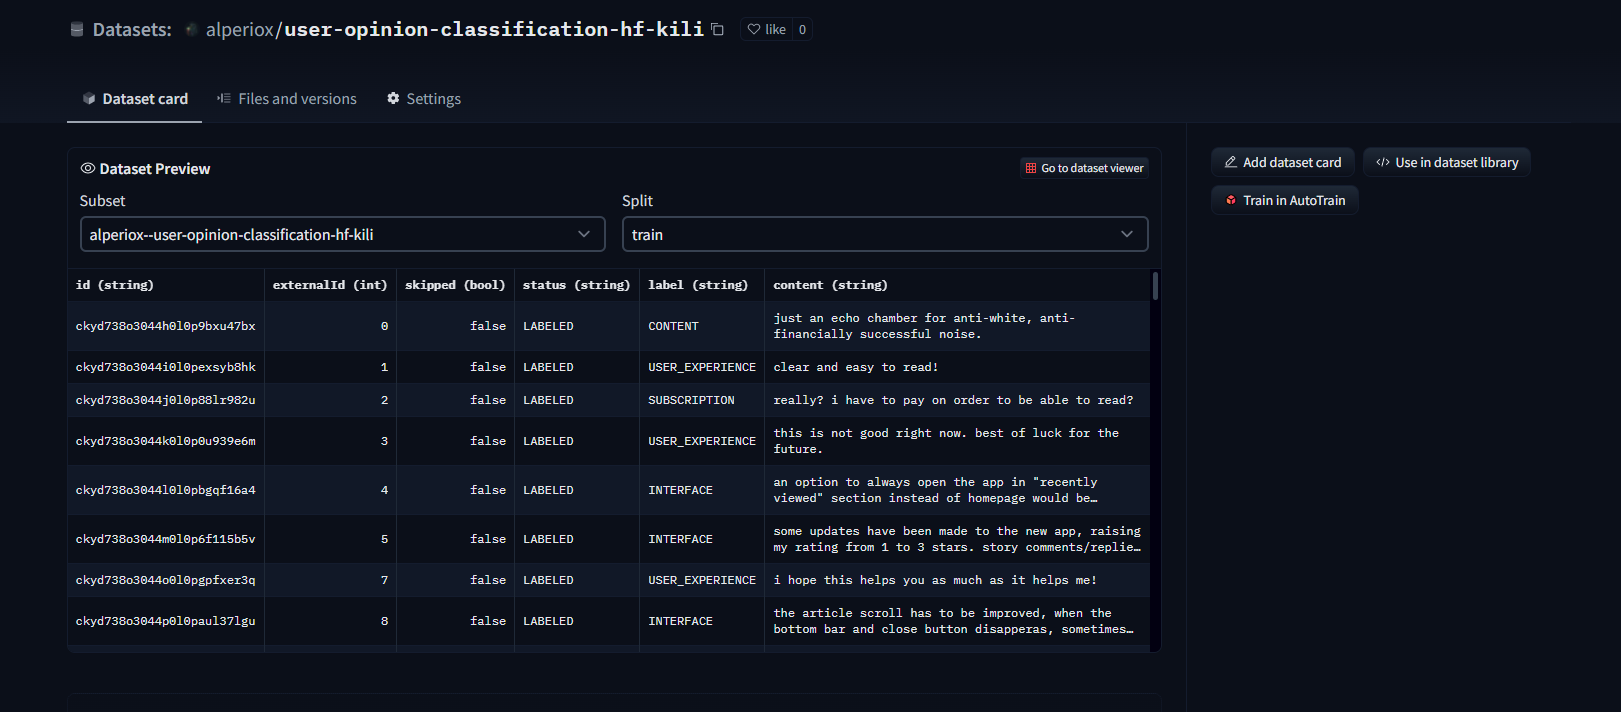
太棒了!我们现在已经将标注数据作为 CSV 文件。让我们在 HuggingFace 中创建一个数据集仓库并将其上传到那里!
这真的很简单,只需点击您的个人资料图片并选择“新建数据集”选项。
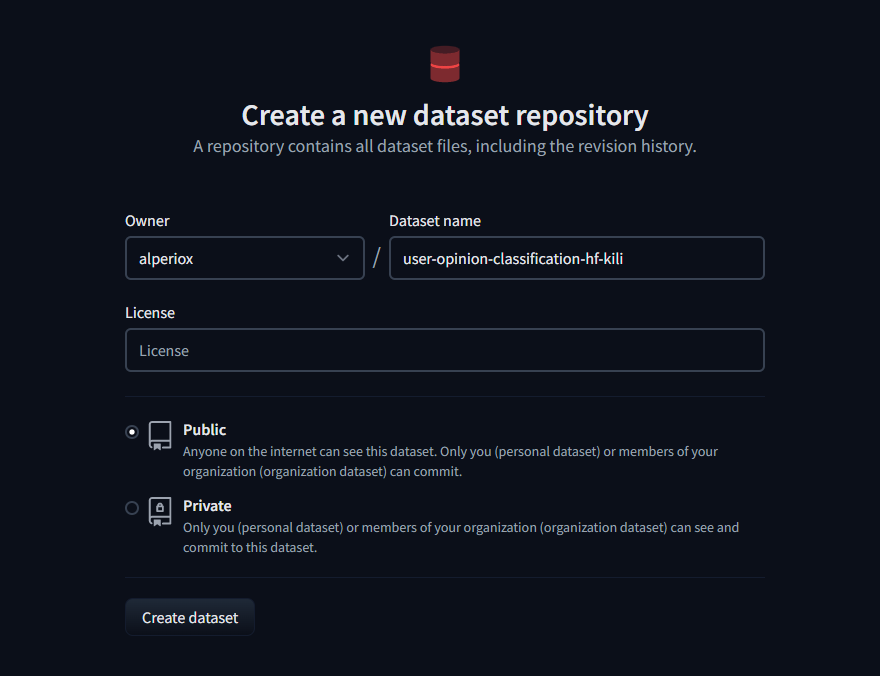
然后输入仓库名称,选择一个许可证(如果需要),就完成了!
现在我们可以在“文件和版本”选项卡中从“添加文件”上传数据集。
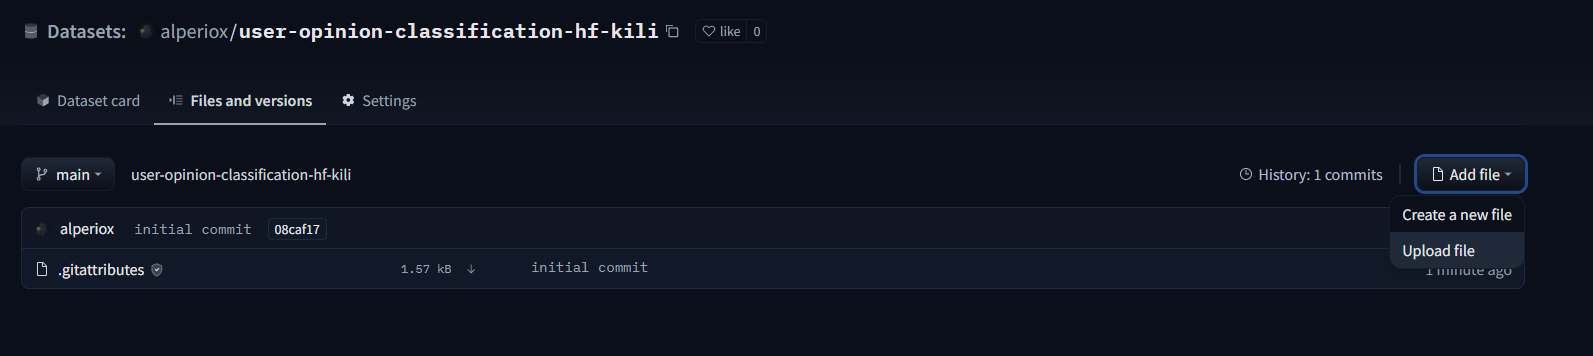
数据集查看器在数据上传后自动可用,我们可以轻松检查样本!
也可以使用 `datasets` 包将数据集上传到 Hugging Face 的数据集中心。
建模
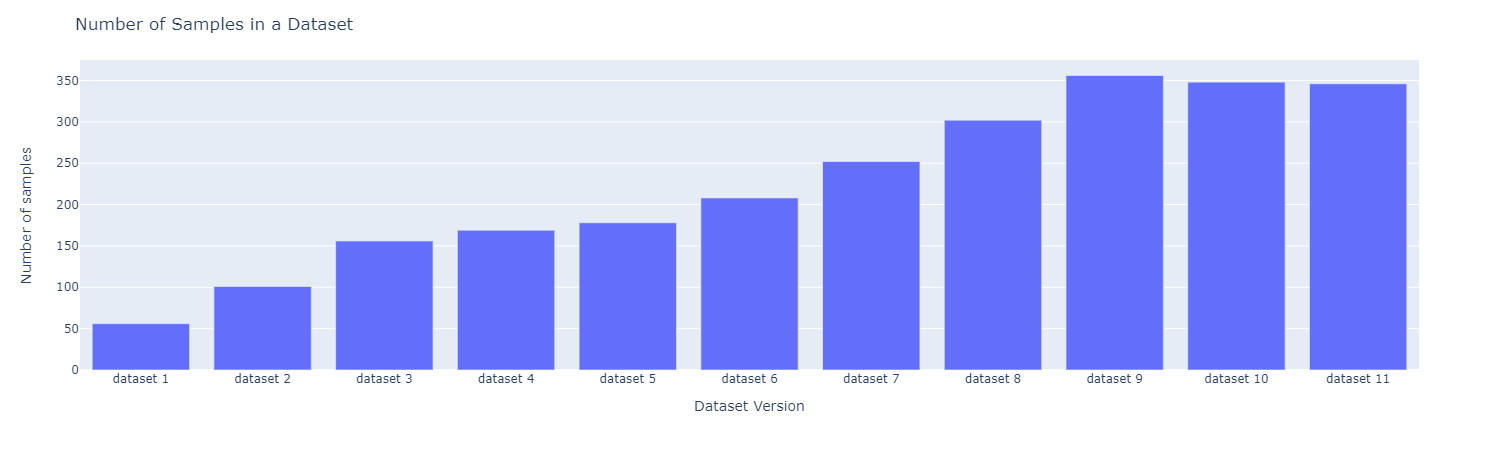
让我们使用主动学习。我们迭代地标注和微调模型。在每次迭代中,我们标注数据集中 50 个样本。样本数量如下所示
让我们先尝试 AutoTrain
首先,打开 AutoTrain
- 创建一个项目
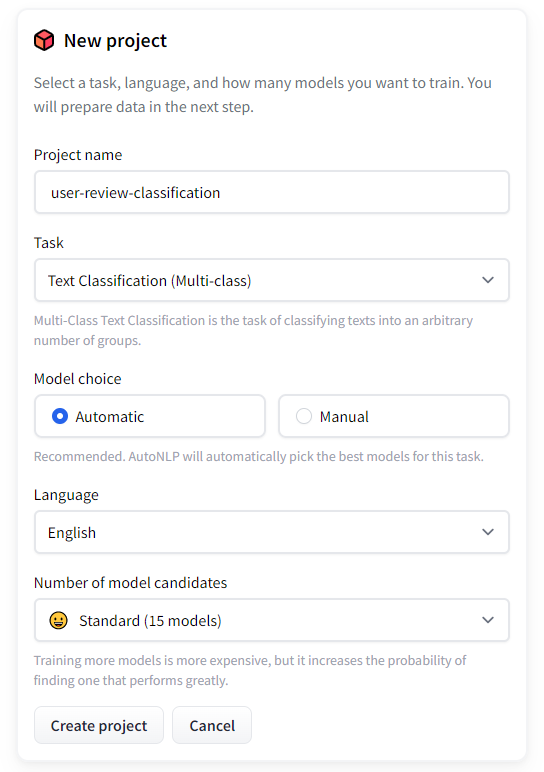
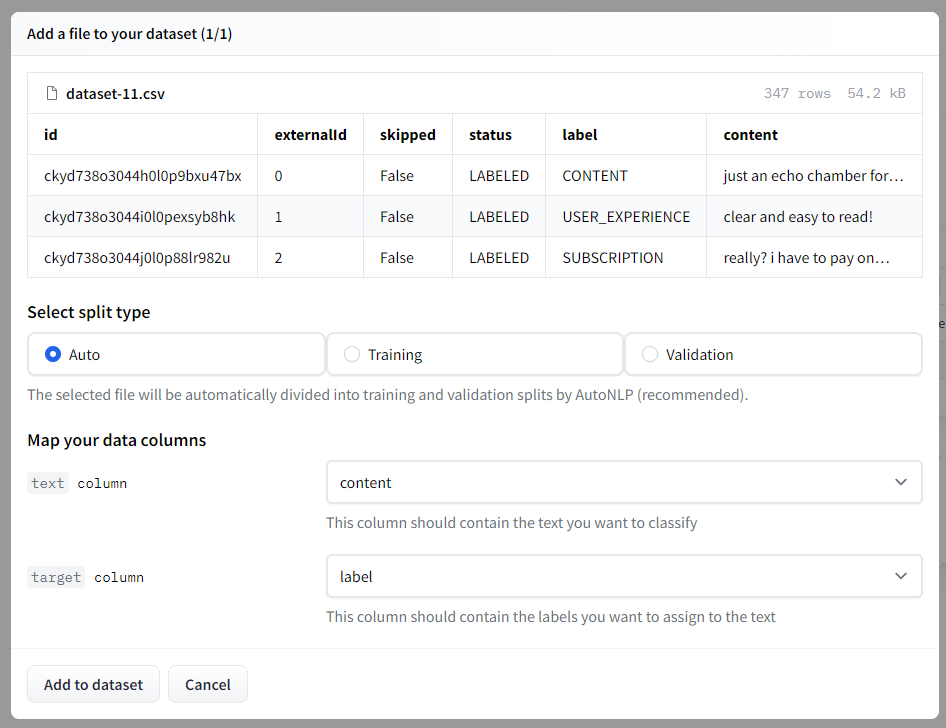
- 我们可以选择之前创建的数据集存储库或再次上传数据集。然后我们需要选择拆分类型,我将保留为自动。
- 训练模型
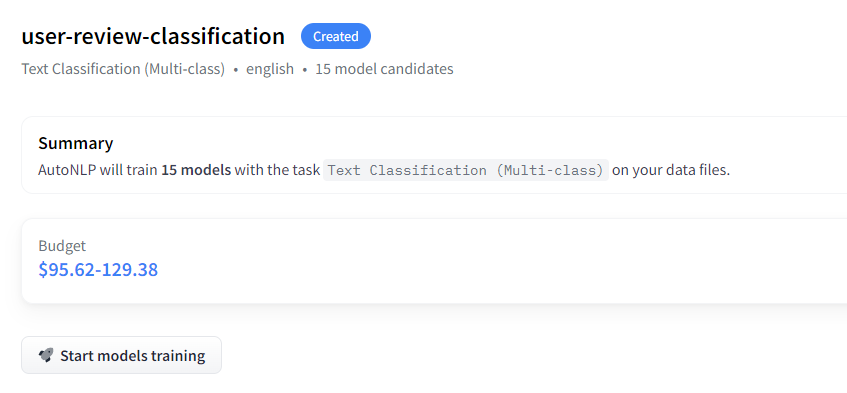
AutoTrain 将尝试不同的模型并选择最佳模型。然后自动执行超参数优化。数据集也自动处理。
价格完全取决于您的用例。它可以低至 10 美元,也可以比当前价值更昂贵。
训练大约在 20 分钟后完成,结果非常好!

最佳模型的准确率几乎达到 89%。
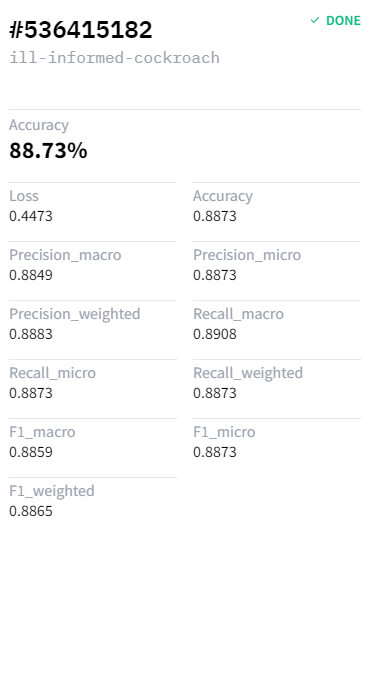
现在我们可以使用这个模型进行分析,整个设置只花了大约 30 分钟。
不使用 AutoTrain 的建模
我们将使用 Ray Tune 和 Hugging Face 的 Trainer API 来搜索超参数并微调预训练的深度学习模型。我们选择了在推文上训练的 roBERTa 基础情感分类模型进行微调。我们已经在 Google Colaboratory 上微调了模型,并且可以在 GitHub 仓库的 `notebooks` 文件夹中找到它。
Ray tune 是一个流行的超参数优化库,它开箱即用地提供了许多 SOTA 算法。也可以使用 Optuna 和 SigOpt。我们还使用了 [异步逐次减半算法 (ASHA) 作为调度器,以及 HyperOpt 作为搜索算法。这基本上是一个起点。您可以使用不同的调度器和搜索算法。
我们要做什么?
- 导入必要的库(十几个)并准备一个数据集类
- 定义处理数据所需的函数和方法
- 加载预训练模型和分词器
- 运行超参数搜索
- 使用最佳结果进行评估
让我们从导入必要的库开始!(所有代码都在 notebooks/modeling.ipynb 和 Google Colaboratory 笔记本中)
# general data science/utilization/visualization imports
import json
import os
import random

# progress bar
from tqdm import tqdm

# data manipulation / reading
import numpy as np
import pandas as pd

# visualization
import plotly.express as px
import matplotlib.pyplot as plt

# pre-defined evaluation metrics
from sklearn.metrics import (accuracy_score, f1_score,
                             precision_score, recall_score)

from sklearn.model_selection import train_test_split
# torch imports
import torch
import torch.nn as nn
from torch.utils.data import DataLoader, Dataset, random_split
# huggingface imports
import transformers
from datasets import load_metric
from transformers import (AutoModelForSequenceClassification, AutoTokenizer,
                          Trainer, TrainingArguments)

# ray tune imports for hyperparameter optimization
from ray.tune.schedulers import ASHAScheduler, PopulationBasedTraining
from ray.tune.suggest.hyperopt import HyperOptSearch
我们将为我们使用的库设置一个种子以确保可重现性
def seed_all(seed):
    torch.manual_seed(seed)
    random.seed(seed)
    np.random.seed(seed)

SEED=42
seed_all(SEED)
现在让我们定义我们的数据集类!
class TextClassificationDataset(Dataset):
    def __init__(self, dataframe):
        self.labels = dataframe.label.to_list()
        self.inputs = dataframe.content.to_list()
        self.labels_to_idx = {k:v for k,v in labels_dict.items()} # copy the labels_dict dictionary

    def __len__(self):
        return len(self.inputs)

    def __getitem__(self, idx):
        if type(idx)==torch.Tensor:
            idx = list(idx)

        input_data = self.inputs[idx]
        target = self.labels[idx]
        target = self.labels_to_idx[target]

        return {'text': input_data, 'label':target}
我们可以通过指定 HuggingFace Hub 仓库轻松下载模型。还需要为指定模型导入分词器。我们必须提供一个函数来在超参数优化期间初始化模型。模型将在那里定义。
要优化的指标是准确性,我们希望这个值尽可能高。因此,我们需要加载指标,然后定义一个函数来获取预测并计算首选指标。
model_name = 'cardiffnlp/twitter-roberta-base-sentiment'
# we will perform the search to optimize the model accuracy,
# we need to specify and load the accuracy metric as a first step
metric = load_metric("accuracy")


# since we already entered a model name, we can load the tokenizer
# we can also load the model but i'll describe it in the model_init function.
tokenizer = AutoTokenizer.from_pretrained(model_name)


def model_init():
    """
    Hyperparameter optimization is performed by newly initialized models,
    therefore we will need to initialize the model again for every single search run.
    This function initializes and returns the pre-trained model selected with `model_name`
    """
    return AutoModelForSequenceClassification.from_pretrained(model_name, num_labels=4, return_dict=True, ignore_mismatched_sizes=True)

# the function to calculate accuracy
def compute_metrics(eval_pred):
    logits, labels = eval_pred
    predictions = np.argmax(logits, axis=-1) # just pick the indices that has the maximum values
    return metric.compute(predictions=predictions, references=labels)
定义度量计算和模型初始化函数后,我们可以加载数据。
file_name = "dataset-11.csv"

dataset_path = os.path.join('data/processed', file_name)
dataset = pd.read_csv(dataset_path)
我还定义了两个字典,用于将标签映射到索引,将索引映射到标签。
idx_to_label = dict(enumerate(dataset.label.unique()))
labels_dict = {v:k for k,v in idx_to_label.items()}
现在我们可以定义超参数搜索的搜索算法和调度器。
scheduler =  ASHAScheduler(metric='objective', mode='max')
search_algorithm = HyperOptSearch(metric='objective', mode='max', random_state_seed=SEED)
# number of runs for parameter searching
n_trials =  40
在将文本数据传递给模型之前,我们还需要对其进行分词,我们可以使用加载的分词器轻松完成此操作。Ray Tune 在黑盒设置下工作,因此我使用分词器作为变通方法的默认参数。否则,会产生关于分词器定义的错误。
def tokenize(sample, tokenizer=tokenizer):
    tokenized_sample = tokenizer(sample['text'], padding=True, truncation=True)
    tokenized_sample['label'] = sample['label']
    return tokenized_sample
另一个实用函数,返回分层和分词后的 PyTorch 数据集拆分。
def prepare_datasets(dataset_df, test_size=.2, val_size=.2):
    train_set, test_set = train_test_split(dataset_df, test_size=test_size,
                                        stratify=dataset_df.label, random_state=SEED)

    train_set, val_set = train_test_split(train_set, test_size=val_size,
                                        stratify=train_set.label, random_state=SEED)

    # shuffle the dataframes beforehand
    train_set = train_set.sample(frac=1, random_state=SEED)
    val_set = val_set.sample(frac=1, random_state=SEED)
    test_set = test_set.sample(frac=1, random_state=SEED)

    # convert dataframes to torch datasets
    train_dataset = TextClassificationDataset(train_set)
    val_dataset = TextClassificationDataset(val_set)
    test_dataset = TextClassificationDataset(test_set)

    # tokenize the datasets
    tokenized_train_set = train_dataset.map(tokenize)
    tokenized_val_set = val_dataset.map(tokenize)
    tokenized_test_set = test_dataset.map(tokenize)

    # finally return the processed sets
    return tokenized_train_set, tokenized_val_set, tokenized_test_set
现在我们可以开始搜索了!让我们从处理数据开始。
tokenized_train_set, tokenized_val_set, tokenized_test_set = prepare_datasets(dataset)

training_args = TrainingArguments(
    'trial_results',
    evaluation_strategy="steps",
    disable_tqdm=True,
    skip_memory_metrics=True,
)

trainer = Trainer(
    args=training_args,
    tokenizer=tokenizer,
    train_dataset=tokenized_train_set,
    eval_dataset=tokenized_val_set,
    model_init=model_init,
    compute_metrics=compute_metrics
    )

best_run = trainer.hyperparameter_search(
    direction="maximize",
    n_trials=n_trials,
    backend="ray",
    search_alg=search_algorithm,
    scheduler=scheduler
    )
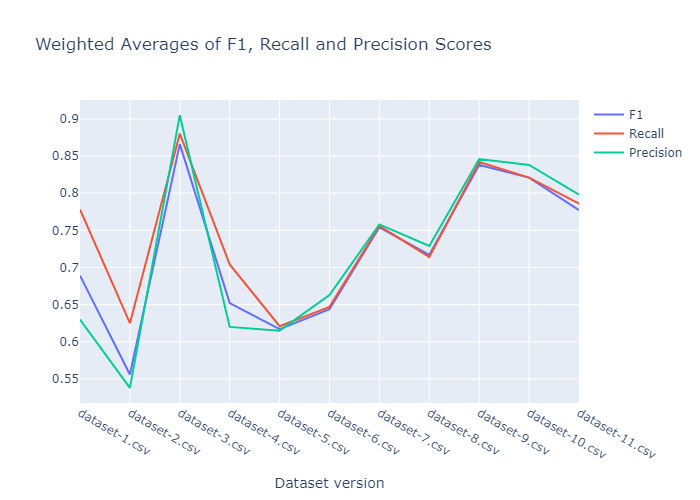
我们分别进行了 20 次和 40 次试验的搜索,结果如下所示。20 次运行的 F1、召回率和精确度得分的加权平均值。
40 次运行的 F1、召回率和精确度得分的加权平均值。
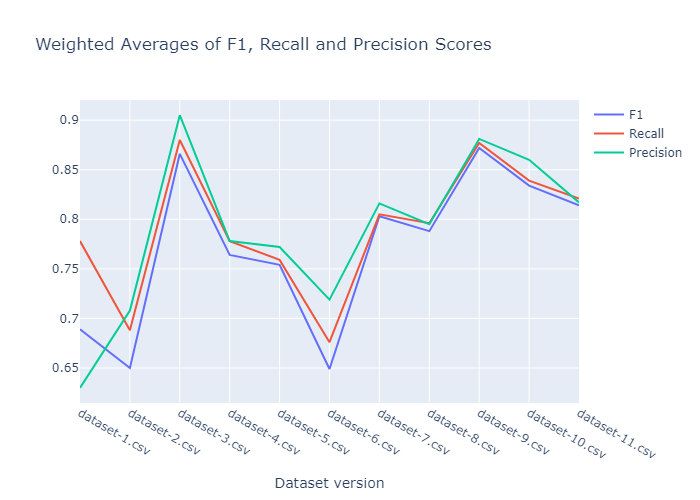
性能在第三个数据集版本时飙升。在数据标注的某个时刻,我不小心给数据集引入了太多的偏差。正如我们所看到的,由于样本方差后来增加,其性能变得更加合理。最终模型保存在 Google Drive 上,可以从这里下载,也可以通过 download_models.py 脚本下载。
最终分析
现在我们可以使用微调过的模型进行最终分析。我们所要做的就是加载数据,处理它,并从模型中获取预测结果。然后我们可以使用预训练模型进行情感分析,并希望能获得洞察。
我们在 Google Colab 中进行推理(这里),然后将结果导出到 result.csv。它可以在 GitHub 仓库的 `results` 文件夹中找到。然后我们在另一个 Google Colaboratory 笔记本中分析结果,以获得交互式体验。因此您也可以轻松交互地使用它。
现在让我们检查一下结果!
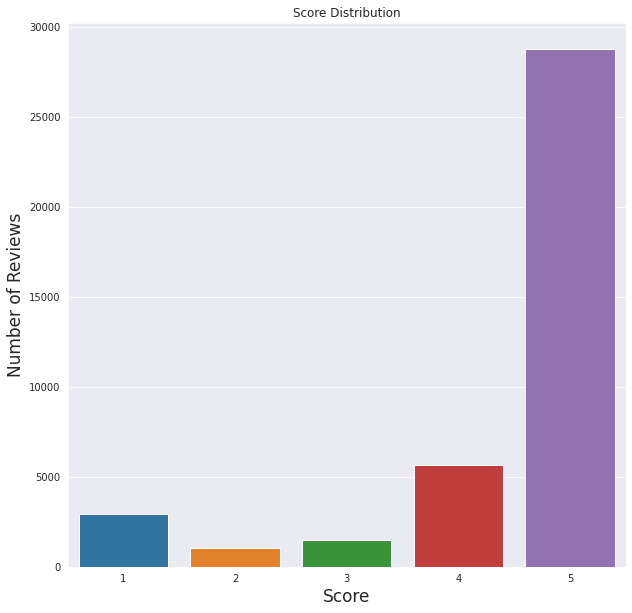
我们可以看到给定的分数非常积极。总的来说,用户喜欢这个应用程序。
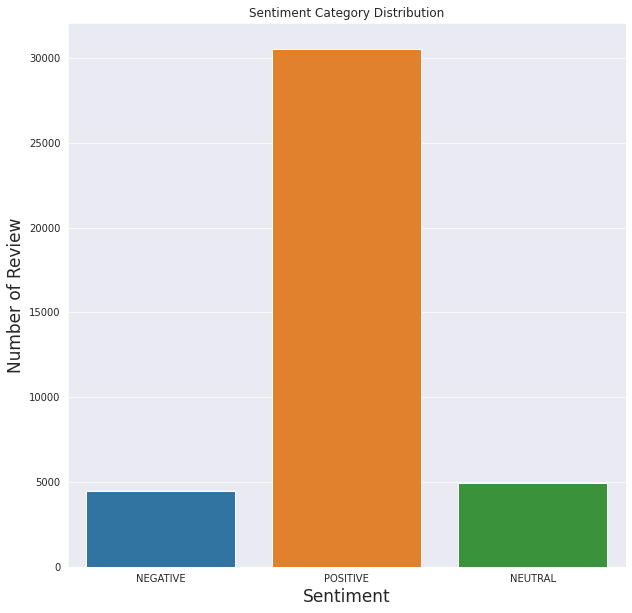
这也与情感分析结果吻合,大多数评论是积极的,而负面评论的数量最少。
正如我们从上面看到的,模型的性能是可以理解的。积极分明显高于其他分数,就像情感分析图表显示的那样。
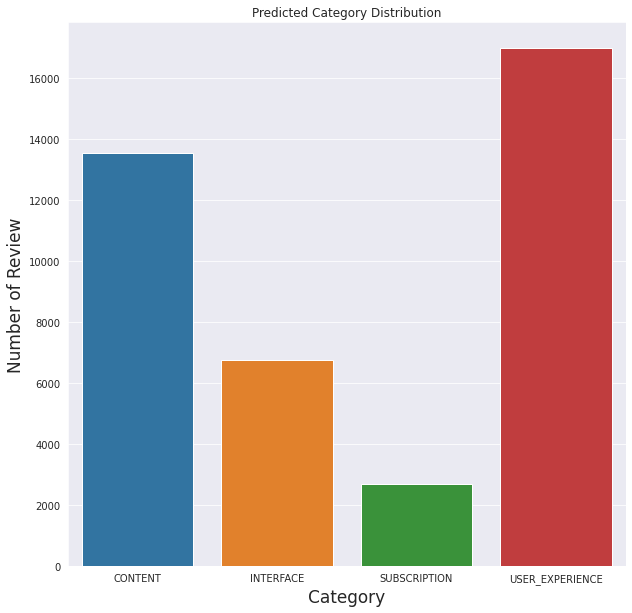
就之前定义的类别而言,模型似乎预测大多数评论都与用户体验有关(不包括与其他类别相关的体验)
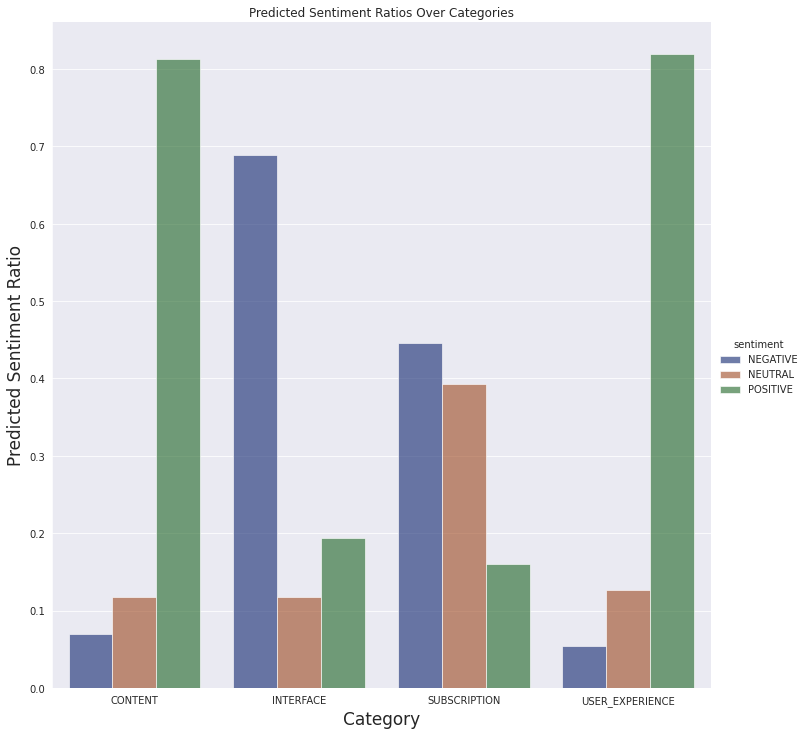
我们还可以看到下面定义的类别的情感预测
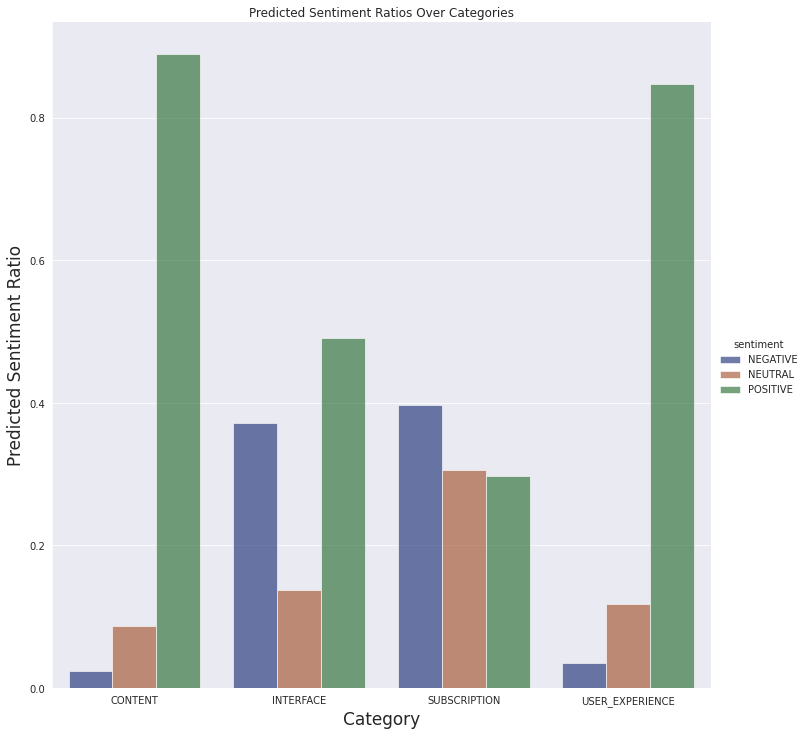
我们不会对评论进行详细分析,对潜在问题有一个基本了解就足够了。因此,从最终数据中得出简单的结论就足够了。
- 订阅方面的大部分评论都是负面的,这是可以理解的。付费内容通常在移动应用程序中不受欢迎。
- 有很多关于界面的负面评论。这可能是进一步分析的线索。也许对功能存在误解,或者某个功能不如用户想象的那样工作。
- 人们普遍喜欢这些文章,并且大多数人都有很好的体验。
关于此图的一个重要注意事项:我们没有按应用程序版本过滤评论。当我们查看最新当前版本 (4.5) 的结果时,似乎应用程序的界面让用户感到困惑或存在恼人的错误。
结论
现在我们可以使用预训练模型来尝试了解移动应用程序的潜在缺点。然后,分析特定功能将变得更容易。
在此示例中,我们使用了 HuggingFace 强大的 API 和 AutoTrain 以及 Kili 易于使用的界面。AutoTrain 的建模仅用了 30 分钟,它为我们的使用选择了模型并进行了训练。AutoTrain 显然效率更高,因为我独自开发模型时花费了更多时间。
所有代码、数据集和脚本都可以在 GitHub 上找到。您也可以尝试 AutoTrain 模型。
虽然这可以被视为一个有效的起点,但我们应该收集更多数据并尝试构建更好的管道。更好的管道将带来更高效的改进。