分布式训练:使用 🤗 Transformers 和 Amazon SageMaker 训练 BART/T5 进行文本摘要


如果您错过了:3 月 25 日,我们宣布与 Amazon SageMaker 合作,以简化最先进机器学习模型的创建,并更快地发布尖端 NLP 功能。
我们与 SageMaker 团队一起构建了 🤗 Transformers 优化深度学习容器,以加速基于 Transformers 的模型的训练。感谢 AWS 的朋友们!🤗 🚀
借助 SageMaker Python SDK 中新的 HuggingFace 估计器,您只需一行代码即可开始训练。
公告博客文章提供了您需要了解的有关集成的所有信息,包括“入门”示例以及文档、示例和功能的链接。
此处再次列出
- 🤗 Transformers 文档:Amazon SageMaker
- 示例笔记本
- Amazon SageMaker 关于 Hugging Face 的文档
- Python SDK SageMaker 关于 Hugging Face 的文档
- 深度学习容器
如果您不熟悉 Amazon SageMaker:“Amazon SageMaker 是一项完全托管的服务,为每位开发人员和数据科学家提供了快速构建、训练和部署机器学习 (ML) 模型的能力。SageMaker 消除了机器学习过程中每个步骤的繁重工作,使开发高质量模型变得更容易。”[参考]
教程
我们将使用新的 Hugging Face DLCs 和 Amazon SageMaker 扩展来训练分布式 Seq2Seq-transformer 模型,用于摘要任务,使用transformers和datasets库,然后将模型上传到 huggingface.co 并进行测试。
作为分布式训练策略,我们将使用SageMaker 数据并行,该功能已内置到 Trainer API 中。要使用数据并行,我们只需在 HuggingFace 估计器中定义 distribution 参数即可。
# configuration for running training on smdistributed Data Parallel
distribution = {'smdistributed':{'dataparallel':{ 'enabled': True }}}
在本教程中,我们将使用 Amazon SageMaker Notebook 实例运行我们的训练作业。您可以在此处了解如何设置 Notebook 实例。
我们将要做什么
- 设置开发环境并安装 sagemaker
- 选择 🤗 Transformers
examples/脚本 - 配置分布式训练和超参数
- 创建
HuggingFace估计器并开始训练 - 将微调模型上传到 huggingface.co
- 测试推理
模型和数据集
我们将在 samsum 数据集上微调 facebook/bart-large-cnn。“BART 是一种以去噪为预训练目标的序列到序列模型。”[参考]
samsum 数据集包含约 1.6 万个类似即时通讯的对话及其摘要。
{"id": "13818513",
 "summary": "Amanda baked cookies and will bring Jerry some tomorrow.",
 "dialogue": "Amanda: I baked cookies. Do you want some?\r\nJerry: Sure!\r\nAmanda: I'll bring you tomorrow :-)"}
设置开发环境并安装 SageMaker
SageMaker Notebook 实例运行后,我们可以选择 Jupyter Notebook 或 JupyterLab,并使用 conda_pytorch_p36 kernel 创建新的 Notebook。
注意: 使用 Jupyter 是可选的:我们也可以从任何安装了 SDK、连接到云和具有适当权限的地方启动 SageMaker 训练作业,例如笔记本电脑、其他 IDE 或任务调度器(如 Airflow 或 AWS Step Functions)。
之后我们可以安装所需的依赖项
!pip install transformers "datasets[s3]" sagemaker --upgrade
为模型上传安装 git-lfs。
!curl -s https://packagecloud.io/install/repositories/github/git-lfs/script.rpm.sh | sudo bash
!sudo yum install git-lfs -y
!git lfs install
要在 SageMaker 上运行训练,我们需要创建一个 sagemaker Session 并提供具有正确权限的 IAM 角色。此 IAM 角色稍后将附加到 TrainingJob,使其能够下载数据,例如从 Amazon S3。
import sagemaker

sess = sagemaker.Session()
role = sagemaker.get_execution_role()

print(f"IAM role arn used for running training: {role}")
print(f"S3 bucket used for storing artifacts: {sess.default_bucket()}")
选择 🤗 Transformers examples/ 脚本
🤗 Transformers 存储库包含几个 examples/ 脚本,用于对从 language-modeling 到 token-classification 的任务进行模型微调。在我们的例子中,我们使用 seq2seq/ 示例中的 run_summarization.py。
注意:您可以按原样使用本教程,以使用不同的示例脚本训练您的模型。
由于 HuggingFace Estimator 内置了 git 支持,我们可以指定一个存储在 GitHub 存储库中的训练脚本作为 entry_point 和 source_dir。
我们将使用 transformers 4.4.2 DLC,这意味着我们需要将 v4.4.2 配置为拉取兼容示例脚本的分支。
#git_config = {'repo': 'https://github.com/huggingface/transformers.git','branch': 'v4.4.2'} # v4.4.2 is referring to the `transformers_version you use in the estimator.
# used due an missing package in v4.4.2
git_config = {'repo': 'https://github.com/philschmid/transformers.git','branch': 'master'} # v4.4.2 is referring to the `transformers_version you use in the estimator.
配置分布式训练和超参数
接下来,我们将定义我们的 hyperparameters 并配置我们的分布式训练策略。作为超参数,我们可以定义任何 Seq2SeqTrainingArguments 和 run_summarization.py 中定义的参数。
# hyperparameters, which are passed into the training job
hyperparameters={
    'per_device_train_batch_size': 4,
    'per_device_eval_batch_size': 4,
    'model_name_or_path':'facebook/bart-large-cnn',
    'dataset_name':'samsum',
    'do_train':True,
    'do_predict': True,
    'predict_with_generate': True,
    'output_dir':'/opt/ml/model',
    'num_train_epochs': 3,
    'learning_rate': 5e-5,
    'seed': 7,
    'fp16': True,
}

# configuration for running training on smdistributed Data Parallel
distribution = {'smdistributed':{'dataparallel':{ 'enabled': True }}}
由于我们使用的是 SageMaker 数据并行,我们的 total_batch_size 将是 per_device_train_batch_size * n_gpus。
创建 HuggingFace 估计器并开始训练
训练前的最后一步是创建 HuggingFace 估计器。该估计器处理端到端的 Amazon SageMaker 训练。我们定义哪个微调脚本应作为 entry_point 使用,应使用哪个 instance_type,以及传入哪个 hyperparameters。
from sagemaker.huggingface import HuggingFace

# create the Estimator
huggingface_estimator = HuggingFace(
      entry_point='run_summarization.py', # script
      source_dir='./examples/seq2seq', # relative path to example
      git_config=git_config,
      instance_type='ml.p3dn.24xlarge',
      instance_count=2,
      transformers_version='4.4.2',
      pytorch_version='1.6.0',
      py_version='py36',
      role=role,
      hyperparameters = hyperparameters,
      distribution = distribution
)
我们使用的 instance_type 是 ml.p3dn.24xlarge,它包含 8 个 NVIDIA A100,instance_count 为 2。这意味着我们将在 16 个 GPU 上运行训练,total_batch_size 为 16*4=64。我们将训练一个 4 亿参数的模型,total_batch_size 为 64,这真是太棒了。要开始训练,我们调用 .fit() 方法。
# starting the training job
huggingface_estimator.fit()
2021-04-01 13:00:35 Starting - Starting the training job...
2021-04-01 13:01:03 Starting - Launching requested ML instancesProfilerReport-1617282031: InProgress
2021-04-01 13:02:23 Starting - Preparing the instances for training......
2021-04-01 13:03:25 Downloading - Downloading input data...
2021-04-01 13:04:04 Training - Downloading the training image...............
2021-04-01 13:06:33 Training - Training image download completed. Training in progress
....
....
2021-04-01 13:16:47 Uploading - Uploading generated training model
2021-04-01 13:27:49 Completed - Training job completed
Training seconds: 2882
Billable seconds: 2882
训练时间为 2882 秒,因为它们乘以实例数。如果我们将 2882/2=1441 计算出来,它就是从“Downloading the training image”(下载训练镜像)到“Training job completed”(训练作业完成)的持续时间。转换为实际费用,我们在 16 个 NVIDIA Tesla V100-GPU 上训练一个最先进的摘要模型大约花费 28 美元。
将微调模型上传到 huggingface.co
由于我们的模型取得了相当好的分数,我们将其上传到 huggingface.co,创建一个 model_card 并使用托管推理小部件进行测试。要上传模型,您需要在此处创建一个帐户。
我们可以使用以下代码片段从 Amazon S3 下载模型并将其解压缩。
import os
import tarfile
from sagemaker.s3 import S3Downloader

local_path = 'my_bart_model'

os.makedirs(local_path, exist_ok = True)

# download model from S3
S3Downloader.download(
    s3_uri=huggingface_estimator.model_data, # s3 uri where the trained model is located
    local_path=local_path, # local path where *.tar.gz will be saved
    sagemaker_session=sess # sagemaker session used for training the model
)

# unzip model
tar = tarfile.open(f"{local_path}/model.tar.gz", "r:gz")
tar.extractall(path=local_path)
tar.close()
os.remove(f"{local_path}/model.tar.gz")
在我们将模型上传到 huggingface.co 之前,我们需要创建一个 model_card。model_card 描述了模型,包括超参数、结果,并指定了用于训练的数据集。为了创建 model_card,我们在 local_path 中创建一个 README.md
# read eval and test results
with open(f"{local_path}/eval_results.json") as f:
    eval_results_raw = json.load(f)
    eval_results={}
    eval_results["eval_rouge1"] = eval_results_raw["eval_rouge1"]
    eval_results["eval_rouge2"] = eval_results_raw["eval_rouge2"]
    eval_results["eval_rougeL"] = eval_results_raw["eval_rougeL"]
    eval_results["eval_rougeLsum"] = eval_results_raw["eval_rougeLsum"]

with open(f"{local_path}/test_results.json") as f:
    test_results_raw = json.load(f)
    test_results={}
    test_results["test_rouge1"] = test_results_raw["test_rouge1"]
    test_results["test_rouge2"] = test_results_raw["test_rouge2"]
    test_results["test_rougeL"] = test_results_raw["test_rougeL"]
    test_results["test_rougeLsum"] = test_results_raw["test_rougeLsum"]
在提取所有需要包含的指标后,我们将创建 README.md。除了自动生成结果表之外,我们还将指标手动添加到模型卡元数据中的 model-index 下。
import json

MODEL_CARD_TEMPLATE = """
---
language: en
tags:
- sagemaker
- bart
- summarization
license: apache-2.0
datasets:
- samsum
model-index:
- name: {model_name}
  results:
  - task:
      name: Abstractive Text Summarization
      type: abstractive-text-summarization
    dataset:
      name: "SAMSum Corpus: A Human-annotated Dialogue Dataset for Abstractive Summarization"
      type: samsum
    metrics:
       - name: Validation ROGUE-1
         type: rogue-1
         value: 42.621
       - name: Validation ROGUE-2
         type: rogue-2
         value: 21.9825
       - name: Validation ROGUE-L
         type: rogue-l
         value: 33.034
       - name: Test ROGUE-1
         type: rogue-1
         value: 41.3174
       - name: Test ROGUE-2
         type: rogue-2
         value: 20.8716
       - name: Test ROGUE-L
         type: rogue-l
         value: 32.1337
widget:
- text: |
    Jeff: Can I train a 🤗 Transformers model on Amazon SageMaker?
    Philipp: Sure you can use the new Hugging Face Deep Learning Container.
    Jeff: ok.
    Jeff: and how can I get started?
    Jeff: where can I find documentation?
    Philipp: ok, ok you can find everything here. https://huggingface.co/blog/the-partnership-amazon-sagemaker-and-hugging-face
---

## `{model_name}`

This model was trained using Amazon SageMaker and the new Hugging Face Deep Learning container.

For more information look at:
- [🤗 Transformers Documentation: Amazon SageMaker](https://huggingface.co/transformers/sagemaker.html)
- [Example Notebooks](https://github.com/huggingface/notebooks/tree/master/sagemaker)
- [Amazon SageMaker documentation for Hugging Face](https://docs.aws.amazon.com/sagemaker/latest/dg/hugging-face.html)
- [Python SDK SageMaker documentation for Hugging Face](https://sagemaker.readthedocs.io/en/stable/frameworks/huggingface/index.html)
- [Deep Learning Container](https://github.com/aws/deep-learning-containers/blob/master/available_images.md#huggingface-training-containers)

## Hyperparameters

    {hyperparameters}


## Usage
    from transformers import pipeline
    summarizer = pipeline("summarization", model="philschmid/{model_name}")

    conversation = '''Jeff: Can I train a 🤗 Transformers model on Amazon SageMaker?
    Philipp: Sure you can use the new Hugging Face Deep Learning Container.
    Jeff: ok.
    Jeff: and how can I get started?
    Jeff: where can I find documentation?
    Philipp: ok, ok you can find everything here. https://huggingface.co/blog/the-partnership-amazon-sagemaker-and-hugging-face
    '''
    nlp(conversation)

## Results

| key | value |
| --- | ----- |
{eval_table}
{test_table}


"""

# Generate model card (todo: add more data from Trainer)
model_card = MODEL_CARD_TEMPLATE.format(
    model_name=f"{hyperparameters['model_name_or_path'].split('/')[1]}-{hyperparameters['dataset_name']}",
    hyperparameters=json.dumps(hyperparameters, indent=4, sort_keys=True),
    eval_table="\n".join(f"| {k} | {v} |" for k, v in eval_results.items()),
    test_table="\n".join(f"| {k} | {v} |" for k, v in test_results.items()),
)

with open(f"{local_path}/README.md", "w") as f:
    f.write(model_card)
将解压缩后的模型和模型卡放在 my_bart_model 中后,我们可以使用 huggingface_hub SDK 创建一个存储库并将其上传到 huggingface.co,或者直接到 https://huggingface.co/new 创建一个新的存储库并上传。
from getpass import getpass
from huggingface_hub import HfApi, Repository

hf_username = "philschmid" # your username on huggingface.co
hf_email = "philipp@huggingface.co" # email used for commit
repository_name = f"{hyperparameters['model_name_or_path'].split('/')[1]}-{hyperparameters['dataset_name']}" # repository name on huggingface.co
password = getpass("Enter your password:") # creates a prompt for entering password

# get hf token
token = HfApi().login(username=hf_username, password=password)

# create repository
repo_url = HfApi().create_repo(token=token, name=repository_name, exist_ok=True)

# create a Repository instance
model_repo = Repository(use_auth_token=token,
                        clone_from=repo_url,
                        local_dir=local_path,
                        git_user=hf_username,
                        git_email=hf_email)

# push model to the hub
model_repo.push_to_hub()
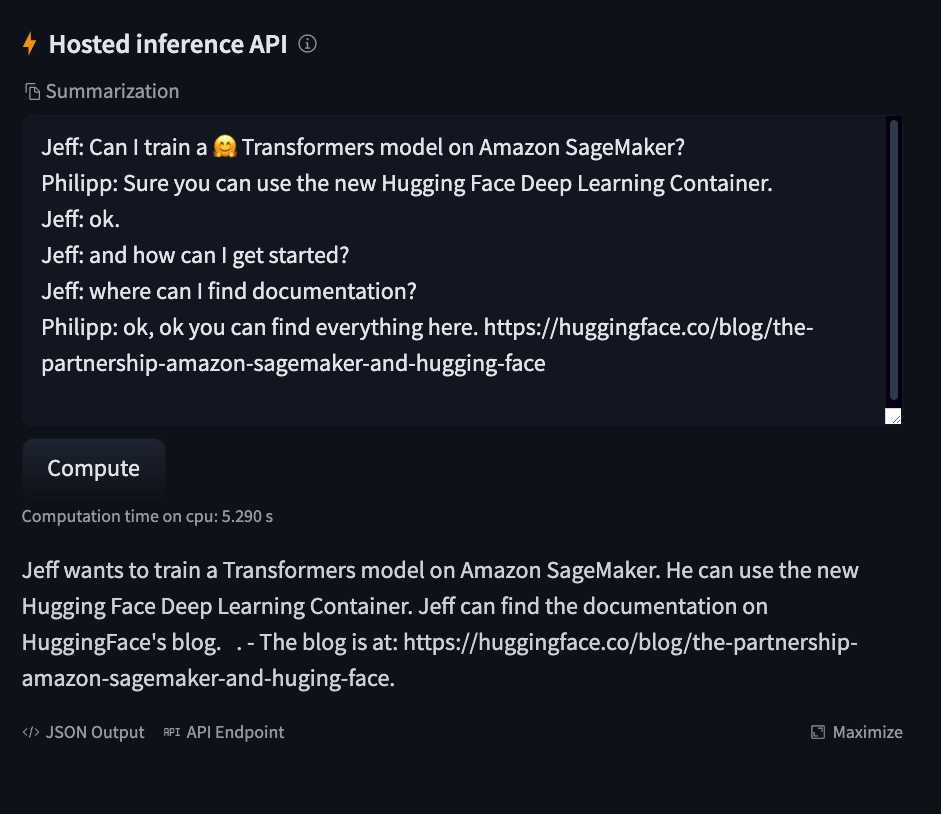
测试推理
上传模型后,我们可以通过 https://huggingface.co/{hf_username}/{repository_name} 访问它。
print(f"https://huggingface.co/{hf_username}/{repository_name}")
并使用“托管推理 API”小部件进行测试。
https://huggingface.co/philschmid/bart-large-cnn-samsum