介绍 Skops


介绍 Skops
在 Hugging Face,我们致力于解决开源机器学习中的各种问题,包括安全开放地托管模型、实现可复现性、可解释性和协作。我们很高兴向您介绍我们的新库:Skops!借助 Skops,您可以在 Hugging Face Hub 上托管您的 scikit-learn 模型,创建模型卡用于模型文档并与他人协作。
让我们通过一个端到端示例:首先训练一个模型,然后逐步了解如何在生产中利用 Skops for sklearn。
# let's import the libraries first
import sklearn
from sklearn.datasets import load_breast_cancer
from sklearn.tree import DecisionTreeClassifier
from sklearn.model_selection import train_test_split

# Load the data and split
X, y = load_breast_cancer(as_frame=True, return_X_y=True)
X_train, X_test, y_train, y_test = train_test_split(
    X, y, test_size=0.3, random_state=42
)

# Train the model
model = DecisionTreeClassifier().fit(X_train, y_train)
您可以使用任何模型文件名和序列化方法,例如 `pickle` 或 `joblib`。目前,我们的后端使用 `joblib` 加载模型。`hub_utils.init` 会创建一个本地文件夹,其中包含给定路径中的模型,以及包含模型训练环境规范的配置文件。传递给 `init` 的数据和任务将帮助 Hugging Face Hub 在模型页面上启用推理小部件,以及查找模型的发现功能。
from skops import hub_utils
import pickle

# let's save the model
model_path = "example.pkl"
local_repo = "my-awesome-model"
with open(model_path, mode="bw") as f:
    pickle.dump(model, file=f)

# we will now initialize a local repository
hub_utils.init(
    model=model_path,
    requirements=[f"scikit-learn={sklearn.__version__}"],
    dst=local_repo,
    task="tabular-classification",
    data=X_test,
)
该仓库现在包含序列化模型和配置文件。该配置包含以下内容
- 模型特性,
- 模型要求,
- 我们传入的 `X_test` 中的示例输入,
- 模型文件名,
- 此处要解决的任务名称。
我们现在将创建模型卡。该卡应符合预期的 Hugging Face Hub 格式:一个 Markdown 部分和一个元数据部分,即顶部的 `yaml` 部分。元数据部分的键在此处定义here,并用于模型的发现。模型卡的内容由一个模板确定,该模板具有一个
- 顶部的 `yaml` 部分用于元数据(例如模型许可证、库名称等)
- Markdown 部分包含自由文本和待填充部分(例如模型的简单描述),以下部分由 `skops` 提取以填充模型卡
- 模型超参数,
- 模型的交互式图表,
- 对于元数据,将填充库名称、任务标识符(例如 tabular-classification)以及推理小部件所需的其他信息。
我们将向您介绍如何以编程方式传递信息以填充模型卡。您可以查看我们关于 `skops` 提供的默认模板及其部分的文档here,以了解模板的预期内容及其外观here。
您可以从 `skops` 实例化 `Card` 类来创建模型卡。在模型序列化期间,任务名称和库名称写入配置文件。此信息也需要在卡的元数据中,因此您可以使用 `metadata_from_config` 方法从配置文件中提取元数据并在创建卡时将其传递给卡。您可以使用 `add` 添加信息和元数据。
from skops import card

# create the card
model_card = card.Card(model, metadata=card.metadata_from_config(Path(destination_folder)))

limitations = "This model is not ready to be used in production."
model_description = "This is a DecisionTreeClassifier model trained on breast cancer dataset."
model_card_authors = "skops_user"
get_started_code = "import pickle \nwith open(dtc_pkl_filename, 'rb') as file: \n    clf = pickle.load(file)"
citation_bibtex = "bibtex\n@inproceedings{...,year={2020}}"

# we can add the information using add
model_card.add(
    citation_bibtex=citation_bibtex,
    get_started_code=get_started_code,
    model_card_authors=model_card_authors,
    limitations=limitations,
    model_description=model_description,
)

# we can set the metadata part directly
model_card.metadata.license = "mit"
我们现在将评估模型并使用 `add` 添加评估方法的描述。度量指标通过 `add_metrics` 添加,它将被解析为表格。
from sklearn.metrics import (ConfusionMatrixDisplay, confusion_matrix,
                            accuracy_score, f1_score)
# let's make a prediction and evaluate the model
y_pred = model.predict(X_test)
# we can pass metrics using add_metrics and pass details with add
model_card.add(eval_method="The model is evaluated using test split, on accuracy and F1 score with macro average.")
model_card.add_metrics(accuracy=accuracy_score(y_test, y_pred))
model_card.add_metrics(**{"f1 score": f1_score(y_test, y_pred, average="micro")})
我们还可以使用 `add_plot` 将我们选择的任何图表添加到卡中,如下所示。
import matplotlib.pyplot as plt
from pathlib import Path
# we will create a confusion matrix
cm = confusion_matrix(y_test, y_pred, labels=model.classes_)
disp = ConfusionMatrixDisplay(confusion_matrix=cm, display_labels=model.classes_)
disp.plot()

# save the plot
plt.savefig(Path(local_repo) / "confusion_matrix.png")

# the plot will be written to the model card under the name confusion_matrix
# we pass the path of the plot itself
model_card.add_plot(confusion_matrix="confusion_matrix.png")
让我们将模型卡保存到本地仓库。这里的文件名应该是 `README.md`,因为这是 Hugging Face Hub 期望的。
model_card.save(Path(local_repo) / "README.md")
我们现在可以将仓库推送到 Hugging Face Hub。为此,我们将使用 `hub_utils` 中的 `push`。Hugging Face Hub 需要令牌进行身份验证,因此如果您从笔记本登录,则需要在 `notebook_login` 中传入您的令牌;如果您从 CLI 登录,则需要在 `huggingface-cli login` 中传入您的令牌。
# if the repository doesn't exist remotely on the Hugging Face Hub, it will be created when we set create_remote to True
repo_id = "skops-user/my-awesome-model"
hub_utils.push(
    repo_id=repo_id,
    source=local_repo,
    token=token,
    commit_message="pushing files to the repo from the example!",
    create_remote=True,
)
一旦我们将模型推送到 Hub,除非仓库是私有的,否则任何人都可以使用它。您可以使用 `download` 下载模型。除了模型文件,仓库还包含模型配置和环境要求。
download_repo = "downloaded-model"
hub_utils.download(repo_id=repo_id, dst=download_repo)
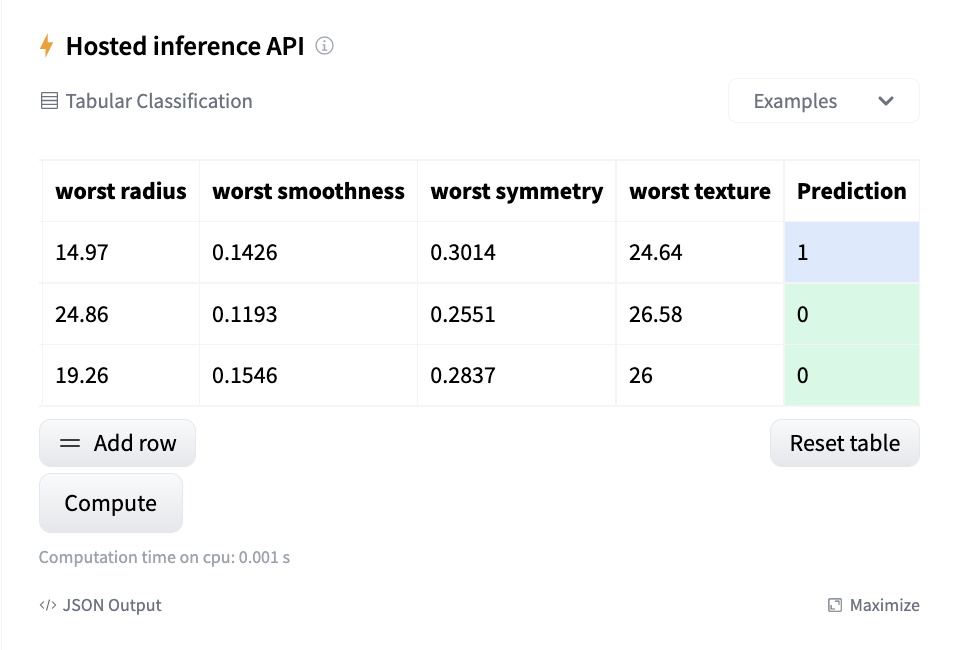
推理小部件已启用,可以在仓库中进行预测。
如果您的项目要求发生变化,您可以使用 `update_env` 更新环境。
hub_utils.update_env(path=local_repo, requirements=["scikit-learn"])
您可以在此处查看使用上述代码推送的示例仓库。我们准备了两个示例来展示如何保存模型和使用模型卡实用程序。您可以在下面的资源部分找到它们。
