使用英特尔 Sapphire Rapids 加速 PyTorch Transformer 模型,第二部分

在最近的一篇文章中,我们向您介绍了英特尔第四代至强 CPU,代号Sapphire Rapids,及其新的高级矩阵扩展 (AMX) 指令集。我们展示了如何结合在 Amazon EC2 上运行的 Sapphire Rapids 服务器集群和英特尔库(如适用于 PyTorch 的英特尔扩展)来高效地大规模运行分布式训练,与上一代至强处理器 (Ice Lake) 相比,速度提升了 8 倍,并实现了近乎线性的扩展。
在这篇文章中,我们将重点关注推理。我们将使用 PyTorch 实现的流行 Hugging Face Transformer 模型,首先测量它们在 Ice Lake 服务器上针对短和长 NLP 序列的性能。然后,我们将在 Sapphire Rapids 服务器和最新版本的 Hugging Face Optimum Intel(一个专用于英特尔平台硬件加速的开源库)上做同样的事情。
我们开始吧!
为什么应该考虑基于 CPU 的推理
在决定是在 CPU 还是 GPU 上运行深度学习推理时,需要考虑几个因素。最重要的因素无疑是模型的大小。一般来说,较大的模型可能从 GPU 提供的额外计算能力中获益更多,而较小的模型可以在 CPU 上高效运行。
需要考虑的另一个因素是模型和推理任务中的并行度。GPU 旨在擅长大规模并行处理,因此它们对于可以有效并行化的任务可能更高效。另一方面,如果模型或推理任务没有很高的并行度,CPU 可能是更有效的选择。
成本也是一个重要的考虑因素。GPU 可能很昂贵,而使用 CPU 可能是一个更具成本效益的选择,特别是如果您的业务用例不需要极低的延迟。此外,如果您需要轻松扩展或缩小推理工作器数量的能力,或者您需要在各种硬件上运行推理,使用 CPU 可能是一个更灵活的选择。
现在,让我们设置我们的测试服务器。
设置我们的测试服务器
就像上一篇文章一样,我们将使用 Amazon EC2 实例:
- 一个基于 Ice Lake 架构的
c6i.16xlarge实例, - 一个基于 Sapphire Rapids 架构的
r7iz.16xlarge-metal实例。您可以在 AWS 网站上阅读更多关于新 r7iz 系列的信息。
两个实例都有 32 个物理核心(因此有 64 个 vCPU)。我们将以相同的方式设置它们:
- Ubuntu 22.04,内核版本 Linux 5.15.0 (
ami-0574da719dca65348), - PyTorch 1.13,带有 Intel Extension for PyTorch 1.13,
- Transformers 4.25.1。
唯一的区别是 r7iz 实例上会额外添加 Optimum Intel Library。
以下是设置步骤。像往常一样,我们建议使用虚拟环境来保持整洁。
sudo apt-get update

# Add libtcmalloc for extra performance
sudo apt install libgoogle-perftools-dev -y
export LD_PRELOAD="/usr/lib/x86_64-linux-gnu/libtcmalloc.so"

sudo apt-get install python3-pip -y
pip install pip --upgrade
export PATH=/home/ubuntu/.local/bin:$PATH
pip install virtualenv
virtualenv inference_env
source inference_env/bin/activate

pip3 install torch==1.13.0 -f https://download.pytorch.org/whl/cpu
pip3 install intel_extension_for_pytorch==1.13.0 -f https://developer.intel.com/ipex-whl-stable-cpu
pip3 install transformers

# Only needed on the r7iz instance
pip3 install optimum[intel]
在两台实例上完成这些步骤后,我们就可以开始运行测试了。
基准测试流行的自然语言处理模型
在此示例中,我们将在文本分类任务上对几个 NLP 模型进行基准测试:distilbert-base-uncased、bert-base-uncased 和roberta-base。您可以在 Github 上找到完整脚本。请随意使用您的模型进行尝试!
models = ["distilbert-base-uncased", "bert-base-uncased", "roberta-base"]
使用 16-token 和 128-token 两种长度的句子,我们将测量单次推理和批处理推理的平均预测延迟和 p99 预测延迟。这应该能让我们很好地了解在实际场景中可以预期的速度提升。
sentence_short = "This is a really nice pair of shoes, I am completely satisfied with my purchase"
sentence_short_array = [sentence_short] * 8

sentence_long = "These Adidas Lite Racer shoes hit a nice sweet spot for comfort shoes. Despite being a little snug in the toe box, these are very comfortable to wear and provide nice support while wearing. I would stop short of saying they are good running shoes or cross-trainers because they simply lack the ankle and arch support most would desire in those type of shoes and the treads wear fairly quickly, but they are definitely comfortable. I actually walked around Disney World all day in these without issue if that is any reference. Bottom line, I use these as the shoes they are best; versatile, inexpensive, and comfortable, without expecting the performance of a high-end athletic sneaker or expecting the comfort of my favorite pair of slippers."
sentence_long_array = [sentence_long] * 8
基准测试函数非常简单。经过几次预热迭代后,我们使用 pipeline API 运行 1,000 次预测,存储预测时间,并计算它们的平均值和 p99 值。
import time
import numpy as np

def benchmark(pipeline, data, iterations=1000):
    # Warmup
    for i in range(100):
        result = pipeline(data)
    times = []
    for i in range(iterations):
        tick = time.time()
        result = pipeline(data)
        tock = time.time()
        times.append(tock - tick)
    return "{:.2f}".format(np.mean(times) * 1000), "{:.2f}".format(
        np.percentile(times, 99) * 1000
    )
在 c6i (Ice Lake) 实例上,我们只使用普通的 Transformers pipeline。
from transformers import pipeline

for model in models:
    print(f"Benchmarking {model}")
    pipe = pipeline("sentiment-analysis", model=model)
    result = benchmark(pipe, sentence_short)
    print(f"Transformers pipeline, short sentence: {result}")
    result = benchmark(pipe, sentence_long)
    print(f"Transformers pipeline, long sentence: {result}")
    result = benchmark(pipe, sentence_short_array)
    print(f"Transformers pipeline, short sentence array: {result}")
    result = benchmark(pipe, sentence_long_array)
    print(f"Transformers pipeline, long sentence array: {result}")
在 r7iz (Sapphire Rapids) 实例上,我们同时使用普通 pipeline 和 Optimum pipeline。在 Optimum pipeline 中,我们启用 bfloat16 模式以利用 AMX 指令。我们还将 jit 设置为 True,以通过即时编译进一步优化模型。
   import torch
    from optimum.intel import inference_mode

    with inference_mode(pipe, dtype=torch.bfloat16, jit=True) as opt_pipe:
        result = benchmark(opt_pipe, sentence_short)
        print(f"Optimum pipeline, short sentence: {result}")
        result = benchmark(opt_pipe, sentence_long)
        print(f"Optimum pipeline, long sentence: {result}")
        result = benchmark(opt_pipe, sentence_short_array)
        print(f"Optimum pipeline, short sentence array: {result}")
        result = benchmark(opt_pipe, sentence_long_array)
        print(f"Optimum pipeline, long sentence array: {result}")
为简洁起见,我们只查看 distilbert-base-uncased 的 p99 结果。所有时间均以毫秒为单位。您可以在文章末尾找到完整结果。
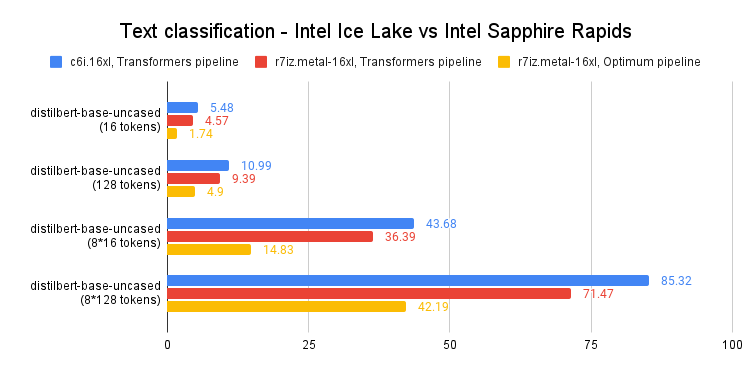
如上图所示,单次预测运行速度比上一代至强 CPU 快 60-65%。换句话说,得益于 Intel Sapphire Rapids 和 Hugging Face Optimum 的结合,您只需对代码进行微小的更改,即可将预测速度提升 3 倍。
这让您即使使用长文本序列,也能实现个位数预测延迟,这在以前只有 GPU 才能做到。
结论
第四代英特尔至强 CPU 提供了出色的推理性能,特别是与 Hugging Face Optimum 结合使用时。这是使深度学习更易于访问和更具成本效益的又一步,我们期待与英特尔的朋友们继续这项工作。
以下是一些可帮助您入门的额外资源:
- Intel IPEX 在 GitHub 上
- GitHub 上的 Hugging Face Optimum
如果您有任何问题或反馈,我们非常乐意在 Hugging Face 论坛上阅读。
感谢阅读!
附录:完整结果
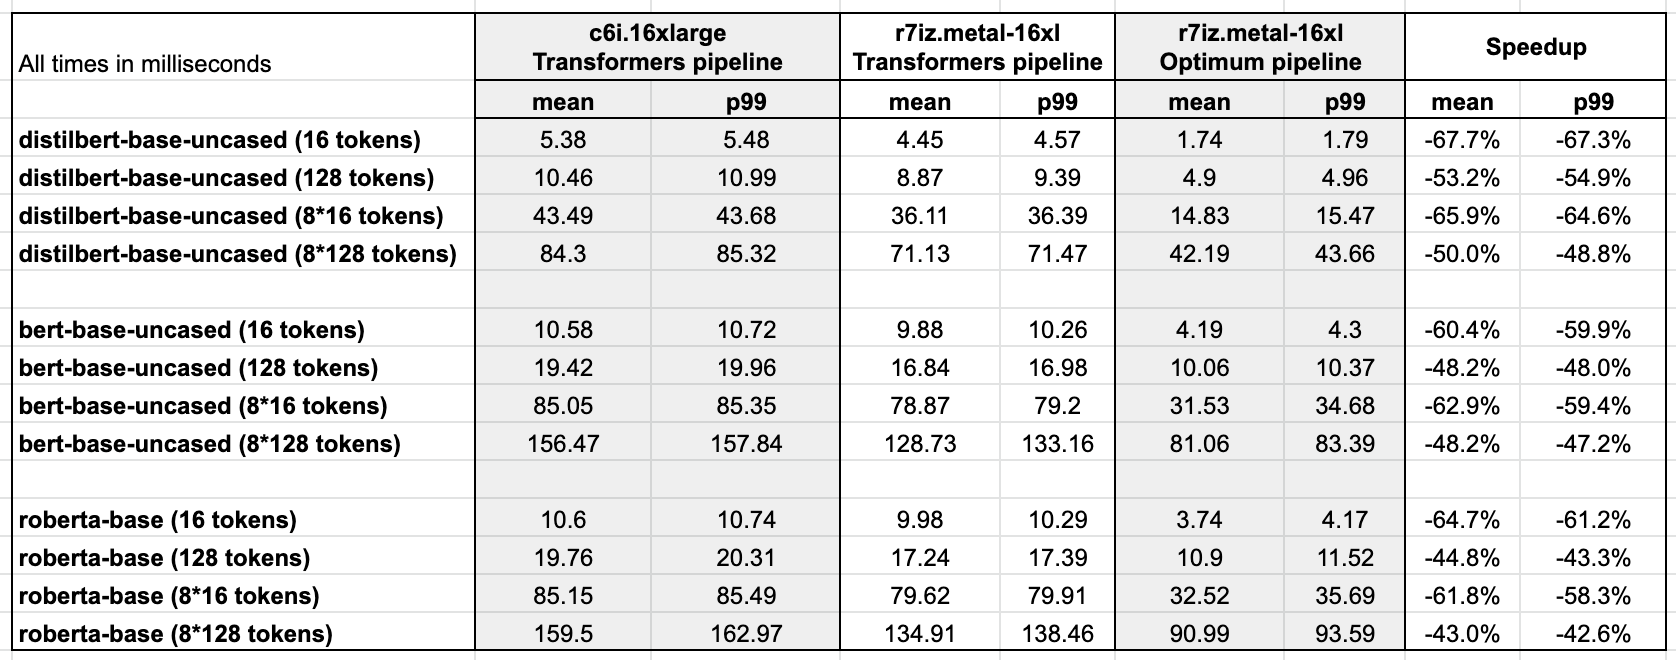
Ubuntu 22.04,带 libtcmalloc,已打补丁支持 Intel AMX 的 Linux 5.15.0,PyTorch 1.13,带 Intel Extension for PyTorch,Transformers 4.25.1,Optimum 1.6.1,Optimum Intel 1.7.0.dev0