在 Intel CPU 上微调 Stable Diffusion 模型

扩散模型凭借其从文本提示生成逼真图像的惊人能力,助力生成式 AI 普及。这些模型现已应用于企业用例,例如合成数据生成或内容创作。Hugging Face Hub 包含 5000 多个预训练文本到图像模型。将它们与 Diffusers 库结合使用,启动实验和构建图像生成工作流程变得前所未有的简单。
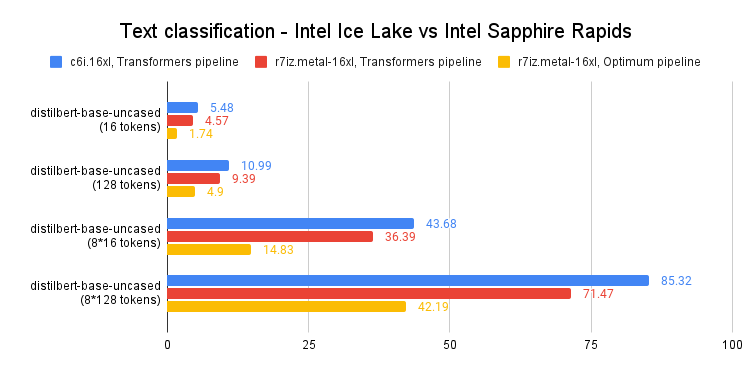
与 Transformer 模型一样,您可以微调扩散模型,以帮助它们生成符合您业务需求的内容。最初,微调只能在 GPU 基础设施上进行,但情况正在改变!几个月前,Intel 推出了第四代 Xeon CPU,代号 Sapphire Rapids。Sapphire Rapids 引入了 Intel Advanced Matrix Extensions (AMX),这是一种用于深度学习工作负载的新硬件加速器。我们已经在多篇博客文章中展示了 AMX 的优势:微调 NLP Transformer、使用 NLP Transformer 进行推理以及使用 Stable Diffusion 模型进行推理。
本文将向您展示如何在 Intel Sapphire Rapids CPU 集群上微调 Stable Diffusion 模型。我们将使用文本反转,这是一种只需要少量示例图像的技术。我们将只使用五张!
让我们开始吧。
设置集群
我们的朋友 Intel 在 Intel 开发人员云 (IDC) 上提供了四台服务器,IDC 是一个服务平台,用于在采用最新 Intel 处理器和性能优化软件堆栈的 Intel® 优化部署环境中开发和运行工作负载。
每台服务器都由两个 Intel Sapphire Rapids CPU 提供支持,每个 CPU 拥有 56 个物理核心和 112 个线程。以下是 lscpu 的输出:
Architecture:            x86_64
  CPU op-mode(s):        32-bit, 64-bit
  Address sizes:         52 bits physical, 57 bits virtual
  Byte Order:            Little Endian
CPU(s):                  224
  On-line CPU(s) list:   0-223
Vendor ID:               GenuineIntel
  Model name:            Intel(R) Xeon(R) Platinum 8480+
    CPU family:          6
    Model:               143
    Thread(s) per core:  2
    Core(s) per socket:  56
    Socket(s):           2
    Stepping:            8
    CPU max MHz:         3800.0000
    CPU min MHz:         800.0000
    BogoMIPS:            4000.00
    Flags:               fpu vme de pse tsc msr pae mce cx8 apic sep mtrr pge mca cmov pat pse36 clflush dts acpi mmx fxsr sse sse2 ss ht tm pbe syscall nx pdpe1gb rdtscp lm constant_tsc art arch_per fmon pebs bts rep_good nopl xtopology nonstop_tsc cpuid aperfmperf tsc_known_freq pni pclmulqdq dtes64 monitor ds_cpl vmx smx est tm2 ssse3 sdbg fma cx16 xtpr pdcm pcid dca sse4_1 sse4_2 x2apic movbe popcnt tsc_deadline_timer aes xsave avx f16c rdrand lahf_lm abm 3dnowprefetch cpuid_fault epb cat_l3 cat_l2 cdp_l3 invpcid_single intel_ppin cdp_l2 ssbd mba ibrs ibpb stibp ibrs_enhanced tpr_shadow vnmi flexpriority ept vpid ept_ad fsgsbase tsc_adjust bmi1 avx2 smep bmi2 erms invpcid cqm rdt_a avx512f avx512dq rdseed adx smap avx512ifma clflushopt clwb intel_pt avx512cd sha_ni avx512bw avx512vl xsaveopt xsavec xgetbv1 xsaves cqm_llc cqm_occup_llc cqm_mbm_total cqm_mbm_local split_lock_detect avx_vnni avx512_bf16 wbnoinvd dtherm ida arat pln pts hwp hwp_act_window hwp_epp hwp_pkg_req avx512vbmi umip pku ospke waitpkg avx512_vbmi2 gfni vaes vpclmulqdq avx512_vnni avx512_bitalg tme avx512_vpopcntdq la57 rdpid bus_lock_detect cldemote movdiri movdir64b enqcmd fsrm md_clear serialize tsxldtrk pconfig arch_lbr amx_bf16 avx512_fp16 amx_tile amx_int8 flush_l1d arch_capabilities
我们首先在 nodefile 中列出服务器的 IP 地址。第一行指的是主服务器。
cat << EOF > nodefile
192.168.20.2
192.168.21.2
192.168.22.2
192.168.23.2
EOF
分布式训练需要在主节点和其他节点之间进行免密码 ssh 连接。如果您不熟悉此过程,这里有一篇不错的文章介绍了如何实现。
接下来,我们在每个节点上创建一个新环境并安装软件依赖项。我们特别安装了两个 Intel 库:oneCCL,用于管理分布式通信,以及 Intel Extension for PyTorch (IPEX),用于利用 Sapphire Rapids 中存在的硬件加速功能。我们还添加了 gperftools 来安装 libtcmalloc,一个高性能内存分配库。
conda create -n diffuser python==3.9
conda activate diffuser
pip3 install torch torchvision torchaudio --index-url https://download.pytorch.org/whl/cpu
pip3 install transformers accelerate==0.19.0
pip3 install oneccl_bind_pt -f https://developer.intel.com/ipex-whl-stable-cpu
pip3 install intel_extension_for_pytorch
conda install gperftools -c conda-forge -y
接下来,我们在每个节点上克隆 diffusers 仓库并从源代码安装它。
git clone https://github.com/huggingface/diffusers.git
cd diffusers
pip install .
接下来,我们将 IPEX 添加到 diffusers/examples/textual_inversion 中的微调脚本。我们导入 IPEX 并优化 U-Net 和变分自动编码器模型。请确保此操作应用于所有节点。
diff --git a/examples/textual_inversion/textual_inversion.py b/examples/textual_inversion/textual_inversion.py
index 4a193abc..91c2edd1 100644
--- a/examples/textual_inversion/textual_inversion.py
+++ b/examples/textual_inversion/textual_inversion.py
@@ -765,6 +765,10 @@ def main():
     unet.to(accelerator.device, dtype=weight_dtype)
     vae.to(accelerator.device, dtype=weight_dtype)

+    import intel_extension_for_pytorch as ipex
+    unet = ipex.optimize(unet, dtype=weight_dtype)
+    vae = ipex.optimize(vae, dtype=weight_dtype)
+
     # We need to recalculate our total training steps as the size of the training dataloader may have changed.
     num_update_steps_per_epoch = math.ceil(len(train_dataloader) / args.gradient_accumulation_steps)
     if overrode_max_train_steps:
最后一步是下载训练图像。理想情况下,我们会使用共享 NFS 文件夹,但为简单起见,我们将在每个节点上下载图像。请确保它们在所有节点上都位于相同的目录中 (/home/devcloud/dicoo)。
mkdir /home/devcloud/dicoo
cd /home/devcloud/dicoo
wget https://huggingface.co/sd-concepts-library/dicoo/resolve/main/concept_images/0.jpeg
wget https://huggingface.co/sd-concepts-library/dicoo/resolve/main/concept_images/1.jpeg
wget https://huggingface.co/sd-concepts-library/dicoo/resolve/main/concept_images/2.jpeg
wget https://huggingface.co/sd-concepts-library/dicoo/resolve/main/concept_images/3.jpeg
wget https://huggingface.co/sd-concepts-library/dicoo/resolve/main/concept_images/4.jpeg
以下是图像:


系统设置现已完成。接下来配置训练任务。
配置微调任务
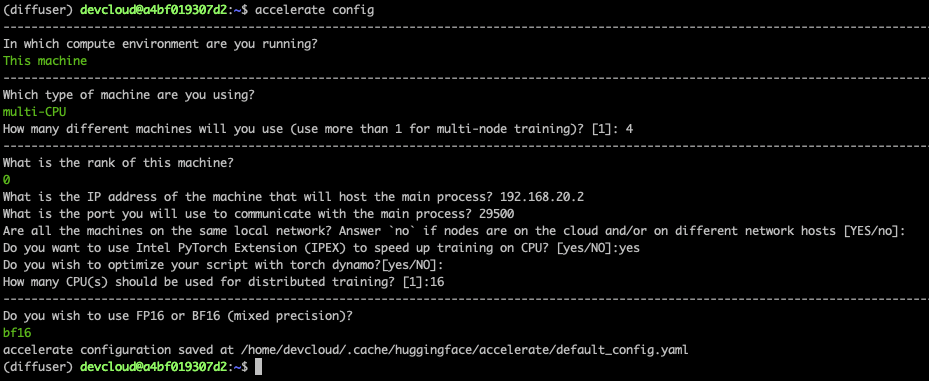
Accelerate 库使得运行分布式训练变得非常容易。我们只需要在每个节点上运行它并回答简单的问题即可。
以下是主节点的屏幕截图。在其他节点上,您需要将秩设置为 1、2 和 3。所有其他答案都相同。
最后,我们需要在主节点上设置环境。它将在微调任务启动时传播到其他节点。第一行设置了连接到所有节点运行的本地网络的网络接口名称。您可能需要使用 ifconfig 来获取适当的信息并进行调整。
export I_MPI_HYDRA_IFACE=ens786f1
oneccl_bindings_for_pytorch_path=$(python -c "from oneccl_bindings_for_pytorch import cwd; print(cwd)")
source $oneccl_bindings_for_pytorch_path/env/setvars.sh
export LD_PRELOAD=${LD_PRELOAD}:${CONDA_PREFIX}/lib/libiomp5.so
export LD_PRELOAD=${LD_PRELOAD}:${CONDA_PREFIX}/lib/libtcmalloc.so
export CCL_ATL_TRANSPORT=ofi
export CCL_WORKER_COUNT=1

export MODEL_NAME="runwayml/stable-diffusion-v1-5"
export DATA_DIR="/home/devcloud/dicoo"
现在我们可以启动微调任务了。
微调模型
我们使用 mpirun 启动微调任务,它在 nodefile 中列出的节点之间设置分布式通信。我们将运行 16 个任务 (-n),每个节点 4 个任务 (-ppn)。Accelerate 会自动在所有任务中设置分布式训练。
在这里,我们训练 200 步,这大约需要五分钟。
mpirun -f nodefile -n 16 -ppn 4                                                         \
accelerate launch diffusers/examples/textual_inversion/textual_inversion.py             \
--pretrained_model_name_or_path=$MODEL_NAME --train_data_dir=$DATA_DIR                  \
--learnable_property="object"   --placeholder_token="<dicoo>" --initializer_token="toy" \
--resolution=512  --train_batch_size=1  --seed=7  --gradient_accumulation_steps=1       \
--max_train_steps=200 --learning_rate=2.0e-03 --scale_lr --lr_scheduler="constant"     \
--lr_warmup_steps=0 --output_dir=./textual_inversion_output --mixed_precision bf16      \
--save_as_full_pipeline
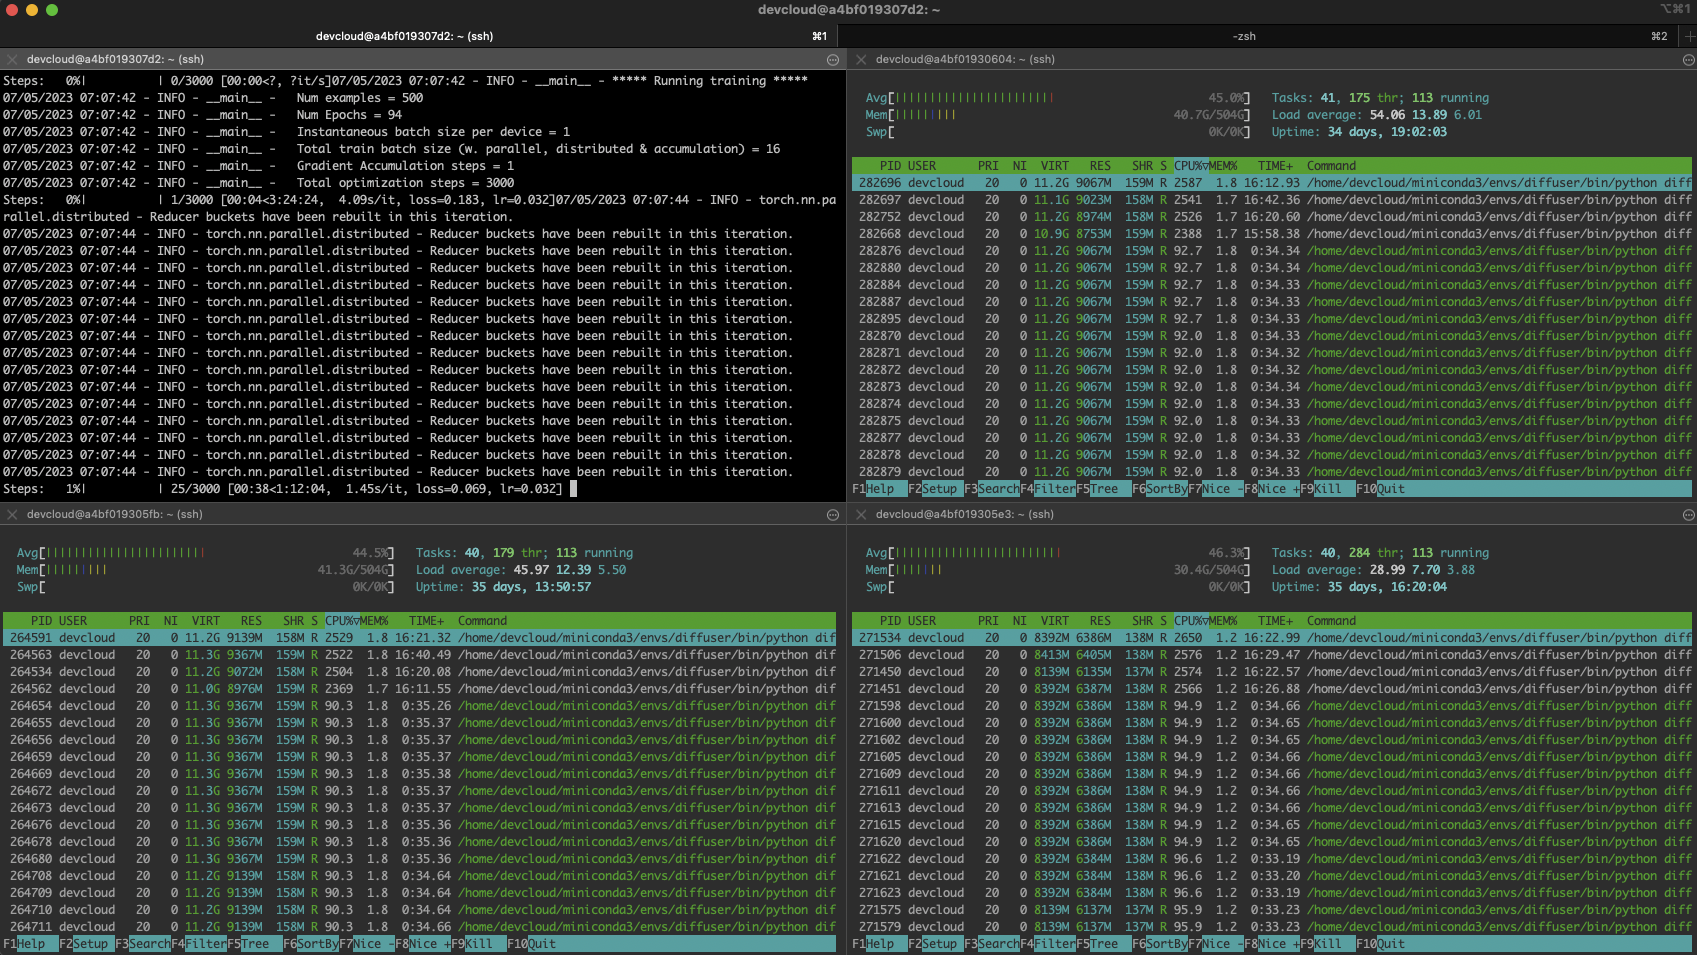
以下是繁忙集群的屏幕截图:
故障排除
分布式训练可能很棘手,尤其是对于新手来说。最可能的问题是单个节点上的细微配置错误:缺少依赖项、图像存储位置不同等等。
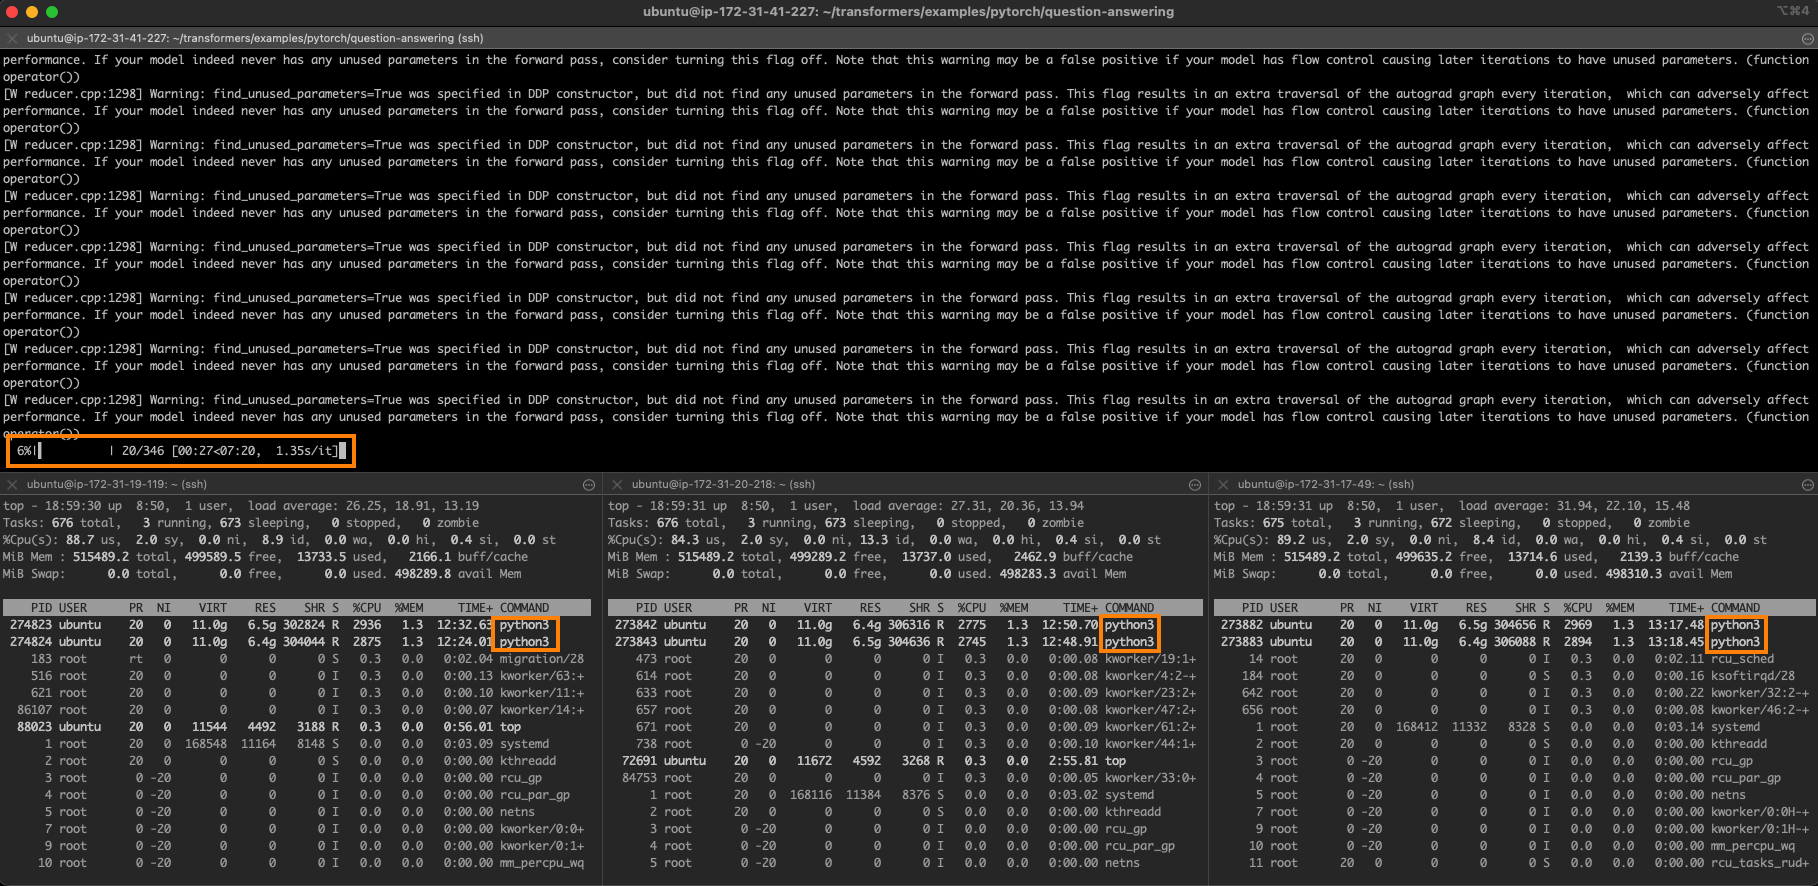
您可以通过登录每个节点并进行本地训练来快速找出问题所在。首先,设置与主节点相同的环境,然后运行:
python diffusers/examples/textual_inversion/textual_inversion.py                        \
--pretrained_model_name_or_path=$MODEL_NAME --train_data_dir=$DATA_DIR                  \
--learnable_property="object"   --placeholder_token="<dicoo>" --initializer_token="toy" \
--resolution=512  --train_batch_size=1  --seed=7  --gradient_accumulation_steps=1       \
--max_train_steps=200 --learning_rate=2.0e-03 --scale_lr --lr_scheduler="constant"     \
--lr_warmup_steps=0 --output_dir=./textual_inversion_output --mixed_precision bf16      \
--save_as_full_pipeline
如果训练成功启动,请停止它并转到下一个节点。如果所有节点上的训练都成功启动,请返回主节点并仔细检查节点文件、环境和 mpirun 命令。别担心,您会找到问题的 :)
使用微调模型生成图像
经过 5 分钟的训练,模型将保存在本地。我们可以使用普通的 diffusers 管道加载它并进行预测。相反,让我们使用 Optimum Intel 和 OpenVINO 来优化模型。如上一篇文章所述,这使您可以在不到 5 秒的时间内在单个 CPU 上生成图像!
pip install optimum[openvino]
在这里,我们加载模型,优化其静态形状,然后保存它。
from optimum.intel.openvino import OVStableDiffusionPipeline

model_id = "./textual_inversion_output"

ov_pipe = OVStableDiffusionPipeline.from_pretrained(model_id, export=True)
ov_pipe.reshape(batch_size=5, height=512, width=512, num_images_per_prompt=1)
ov_pipe.save_pretrained("./textual_inversion_output_ov")
然后,我们加载优化后的模型,生成五张不同的图像并保存它们。
from optimum.intel.openvino import OVStableDiffusionPipeline

model_id = "./textual_inversion_output_ov"

ov_pipe = OVStableDiffusionPipeline.from_pretrained(model_id, num_inference_steps=20)
prompt = ["a yellow <dicoo> robot at the beach, high quality"]*5
images = ov_pipe(prompt).images
print(images)
for idx,img in enumerate(images):
    img.save(f"image{idx}.png")
这是一张生成的图像。令人印象深刻的是,模型仅用了五张图像就学会了 dicoos 戴着眼镜!

如果您愿意,可以进一步微调模型。以下是经过 3000 步训练(大约一小时训练)的模型生成的精美示例。

结论
感谢 Hugging Face 和 Intel,您现在可以使用 Xeon CPU 服务器生成高质量、符合您业务需求的图像。与 GPU 等专用硬件相比,它们通常更经济实惠且更广泛可用。Xeon CPU 还可以轻松地重新用于其他生产任务,从 Web 服务器到数据库,使其成为 IT 基础设施的多功能灵活选择。
以下是一些资源可帮助您入门:
- Diffusers 文档
- Optimum Intel 文档
- Intel IPEX 在 GitHub 上
- Intel 和 Hugging Face 提供的开发人员资源。
- Intel Developer Cloud、AWS 和 GCP 上的 Sapphire Rapids 服务器。
如果您有任何问题或反馈,我们非常乐意在 Hugging Face 论坛上阅读。
感谢阅读!