智能体课程文档
构建你的第一个 LangGraph
并获得增强的文档体验
开始使用
构建你的第一个 LangGraph
现在我们已经了解了构建模块,让我们通过构建第一个功能图来将其付诸实践。我们将实现阿尔弗雷德的电子邮件处理系统,他需要:
- 读取传入的电子邮件
- 将其分类为垃圾邮件或合法邮件
- 为合法邮件起草初步回复
- 在合法时向韦恩先生发送信息(仅打印)
此示例演示了如何使用 LangGraph 构建涉及基于 LLM 的决策的工作流程。虽然这不能被视为一个 Agent,因为不涉及任何工具,但本节更侧重于学习 LangGraph 框架,而非 Agent。
我们的工作流程
这是我们将要构建的工作流程

设置我们的环境
首先,让我们安装所需的包
%pip install langgraph langchain_openai
接下来,我们导入必要的模块
import os
from typing import TypedDict, List, Dict, Any, Optional
from langgraph.graph import StateGraph, START, END
from langchain_openai import ChatOpenAI
from langchain_core.messages import HumanMessage
步骤 1:定义我们的状态
让我们定义阿尔弗雷德在电子邮件处理工作流程中需要跟踪的信息
class EmailState(TypedDict):
    # The email being processed
    email: Dict[str, Any]  # Contains subject, sender, body, etc.

    # Category of the email (inquiry, complaint, etc.)
    email_category: Optional[str]

    # Reason why the email was marked as spam
    spam_reason: Optional[str]

    # Analysis and decisions
    is_spam: Optional[bool]

    # Response generation
    email_draft: Optional[str]

    # Processing metadata
    messages: List[Dict[str, Any]]  # Track conversation with LLM for analysis
💡 提示:使你的状态足够全面以跟踪所有重要信息,但避免用不必要的细节使其膨胀。
步骤 2:定义我们的节点
现在,让我们创建将形成我们节点的处理函数
# Initialize our LLM
model = ChatOpenAI(temperature=0)

def read_email(state: EmailState):
    """Alfred reads and logs the incoming email"""
    email = state["email"]

    # Here we might do some initial preprocessing
    print(f"Alfred is processing an email from {email['sender']} with subject: {email['subject']}")

    # No state changes needed here
    return {}

def classify_email(state: EmailState):
    """Alfred uses an LLM to determine if the email is spam or legitimate"""
    email = state["email"]

    # Prepare our prompt for the LLM
    prompt = f"""
    As Alfred the butler, analyze this email and determine if it is spam or legitimate.

    Email:
    From: {email['sender']}
    Subject: {email['subject']}
    Body: {email['body']}

    First, determine if this email is spam. If it is spam, explain why.
    If it is legitimate, categorize it (inquiry, complaint, thank you, etc.).
    """

    # Call the LLM
    messages = [HumanMessage(content=prompt)]
    response = model.invoke(messages)

    # Simple logic to parse the response (in a real app, you'd want more robust parsing)
    response_text = response.content.lower()
    is_spam = "spam" in response_text and "not spam" not in response_text

    # Extract a reason if it's spam
    spam_reason = None
    if is_spam and "reason:" in response_text:
        spam_reason = response_text.split("reason:")[1].strip()

    # Determine category if legitimate
    email_category = None
    if not is_spam:
        categories = ["inquiry", "complaint", "thank you", "request", "information"]
        for category in categories:
            if category in response_text:
                email_category = category
                break

    # Update messages for tracking
    new_messages = state.get("messages", []) + [
        {"role": "user", "content": prompt},
        {"role": "assistant", "content": response.content}
    ]

    # Return state updates
    return {
        "is_spam": is_spam,
        "spam_reason": spam_reason,
        "email_category": email_category,
        "messages": new_messages
    }

def handle_spam(state: EmailState):
    """Alfred discards spam email with a note"""
    print(f"Alfred has marked the email as spam. Reason: {state['spam_reason']}")
    print("The email has been moved to the spam folder.")

    # We're done processing this email
    return {}

def draft_response(state: EmailState):
    """Alfred drafts a preliminary response for legitimate emails"""
    email = state["email"]
    category = state["email_category"] or "general"

    # Prepare our prompt for the LLM
    prompt = f"""
    As Alfred the butler, draft a polite preliminary response to this email.

    Email:
    From: {email['sender']}
    Subject: {email['subject']}
    Body: {email['body']}

    This email has been categorized as: {category}

    Draft a brief, professional response that Mr. Hugg can review and personalize before sending.
    """

    # Call the LLM
    messages = [HumanMessage(content=prompt)]
    response = model.invoke(messages)

    # Update messages for tracking
    new_messages = state.get("messages", []) + [
        {"role": "user", "content": prompt},
        {"role": "assistant", "content": response.content}
    ]

    # Return state updates
    return {
        "email_draft": response.content,
        "messages": new_messages
    }

def notify_mr_hugg(state: EmailState):
    """Alfred notifies Mr. Hugg about the email and presents the draft response"""
    email = state["email"]

    print("\n" + "="*50)
    print(f"Sir, you've received an email from {email['sender']}.")
    print(f"Subject: {email['subject']}")
    print(f"Category: {state['email_category']}")
    print("\nI've prepared a draft response for your review:")
    print("-"*50)
    print(state["email_draft"])
    print("="*50 + "\n")

    # We're done processing this email
    return {}
步骤 3:定义我们的路由逻辑
我们需要一个函数来确定分类后要走哪条路径
def route_email(state: EmailState) -> str:
    """Determine the next step based on spam classification"""
    if state["is_spam"]:
        return "spam"
    else:
        return "legitimate"
💡 注意:此路由函数由 LangGraph 调用,以确定分类节点后要遵循哪个边。返回值必须与我们条件边映射中的一个键匹配。
步骤 4:创建 StateGraph 并定义边
现在我们将所有内容连接起来
# Create the graph
email_graph = StateGraph(EmailState)

# Add nodes
email_graph.add_node("read_email", read_email)
email_graph.add_node("classify_email", classify_email)
email_graph.add_node("handle_spam", handle_spam)
email_graph.add_node("draft_response", draft_response)
email_graph.add_node("notify_mr_hugg", notify_mr_hugg)

# Start the edges
email_graph.add_edge(START, "read_email")
# Add edges - defining the flow
email_graph.add_edge("read_email", "classify_email")

# Add conditional branching from classify_email
email_graph.add_conditional_edges(
    "classify_email",
    route_email,
    {
        "spam": "handle_spam",
        "legitimate": "draft_response"
    }
)

# Add the final edges
email_graph.add_edge("handle_spam", END)
email_graph.add_edge("draft_response", "notify_mr_hugg")
email_graph.add_edge("notify_mr_hugg", END)

# Compile the graph
compiled_graph = email_graph.compile()
注意我们如何使用 LangGraph 提供的特殊 END 节点。这表示工作流程完成的终止状态。
步骤 5:运行应用程序
让我们用一封合法邮件和一封垃圾邮件来测试我们的图表
# Example legitimate email
legitimate_email = {
"sender": "john.smith@example.com",
"subject": "Question about your services",
"body": "Dear Mr. Hugg, I was referred to you by a colleague and I'm interested in learning more about your consulting services. Could we schedule a call next week? Best regards, John Smith"
}
# Example spam email
spam_email = {
"sender": "winner@lottery-intl.com",
"subject": "YOU HAVE WON $5,000,000!!!",
"body": "CONGRATULATIONS! You have been selected as the winner of our international lottery! To claim your $5,000,000 prize, please send us your bank details and a processing fee of $100."
}
# Process the legitimate email
print("\nProcessing legitimate email...")
legitimate_result = compiled_graph.invoke({
"email": legitimate_email,
"is_spam": None,
"spam_reason": None,
"email_category": None,
"email_draft": None,
"messages": []
})
# Process the spam email
print("\nProcessing spam email...")
spam_result = compiled_graph.invoke({
"email": spam_email,
"is_spam": None,
"spam_reason": None,
"email_category": None,
"email_draft": None,
"messages": []
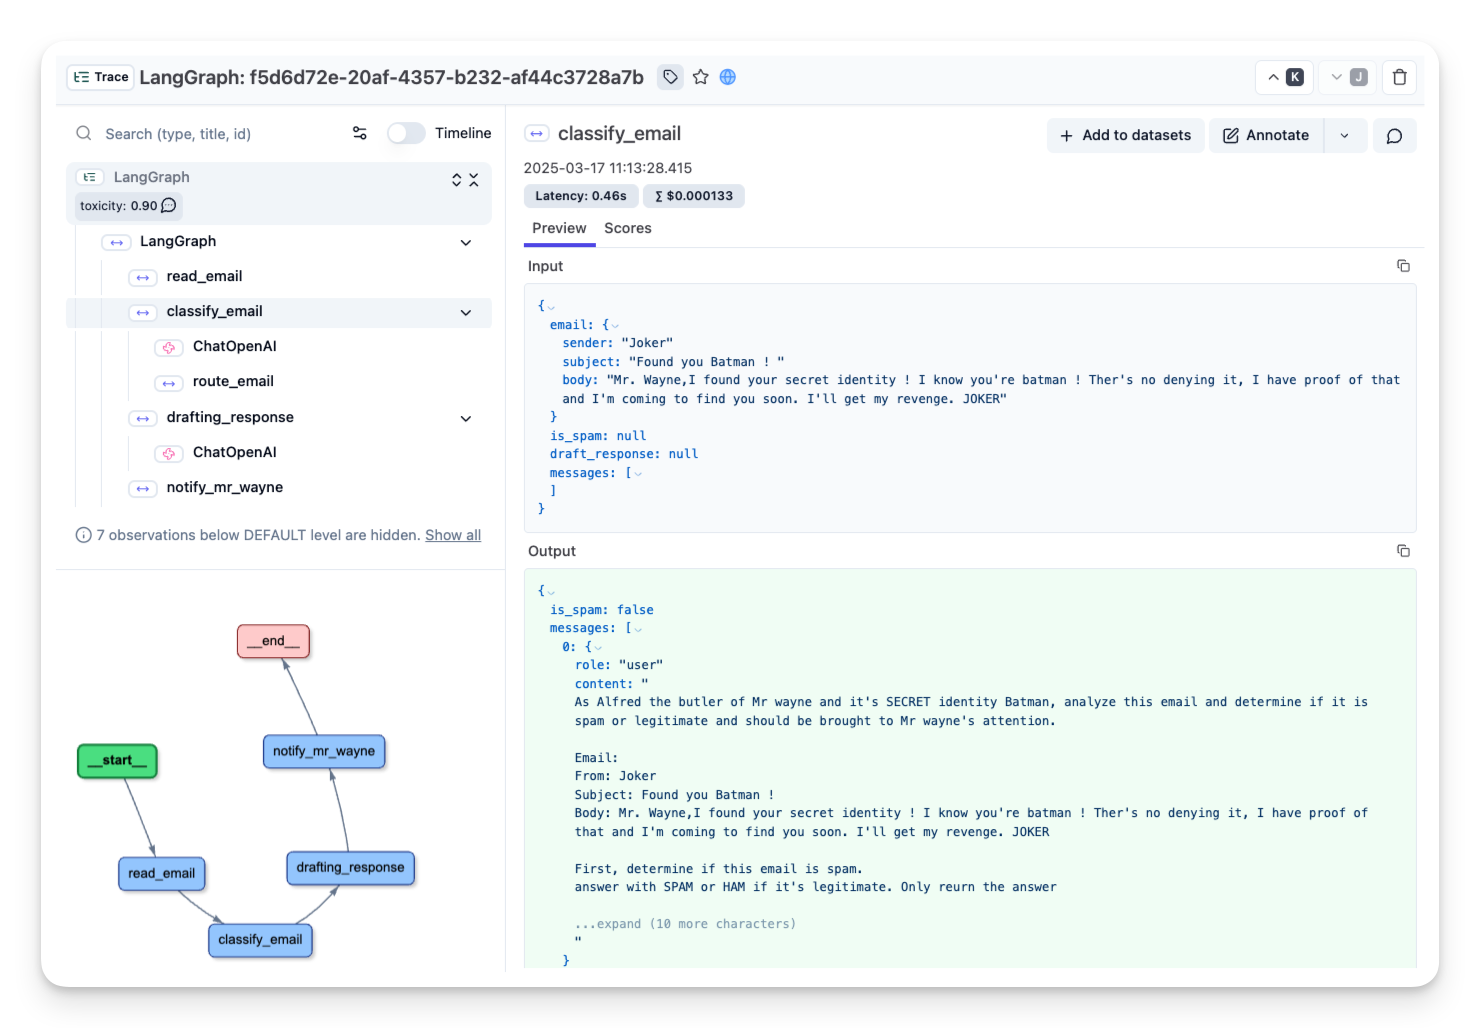
})步骤 6:使用 Langfuse 检查我们的邮件分类代理 📡
随着阿尔弗雷德对邮件分类代理进行微调,他越来越厌倦调试其运行。代理本质上是不可预测且难以检查的。但由于他旨在构建终极垃圾邮件检测代理并将其部署到生产环境中,他需要强大的可追溯性以用于未来的监控和分析。
为此,阿尔弗雷德可以使用像 Langfuse 这样的可观察性工具来跟踪和监控代理。
首先,我们使用 pip 安装 Langfuse
%pip install -q langfuse
其次,我们使用 pip 安装 Langchain(因为我们使用 LangFuse,所以需要 LangChain)
%pip install langchain
接下来,我们将 Langfuse API 密钥和主机地址添加为环境变量。你可以通过注册 Langfuse Cloud 或自托管 Langfuse 来获取你的 Langfuse 凭据。
import os

# Get keys for your project from the project settings page: https://cloud.langfuse.com
os.environ["LANGFUSE_PUBLIC_KEY"] = "pk-lf-..."
os.environ["LANGFUSE_SECRET_KEY"] = "sk-lf-..."
os.environ["LANGFUSE_HOST"] = "https://cloud.langfuse.com" # 🇪🇺 EU region
# os.environ["LANGFUSE_HOST"] = "https://us.cloud.langfuse.com" # 🇺🇸 US region
然后,我们配置 Langfuse callback_handler 并通过将 langfuse_callback 添加到图的调用中来检测代理:config={"callbacks": [langfuse_handler]}。
from langfuse.langchain import CallbackHandler

# Initialize Langfuse CallbackHandler for LangGraph/Langchain (tracing)
langfuse_handler = CallbackHandler()

# Process legitimate email
legitimate_result = compiled_graph.invoke(
    input={"email": legitimate_email, "is_spam": None, "spam_reason": None, "email_category": None, "draft_response": None, "messages": []},
    config={"callbacks": [langfuse_handler]}
)
阿尔弗雷德现在已连接 🔌!LangGraph 的运行日志正在 Langfuse 中记录,这让他能够完全了解代理的行为。有了这个设置,他就可以重新访问之前的运行并进一步完善他的邮件分类代理。
可视化我们的图
LangGraph 允许我们可视化我们的工作流程,以更好地理解和调试其结构
compiled_graph.get_graph().draw_mermaid_png()

这会生成一个可视化表示,显示我们的节点如何连接以及可以采取的条件路径。
我们构建了什么
我们创建了一个完整的电子邮件处理工作流程,它
- 接收一封传入的电子邮件
- 使用 LLM 将其分类为垃圾邮件或合法邮件
- 通过丢弃垃圾邮件来处理
- 对于合法邮件,起草回复并通知 Hugg 先生
这展示了 LangGraph 在协调复杂 LLM 工作流程的同时保持清晰、结构化流程的能力。
关键要点
- 状态管理:我们定义了全面的状态来跟踪电子邮件处理的所有方面
- 节点实现:我们创建了与 LLM 交互的功能节点
- 条件路由:我们根据电子邮件分类实现了分支逻辑
- 终止状态:我们使用 END 节点来标记工作流程中的完成点
接下来是什么?
在下一节中,我们将探索 LangGraph 更高级的功能,包括处理工作流程中的人机交互以及基于多个条件实现更复杂的路由逻辑。
< > 在 GitHub 上更新