Diffusers 文档
理解流水线、模型和调度器
并获得增强的文档体验
开始使用
理解流水线、模型和调度器
🧨 Diffusers 旨在成为一个用户友好且灵活的工具箱,用于构建适合您用例的扩散系统。该工具箱的核心是模型和调度器。虽然 DiffusionPipeline 为了方便将这些组件捆绑在一起,您也可以将流水线解绑,并单独使用模型和调度器来创建新的扩散系统。
在本教程中,您将学习如何使用模型和调度器来组装一个用于推理的扩散系统,从基本的流水线开始,然后逐步过渡到 Stable Diffusion 流水线。
解构基本流水线
流水线是运行模型进行推理的快速简便方法,只需四行代码即可生成图像
>>> from diffusers import DDPMPipeline

>>> ddpm = DDPMPipeline.from_pretrained("google/ddpm-cat-256", use_safetensors=True).to("cuda")
>>> image = ddpm(num_inference_steps=25).images[0]
>>> image
这真是太简单了,但是流水线是如何做到的呢?让我们分解一下流水线,看看幕后发生了什么。
在上面的示例中,流水线包含一个 UNet2DModel 模型和一个 DDPMScheduler。流水线通过将所需输出大小的随机噪声多次传递到模型中来对图像进行去噪。在每个时间步,模型预测*噪声残差*,调度器使用它来预测噪声较少的图像。流水线重复此过程,直到达到指定数量的推理步骤。
要使用模型和调度器单独重新创建流水线,让我们编写自己的去噪过程。
- 加载模型和调度器
>>> from diffusers import DDPMScheduler, UNet2DModel

>>> scheduler = DDPMScheduler.from_pretrained("google/ddpm-cat-256")
>>> model = UNet2DModel.from_pretrained("google/ddpm-cat-256", use_safetensors=True).to("cuda")- 设置去噪过程运行的时间步数
>>> scheduler.set_timesteps(50)- 设置调度器时间步会创建一个张量,其中包含均匀分布的元素,本示例中为 50 个。每个元素对应于模型对图像去噪的时间步。当您稍后创建去噪循环时,您将遍历此张量以对图像进行去噪
>>> scheduler.timesteps
tensor([980, 960, 940, 920, 900, 880, 860, 840, 820, 800, 780, 760, 740, 720,
    700, 680, 660, 640, 620, 600, 580, 560, 540, 520, 500, 480, 460, 440,
    420, 400, 380, 360, 340, 320, 300, 280, 260, 240, 220, 200, 180, 160,
140, 120, 100, 80, 60, 40, 20, 0])- 创建与所需输出形状相同的随机噪声
>>> import torch

>>> sample_size = model.config.sample_size
>>> noise = torch.randn((1, 3, sample_size, sample_size), device="cuda")- 现在编写一个循环来遍历时间步。在每个时间步,模型进行 UNet2DModel.forward() 前向传播并返回噪声残差。调度器的 step() 方法接收噪声残差、时间步和输入,并预测前一个时间步的图像。此输出将成为去噪循环中模型的下一个输入,并重复此过程直到达到 `timesteps` 数组的末尾。
>>> input = noise

>>> for t in scheduler.timesteps:
...     with torch.no_grad():
...         noisy_residual = model(input, t).sample
...     previous_noisy_sample = scheduler.step(noisy_residual, t, input).prev_sample
...     input = previous_noisy_sample
这就是整个去噪过程,您可以使用相同的模式编写任何扩散系统。
- 最后一步是将去噪输出转换为图像
>>> from PIL import Image
>>> import numpy as np

>>> image = (input / 2 + 0.5).clamp(0, 1).squeeze()
>>> image = (image.permute(1, 2, 0) * 255).round().to(torch.uint8).cpu().numpy()
>>> image = Image.fromarray(image)
>>> image
在下一节中,您将测试您的技能并分解更复杂的 Stable Diffusion 流水线。步骤或多或少相同。您将初始化必要的组件,并设置时间步数以创建 `timestep` 数组。`timestep` 数组用于去噪循环,对于此数组中的每个元素,模型预测噪声较少的图像。去噪循环遍历 `timestep`,在每个时间步,它输出一个噪声残差,调度器使用它来预测前一个时间步的噪声较少的图像。此过程重复直到您到达 `timestep` 数组的末尾。
让我们试试看!
解构 Stable Diffusion 流水线
Stable Diffusion 是一种文本到图像的*潜在扩散*模型。之所以称之为潜在扩散模型,是因为它处理图像的低维表示而不是实际的像素空间,这使其更节省内存。编码器将图像压缩成较小的表示,解码器将压缩的表示转换回图像。对于文本到图像模型,您需要一个分词器和一个编码器来生成文本嵌入。从前面的示例中,您已经知道需要一个 UNet 模型和一个调度器。
正如你所看到的,这比只包含 UNet 模型的 DDPM 流水线要复杂得多。Stable Diffusion 模型有三个独立的预训练模型。
💡 阅读Stable Diffusion 如何工作?博客,了解有关 VAE、UNet 和文本编码器模型如何工作的更多详细信息。
现在您知道 Stable Diffusion 流水线需要什么了,使用 from_pretrained() 方法加载所有这些组件。您可以在预训练的 stable-diffusion-v1-5/stable-diffusion-v1-5 检查点中找到它们,每个组件都存储在单独的子文件夹中
>>> from PIL import Image
>>> import torch
>>> from transformers import CLIPTextModel, CLIPTokenizer
>>> from diffusers import AutoencoderKL, UNet2DConditionModel, PNDMScheduler

>>> vae = AutoencoderKL.from_pretrained("CompVis/stable-diffusion-v1-4", subfolder="vae", use_safetensors=True)
>>> tokenizer = CLIPTokenizer.from_pretrained("CompVis/stable-diffusion-v1-4", subfolder="tokenizer")
>>> text_encoder = CLIPTextModel.from_pretrained(
...     "CompVis/stable-diffusion-v1-4", subfolder="text_encoder", use_safetensors=True
... )
>>> unet = UNet2DConditionModel.from_pretrained(
...     "CompVis/stable-diffusion-v1-4", subfolder="unet", use_safetensors=True
... )
与其使用默认的 PNDMScheduler,不如将其替换为 UniPCMultistepScheduler,看看插入不同的调度器有多容易
>>> from diffusers import UniPCMultistepScheduler

>>> scheduler = UniPCMultistepScheduler.from_pretrained("CompVis/stable-diffusion-v1-4", subfolder="scheduler")
为了加速推理,将模型移动到 GPU,因为与调度器不同,它们具有可训练的权重
>>> torch_device = "cuda"
>>> vae.to(torch_device)
>>> text_encoder.to(torch_device)
>>> unet.to(torch_device)
创建文本嵌入
下一步是分词文本以生成嵌入。文本用于条件化 UNet 模型,并引导扩散过程生成类似于输入提示的内容。
💡 `guidance_scale` 参数确定在生成图像时应给予提示多少权重。
如果您想生成其他内容,请随意选择您喜欢的任何提示!
>>> prompt = ["a photograph of an astronaut riding a horse"]
>>> height = 512  # default height of Stable Diffusion
>>> width = 512  # default width of Stable Diffusion
>>> num_inference_steps = 25  # Number of denoising steps
>>> guidance_scale = 7.5  # Scale for classifier-free guidance
>>> generator = torch.manual_seed(0)  # Seed generator to create the initial latent noise
>>> batch_size = len(prompt)
将文本分词并从提示生成嵌入
>>> text_input = tokenizer(
...     prompt, padding="max_length", max_length=tokenizer.model_max_length, truncation=True, return_tensors="pt"
... )

>>> with torch.no_grad():
...     text_embeddings = text_encoder(text_input.input_ids.to(torch_device))[0]
您还需要生成*无条件文本嵌入*,即填充标记的嵌入。它们需要与条件 `text_embeddings` 具有相同的形状(`batch_size` 和 `seq_length`)
>>> max_length = text_input.input_ids.shape[-1]
>>> uncond_input = tokenizer([""] * batch_size, padding="max_length", max_length=max_length, return_tensors="pt")
>>> uncond_embeddings = text_encoder(uncond_input.input_ids.to(torch_device))[0]
让我们将条件嵌入和无条件嵌入连接成一个批次,以避免进行两次前向传播
>>> text_embeddings = torch.cat([uncond_embeddings, text_embeddings])创建随机噪声
接下来,生成一些初始随机噪声作为扩散过程的起点。这是图像的潜在表示,它将逐渐去噪。此时,`latent` 图像小于最终图像大小,但这没关系,因为模型稍后会将其转换为最终的 512x512 图像尺寸。
💡 高度和宽度除以 8,因为 `vae` 模型有 3 个下采样层。您可以通过运行以下命令进行检查
2 ** (len(vae.config.block_out_channels) - 1) == 8>>> latents = torch.randn(
... (batch_size, unet.config.in_channels, height // 8, width // 8),
... generator=generator,
... device=torch_device,
... )图像去噪
首先使用初始噪声分布(即噪声尺度值 *sigma*)缩放输入,这是 UniPCMultistepScheduler 等改进型调度器所必需的
>>> latents = latents * scheduler.init_noise_sigma最后一步是创建去噪循环,它将逐步将 `latents` 中的纯噪声转换为由您的提示描述的图像。请记住,去噪循环需要完成三件事
- 设置调度器在去噪过程中使用的时间步。
- 遍历时间步。
- 在每个时间步,调用 UNet 模型预测噪声残差,并将其传递给调度器以计算前一个噪声样本。
>>> from tqdm.auto import tqdm

>>> scheduler.set_timesteps(num_inference_steps)

>>> for t in tqdm(scheduler.timesteps):
...     # expand the latents if we are doing classifier-free guidance to avoid doing two forward passes.
...     latent_model_input = torch.cat([latents] * 2)

...     latent_model_input = scheduler.scale_model_input(latent_model_input, timestep=t)

...     # predict the noise residual
...     with torch.no_grad():
...         noise_pred = unet(latent_model_input, t, encoder_hidden_states=text_embeddings).sample

...     # perform guidance
...     noise_pred_uncond, noise_pred_text = noise_pred.chunk(2)
...     noise_pred = noise_pred_uncond + guidance_scale * (noise_pred_text - noise_pred_uncond)

...     # compute the previous noisy sample x_t -> x_t-1
...     latents = scheduler.step(noise_pred, t, latents).prev_sample
解码图像
最后一步是使用 `vae` 将潜在表示解码为图像,并通过 `sample` 获取解码后的输出
# scale and decode the image latents with vae
latents = 1 / 0.18215 * latents
with torch.no_grad():
    image = vae.decode(latents).sample
最后,将图像转换为 `PIL.Image` 以查看您生成的图像!
>>> image = (image / 2 + 0.5).clamp(0, 1).squeeze()
>>> image = (image.permute(1, 2, 0) * 255).to(torch.uint8).cpu().numpy()
>>> image = Image.fromarray(image)
>>> image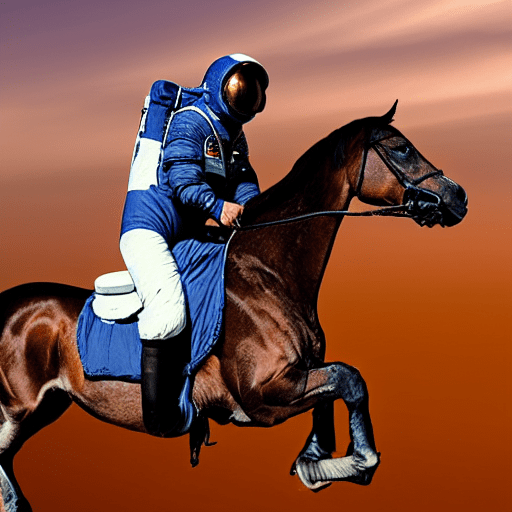
后续步骤
从基本流水线到复杂流水线,您已经看到,编写自己的扩散系统真正需要的只是一个去噪循环。该循环应设置调度器的时间步,遍历它们,并交替调用 UNet 模型预测噪声残差并将其传递给调度器以计算前一个噪声样本。
这正是 🧨 Diffusers 的设计初衷:让您能够直观轻松地使用模型和调度器编写自己的扩散系统。
接下来,您可以
< > 在 GitHub 上更新