开源 AI 食谱文档
多模态RAG:在消费级GPU上使用ColQwen2、Reranker和量化VLM
并获得增强的文档体验
开始使用
多模态RAG:在消费级GPU上使用ColQwen2、Reranker和量化VLM
作者: Sergio Paniego
在本笔记本中,我们将演示如何通过集成ColQwen2进行文档检索,MonoQwen2-VL-v0.1进行重排序,以及Qwen2-VL作为视觉语言模型(VLM)来构建一个多模态检索增强生成(RAG)系统。这些模型共同构成了一个强大的RAG系统,通过无缝结合基于文本的文档和视觉数据来增强查询响应。值得注意的是,由于集成了量化的VLM,本笔记本已针对在单个消费级GPU上使用进行了优化。
我们不依赖于复杂的基于OCR的文档处理管道,而是利用文档检索模型根据用户的查询高效地检索最相关的文档,从而使系统更具可扩展性和效率。
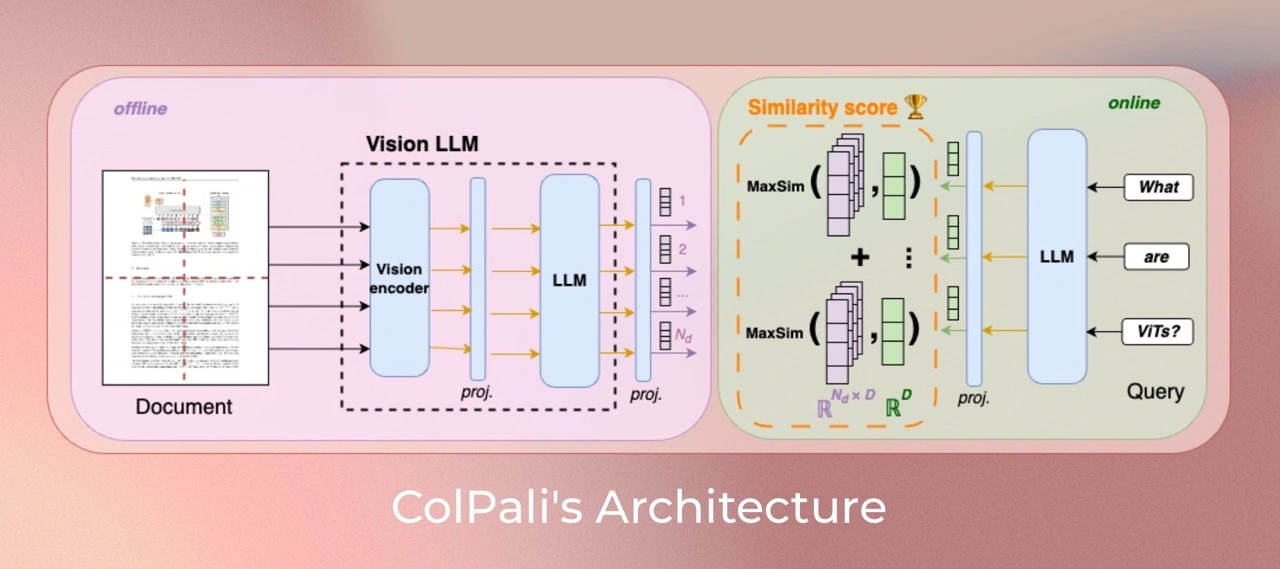
本笔记本建立在我们之前的指南《使用文档检索(ColPali)和视觉语言模型(VLM)的多模态检索增强生成(RAG)》中介绍的概念之上。如果您尚未阅读该笔记本,我们建议您在继续阅读本笔记本之前先阅读它。
在L4 GPU上测试。
此图灵感来自Aymeric Roucher在高级RAG或RAG评估教程中的工作。
1. 安装依赖项
让我们开始安装项目所需的基本库!🚀
!pip install -U -q byaldi pdf2image qwen-vl-utils transformers bitsandbytes peft
# Tested with byaldi==0.0.7, pdf2image==1.17.0, qwen-vl-utils==0.0.8, transformers==4.46.3!pip install -U -q rerankers[monovlm]
2. 加载数据集 📁
在本笔记本中,我们将使用来自世界数据(Our World in Data)的图表和地图,这是一个提供广泛数据和可视化开放访问的宝贵资源。具体来说,我们将重点关注预期寿命数据。
为了方便访问,我们已在以下数据集中整理了该数据的一小部分。
虽然我们从这个来源选择了一些示例用于演示目的,但在实际场景中,您可以处理更大规模的视觉数据集合,以进一步增强模型的能力。
引用
Saloni Dattani, Lucas Rodés-Guirao, Hannah Ritchie, Esteban Ortiz-Ospina and Max Roser (2023) - “Life Expectancy” Published online at OurWorldinData.org. Retrieved from: 'https://ourworldindata.org/life-expectancy' [Online Resource]from datasets import load_dataset
dataset = load_dataset("sergiopaniego/ourworldindata_example", split="train")下载视觉数据后,我们将将其本地保存,以便RAG(检索增强生成)系统稍后可以索引文件。这一步至关重要,因为它允许文档检索模型(ColQwen2)高效地处理和操作视觉内容。此外,我们将图像大小减小到448x448,以进一步减少内存消耗并确保更快的处理速度,这对于优化大规模操作的性能非常重要。
import os
from PIL import Image


def save_images_to_local(dataset, output_folder="data/"):
    os.makedirs(output_folder, exist_ok=True)

    for image_id, image_data in enumerate(dataset):
        image = image_data["image"]

        if isinstance(image, str):
            image = Image.open(image)

        image = image.resize((448, 448))

        output_path = os.path.join(output_folder, f"image_{image_id}.png")

        image.save(output_path, format="PNG")

        print(f"Image saved in: {output_path}")


save_images_to_local(dataset)
现在,让我们加载图片以探索数据并大致了解视觉内容。
import os
from PIL import Image


def load_png_images(image_folder):
    png_files = [f for f in os.listdir(image_folder) if f.endswith(".png")]
    all_images = {}

    for image_id, png_file in enumerate(png_files):
        image_path = os.path.join(image_folder, png_file)
        image = Image.open(image_path)
        all_images[image_id] = image

    return all_images


all_images = load_png_images("/content/data/")
让我们可视化一些样本,以了解数据的结构!这将帮助我们掌握将要处理的内容的格式和布局。👀
>>> import matplotlib.pyplot as plt

>>> fig, axes = plt.subplots(1, 5, figsize=(20, 15))

>>> for i, ax in enumerate(axes.flat):
...     img = all_images[i]
...     ax.imshow(img)
...     ax.axis("off")

>>> plt.tight_layout()
>>> plt.show()
3. 初始化ColQwen2多模态文档检索模型 🤖
现在数据集已准备就绪,我们将初始化文档检索模型,该模型将负责从原始图像中提取相关信息,并根据我们的查询提供适当的文档。
使用此模型,我们可以大大增强系统的对话能力。
对于此任务,我们将使用Byaldi。开发者将该库描述为:“Byaldi是RAGatouille的迷你姐妹项目。它是ColPali存储库的一个简单包装器,旨在使ColPALI等延迟交互多模态模型易于使用熟悉的API。”
在此项目中,我们将特别关注 ColQwen2。

此外,您可以访问ViDore(视觉文档检索基准),查看表现最佳的检索器。
首先,我们将从检查点加载模型。
from byaldi import RAGMultiModalModel

docs_retrieval_model = RAGMultiModalModel.from_pretrained("vidore/colqwen2-v1.0")
接下来,我们可以直接使用文档检索模型索引我们的文档,通过指定图像存储的文件夹。这将使模型能够处理和组织文档,以便根据我们的查询进行高效检索。
docs_retrieval_model.index(
    input_path="data/", index_name="image_index", store_collection_with_index=False, overwrite=True
)
4. 使用文档检索模型检索文档并使用重排序模型进行重排序 🤔
文档检索模型初始化完成后,我们可以通过提交用户查询并查看其检索到的相关文档来测试其能力。
模型将返回按与查询的相关性排名结果。接下来,我们将使用重排序器进一步增强检索管道。
我们来试试吧!
text_query = "How does the life expectancy change over time in France and South Africa?"

results = docs_retrieval_model.search(text_query, k=3)
results
现在,让我们检查模型已检索到的具体文档(图像)。这将使我们深入了解与查询相对应的视觉内容,并帮助我们理解模型如何选择相关信息。
def get_grouped_images(results, all_images):
    grouped_images = []

    for result in results:
        doc_id = result["doc_id"]
        page_num = result["page_num"]
        grouped_images.append(all_images[doc_id])
    return grouped_images


grouped_images = get_grouped_images(results, all_images)
让我们仔细看看检索到的文档,以便更好地理解它们包含的信息。这项检查将帮助我们评估内容与查询的相关性和质量。
>>> import matplotlib.pyplot as plt

>>> fig, axes = plt.subplots(1, 3, figsize=(15, 10))

>>> for i, ax in enumerate(axes.flat):
...     img = grouped_images[i]
...     ax.imshow(img)
...     ax.axis("off")

>>> plt.tight_layout()
>>> plt.show()
如您所见,检索到的文档与查询相关,因为它们包含相关数据。
现在,让我们初始化我们的重排序模型。为此,我们将使用rerankers模块。
from rerankers import Reranker

ranker = Reranker("monovlm", device="cuda")
重排序器需要图像为base64格式,因此我们先将图像转换,然后再进行重排序。
import base64
from io import BytesIO


def images_to_base64(images):
    base64_images = []
    for img in images:
        buffer = BytesIO()
        img.save(buffer, format="JPEG")
        buffer.seek(0)

        img_base64 = base64.b64encode(buffer.getvalue()).decode("utf-8")
        base64_images.append(img_base64)

    return base64_images


base64_list = images_to_base64(grouped_images)
我们再次将`text_query`和图像列表传递给重排序器,以便它可以增强检索到的上下文。这次,我们只返回1个文档,而不是之前检索到的3个文档。如果您查看结果,您会发现模型将大部分分数分配给一张图像,从而改善了之前迭代的排名。
results = ranker.rank(text_query, base64_list)
>>> def process_ranker_results(results, grouped_images, top_k=3, log=False):
...     new_grouped_images = []
...     for i, doc in enumerate(results.top_k(top_k)):
...         if log:
...             print(f"Rank {i}:")
...             print("Document ID:", doc.doc_id)
...             print("Document Score:", doc.score)
...             print("Document Base64:", doc.base64[:30] + "...")
...             print("Document Path:", doc.image_path)
...         new_grouped_images.append(grouped_images[doc.doc_id])
...     return new_grouped_images


>>> new_grouped_images = process_ranker_results(results, grouped_images, top_k=1, log=True)
Rank 0: Document ID: 0 Document Score: 0.99609375 Document Base64: /9j/4AAQSkZJRgABAQAAAQABAAD/2w... Document Path: None
之后,我们就可以加载 VLM 并生成对用户查询的响应了!
5. 初始化用于问答的视觉语言模型 🙋
接下来,我们将初始化用于问答的视觉语言模型(VLM)。为此,我们将使用 Qwen2_VL。

请在此处查看排行榜here,了解Open VLM的最新进展。
首先,我们将从预训练检查点加载模型,并将其移动到GPU以获得最佳性能。您可以在此处找到该模型。
在本笔记本中,我们使用模型的量化版本来优化内存使用和处理速度,这在消费级GPU上运行时尤为重要。通过使用量化版本,我们减少了模型的内存占用,提高了其效率,同时保持了手头任务的性能。
from transformers import Qwen2VLForConditionalGeneration, Qwen2VLProcessor, BitsAndBytesConfig
from qwen_vl_utils import process_vision_info
import torch

# BitsAndBytesConfig int-4 config
bnb_config = BitsAndBytesConfig(
    load_in_4bit=True, bnb_4bit_use_double_quant=True, bnb_4bit_quant_type="nf4", bnb_4bit_compute_dtype=torch.bfloat16
)

# Load model and tokenizer
vl_model = Qwen2VLForConditionalGeneration.from_pretrained(
    "Qwen/Qwen2-VL-7B-Instruct", device_map="auto", torch_dtype=torch.bfloat16, quantization_config=bnb_config
)
vl_model.eval()
接下来,我们将初始化视觉语言模型 (VLM) 处理器。在此步骤中,我们指定最小和最大像素大小,以优化图像如何适应 GPU 内存。像素尺寸越大,消耗的内存就越多,因此找到一个平衡点以确保最佳性能而不会使 GPU 过载非常重要。
有关如何优化图像分辨率以提高性能的更多详细信息,您可以参阅此处的文档。
min_pixels = 224 * 224
max_pixels = 448 * 448
vl_model_processor = Qwen2VLProcessor.from_pretrained(
    "Qwen/Qwen2-VL-7B-Instruct", min_pixels=min_pixels, max_pixels=max_pixels
)
6. 组装VLM模型并测试系统 🔧
所有组件加载完毕后,我们就可以组装系统进行测试了。首先,我们将通过向系统提供检索到的图像和用户查询来设置聊天结构。此步骤具有高度可定制性,可以灵活地根据您的需求调整交互,并允许尝试不同的输入和输出。
chat_template = [
    {
        "role": "user",
        "content": [
            {
                "type": "image",
                "image": new_grouped_images[0],
            },
            {"type": "text", "text": text_query},
        ],
    }
]
现在,让我们应用此聊天模板来设置系统,以便与模型进行交互。
text = vl_model_processor.apply_chat_template(chat_template, tokenize=False, add_generation_prompt=True)接下来,我们将处理输入,以确保它们已正确格式化并准备好与视觉语言模型 (VLM) 一起使用。此步骤对于使模型能够根据提供的数据生成准确的响应至关重要。
image_inputs, _ = process_vision_info(chat_template)
inputs = vl_model_processor(
    text=[text],
    images=image_inputs,
    padding=True,
    return_tensors="pt",
)
inputs = inputs.to("cuda")
现在我们可以生成答案了!让我们看看系统如何使用处理后的输入,根据用户查询和检索到的图像提供响应。
generated_ids = vl_model.generate(**inputs, max_new_tokens=500)模型生成输出后,我们对其进行后处理以生成最终答案。
generated_ids_trimmed = [out_ids[len(in_ids) :] for in_ids, out_ids in zip(inputs.input_ids, generated_ids)]
output_text = vl_model_processor.batch_decode(
    generated_ids_trimmed, skip_special_tokens=True, clean_up_tokenization_spaces=False
)>>> print(output_text[0])The life expectancy in France has increased over time, while the life expectancy in South Africa has decreased over time.
7. 大功告成! 🧑🏭️
现在,让我们创建一个包含整个管道的方法,以便将来可以轻松地重复使用它。
def answer_with_multimodal_rag(
    vl_model,
    docs_retrieval_model,
    vl_model_processor,
    grouped_images,
    text_query,
    retrival_top_k,
    reranker_top_k,
    max_new_tokens,
):
    results = docs_retrieval_model.search(text_query, k=retrival_top_k)
    grouped_images = get_grouped_images(results, all_images)

    base64_list = images_to_base64(grouped_images)
    results = ranker.rank(text_query, base64_list)
    grouped_images = process_ranker_results(results, grouped_images, top_k=reranker_top_k)

    chat_template = [
        {
            "role": "user",
            "content": [{"type": "image", "image": image} for image in grouped_images]
            + [{"type": "text", "text": text_query}],
        }
    ]

    # Prepare the inputs
    text = vl_model_processor.apply_chat_template(chat_template, tokenize=False, add_generation_prompt=True)
    image_inputs, video_inputs = process_vision_info(chat_template)
    inputs = vl_model_processor(
        text=[text],
        images=image_inputs,
        padding=True,
        return_tensors="pt",
    )
    inputs = inputs.to("cuda")

    # Generate text from the vl_model
    generated_ids = vl_model.generate(**inputs, max_new_tokens=max_new_tokens)
    generated_ids_trimmed = [out_ids[len(in_ids) :] for in_ids, out_ids in zip(inputs.input_ids, generated_ids)]

    # Decode the generated text
    output_text = vl_model_processor.batch_decode(
        generated_ids_trimmed, skip_special_tokens=True, clean_up_tokenization_spaces=False
    )

    return output_text
让我们看看完整的 RAG 系统是如何运行的!
>>> output_text = answer_with_multimodal_rag(
...     vl_model=vl_model,
...     docs_retrieval_model=docs_retrieval_model,
...     vl_model_processor=vl_model_processor,
...     grouped_images=grouped_images,
...     text_query="What is the overall trend in life expectancy across different countries and regions?",
...     retrival_top_k=3,
...     reranker_top_k=1,
...     max_new_tokens=500,
... )
>>> print(output_text[0])
The overall trend in life expectancy across different countries and regions is an increase over time.
>>> import torch

>>> torch.cuda.empty_cache()
>>> torch.cuda.synchronize()
>>> print(f"GPU allocated memory: {torch.cuda.memory_allocated() / 1024**3:.2f} GB")
>>> print(f"GPU reserved memory: {torch.cuda.memory_reserved() / 1024**3:.2f} GB")
GPU allocated memory: 13.93 GB GPU reserved memory: 14.59 GB
🏆 我们现在拥有一个功能齐全的RAG管道,它集成了文档检索模型和视觉语言模型,并经过优化,可在单个消费级GPU上运行!这种强大的组合使我们能够根据用户查询和相关文档生成富有洞察力的响应。
此外,我们还实施了重新排序步骤,以进一步完善文档检索过程,提高结果的相关性并增强系统的整体性能。
8. 继续旅程 🧑🎓️
如果您渴望继续探索,请务必查看我们之前指南《使用文档检索(ColPali)和视觉语言模型(VLM)的多模态检索增强生成(RAG)》结论中的结果和见解。这是深入了解多模态RAG系统的绝佳下一步!
< > 在 GitHub 上更新