google-cloud 文档
在 Vertex AI 上使用 TGI DLC 部署 Meta Llama 3.1 405B
并获得增强的文档体验
开始使用
在 Vertex AI 上使用 TGI DLC 部署 Meta Llama 3.1 405B
Meta Llama 3.1 是 Meta 最新的开源 LLM,是 Llama 3 的后续迭代版本,于 2024 年 7 月发布。Meta Llama 3.1 提供了三种尺寸:8B 用于在消费级 GPU 上高效部署和开发;70B 用于大规模 AI 原生应用;405B 用于合成数据、作为裁判的 LLM 或蒸馏等用例。Meta Llama 3.1 的新功能亮点包括:128K 令牌的超大上下文长度(原版为 8K)、多语言能力、工具使用能力和更宽松的许可证。
本示例展示了如何通过 Hugging Face 专为文本生成推理 (TGI) 在 Google Cloud 上构建的深度学习容器 (DLC),将 meta-llama/Meta-Llama-3.1-405B-Instruct-FP8 部署到 Vertex AI 上,使用配备 8 个 NVIDIA H100 的 A3 加速器优化实例。
设置/配置
首先,您需要在本地机器上安装 `gcloud`,它是 Google Cloud 的命令行工具,请按照 Cloud SDK 文档 - 安装 gcloud CLI 中的说明进行操作。
然后,您还需要安装 google-cloud-aiplatform Python SDK,这是以编程方式创建 Vertex AI 模型、注册模型、创建端点并在 Vertex AI 上部署模型所需的。
!pip install --upgrade --quiet google-cloud-aiplatform
或者,为了简化本教程中命令的使用,您需要为 GCP 设置以下环境变量
%env PROJECT_ID=your-project-id
%env LOCATION=your-location
%env CONTAINER_URI=us-docker.pkg.dev/deeplearning-platform-release/gcr.io/huggingface-text-generation-inference-cu124.2-3.ubuntu2204.py311
然后您需要登录您的 GCP 帐户,并将项目 ID 设置为您想要用于在 Vertex AI 上注册和部署模型的项目 ID。
!gcloud auth login
!gcloud auth application-default login  # For local development
!gcloud config set project $PROJECT_ID
登录后,您需要启用 GCP 中必要的服务 API,例如 Vertex AI API、Compute Engine API 和 Google Container Registry 相关 API。
!gcloud services enable aiplatform.googleapis.com
!gcloud services enable compute.googleapis.com
!gcloud services enable container.googleapis.com
!gcloud services enable containerregistry.googleapis.com
!gcloud services enable containerfilesystem.googleapis.com
设置完成后,您可以通过 `google-cloud-aiplatform` Python SDK 初始化 Vertex AI 会话,如下所示:
import os
from google.cloud import aiplatform

aiplatform.init(
    project=os.getenv("PROJECT_ID"),
    location=os.getenv("LOCATION"),
)
Google Cloud 上的配额
要提供 meta-llama/Meta-Llama-3.1-405B-Instruct-FP8 服务,您需要一个至少 400GiB GPU VRAM 且支持 FP8 数据类型的实例,Google Cloud 上的 A3 加速器优化机器是您需要使用的机器。
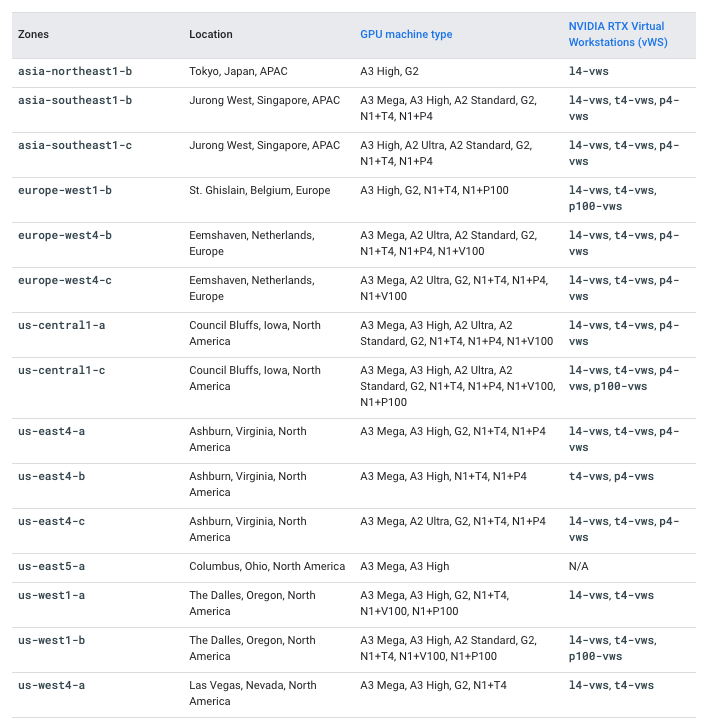
即使 Google Cloud 上有配备 8 个 NVIDIA H100 80GB GPU 的 A3 加速器优化机器,您仍然需要请求 Google Cloud 提高自定义配额,因为这些机器需要特定审批。请注意,A3 加速器优化机器仅在某些区域可用,因此请务必在 Compute Engine - GPU 区域和可用区 中查看每个区域 A3 High 甚至 A3 Mega 的可用性。
在这种情况下,要请求增加配额以使用配备 8 个 NVIDIA H100 的机器,您需要增加以下配额
服务:Vertex AI API和名称:自定义模型服务 Nvidia H100 80GB GPU 每区域设置为 8服务:Vertex AI API和名称:自定义模型服务 A3 CPU 每区域设置为 208
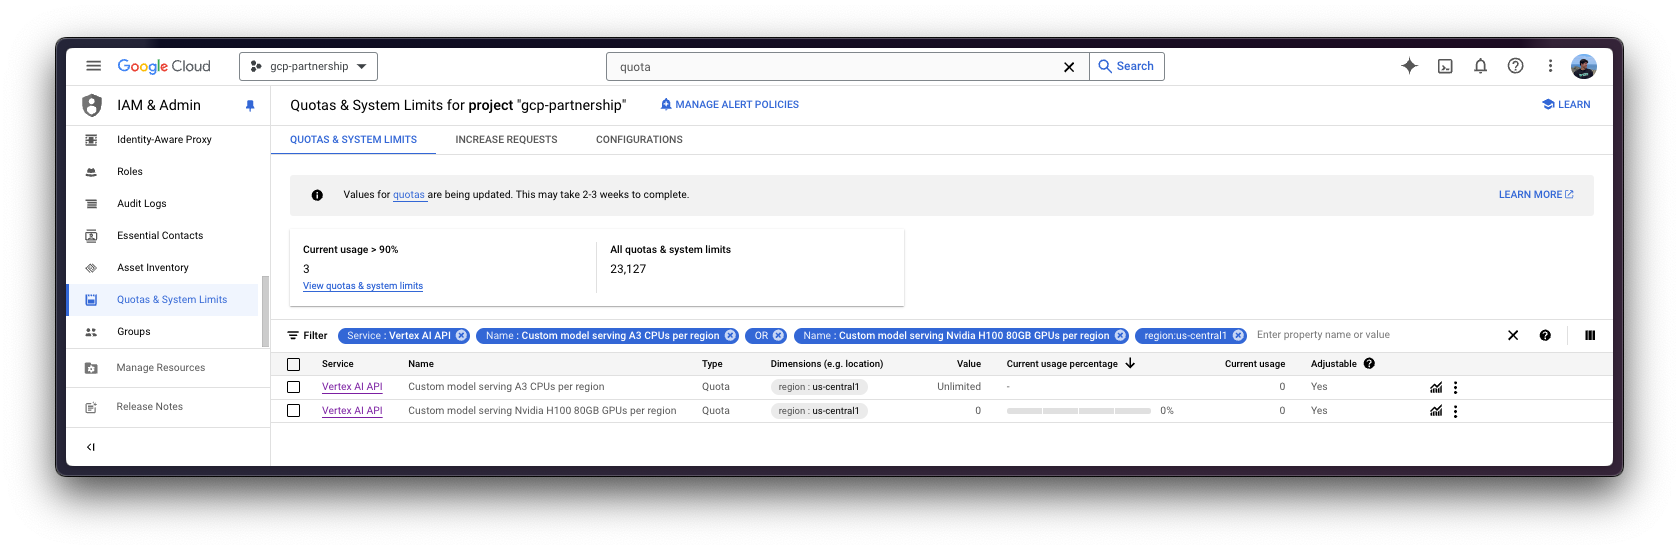
有关如何请求增加配额的更多信息,请参阅 Google Cloud 文档 - 查看和管理配额。
在 Vertex AI 上注册模型
由于 `meta-llama/Meta-Llama-3.1-405B-Instruct-FP8` 是一个受限模型,您需要登录到 Hugging Face Hub 账户,接受受限要求,然后生成一个访问令牌,该令牌可以仅对受限模型具有细粒度读取权限(推荐),或者对您的账户具有读取权限。
阅读更多关于 Hugging Face Hub 访问令牌的信息。
要进行身份验证,您可以使用以下所示的 `huggingface_hub` Python SDK(推荐),或者直接设置环境变量 `HF_TOKEN`。
!pip install --upgrade --quiet huggingface_hub
from huggingface_hub import interpreter_login

interpreter_login()
然后您就可以“上传”模型,即在 Vertex AI 上注册模型。这本身并不是上传,因为模型将通过 `MODEL_ID` 环境变量在启动时从 Hugging Face Hub 的 Hugging Face DLC 中自动下载,所以上传的只是配置,而不是模型权重。
在深入代码之前,我们先快速回顾一下提供给 upload 方法的参数
display_name是将在 Vertex AI 模型注册表中显示的名称。serving_container_image_uri是将用于服务模型的 Hugging Face DLC for TGI 的位置。- `serving_container_environment_variables` 是容器运行时将使用的环境变量,因此这些变量与 TGI 通过 `text-generation-launcher` 定义的环境变量对齐,后者暴露了一些环境变量,例如以下内容
MODEL_IDHugging Face Hub 上的模型 ID。NUM_SHARD要使用的分片数量,即要使用的 GPU 数量,在本例中设置为 8,因为将使用一个包含 8 个 NVIDIA H100 的节点。HUGGING_FACE_HUB_TOKEN是 Hugging Face Hub 令牌,由于meta-llama/Meta-Llama-3.1-405B-Instruct-FP8是一个门控模型,因此需要它。HF_HUB_ENABLE_HF_TRANSFER用于通过 `hf_transfer` 库启用更快的下载速度。
有关支持的参数的更多信息,请查阅 `aiplatform.Model.upload` Python 参考文档。
从 TGI 2.3 DLC 开始,即 `us-docker.pkg.dev/deeplearning-platform-release/gcr.io/huggingface-text-generation-inference-cu124.2-3.ubuntu2204.py311` 及更高版本,您可以将环境变量 `MESSAGES_API_ENABLED` 设置为 `"true"` 以在 Vertex AI 上部署 Messages API,否则将部署 Generate API。
from huggingface_hub import get_token

model = aiplatform.Model.upload(
    display_name="meta-llama--Meta-Llama-3.1-405B-Instruct-FP8",
    serving_container_image_uri="",
    serving_container_environment_variables={
        "MODEL_ID": "meta-llama/Meta-Llama-3.1-405B-Instruct-FP8",
        "HUGGING_FACE_HUB_TOKEN": get_token(),
        "HF_HUB_ENABLE_HF_TRANSFER": "1",
        "NUM_SHARD": "8",
    },
)
model.wait()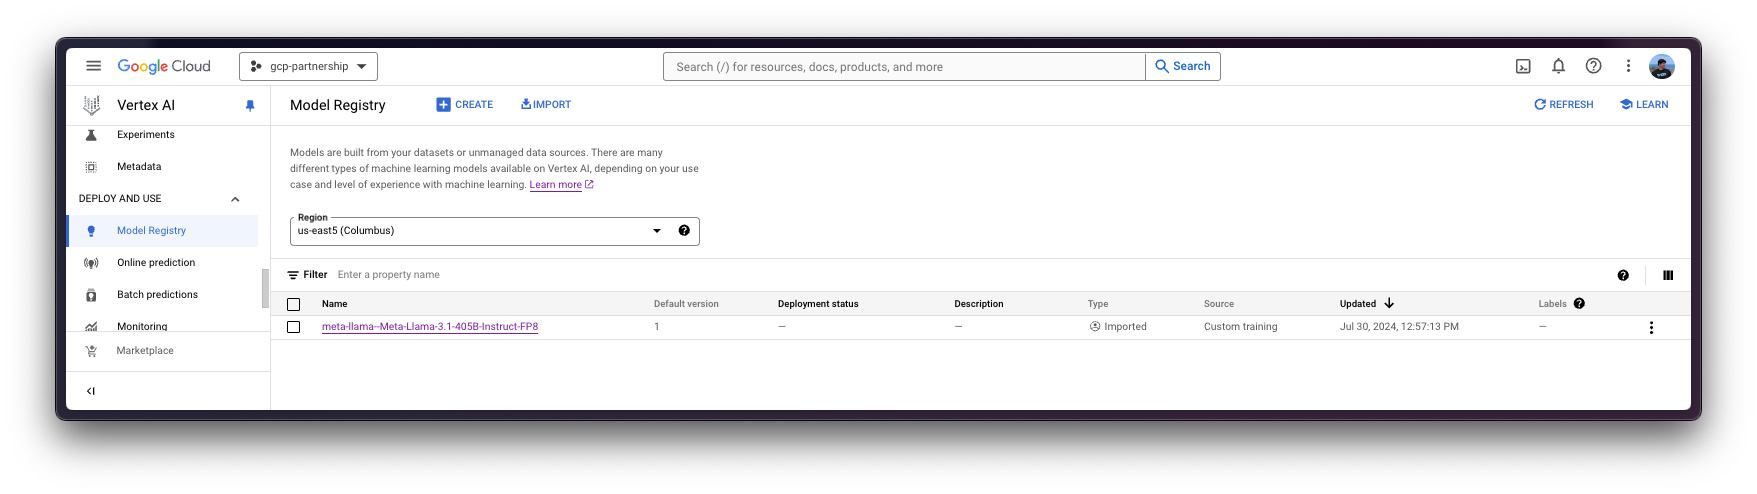
在 Vertex AI 上部署模型
一旦 Meta Llama 3.1 405B 在 Vertex AI 模型注册表中注册,您就可以在 Vertex AI 端点上使用 Hugging Face 的 TGI DLC 部署它。
deploy 方法会将之前创建的端点资源与包含服务容器配置的模型链接起来,然后将其部署到指定实例的 Vertex AI 上。
在深入代码之前,我们先快速回顾一下提供给 deploy 方法的参数
endpoint是要将模型部署到的端点,它是可选的,默认情况下将设置为模型显示名称加上_endpoint后缀。- `machine_type`、`accelerator_type` 和 `accelerator_count` 是定义要使用的实例、加速器以及加速器数量的参数。`machine_type` 和 `accelerator_type` 是相互关联的,因此您需要选择一个支持您正在使用的加速器的实例,反之亦然。有关不同实例的更多信息,请参阅 Compute Engine 文档 - GPU 机器类型,有关 `accelerator_type` 命名方式的更多信息,请参阅 Vertex AI 文档 - MachineSpec。
有关支持参数的更多信息,您可以查看 `aiplatform.Model.deploy` Python 参考文档。
如前所述,由于 FP8 中的 Meta Llama 3.1 405B 占用约 400 GiB 的磁盘空间,这意味着您需要至少 400 GiB 的 GPU VRAM 来加载模型,并且节点中的 GPU 需要支持 FP8 数据类型。在这种情况下,将使用一个配备 8 个 NVIDIA H100 80GB GPU 的 A3 实例,总计约 640 GiB VRAM,用于加载模型,同时为 KV 缓存和 CUDA 图留下一些空闲 VRAM。
deployed_model = model.deploy(
    endpoint=aiplatform.Endpoint.create(display_name="Meta-Llama-3.1-405B-FP8-Endpoint"),
    machine_type="a3-highgpu-8g",
    accelerator_type="NVIDIA_H100_80GB",
    accelerator_count=8,
    enable_access_logging=True,
)
`meta-llama/Meta-Llama-3.1-405B-Instruct-FP8` 在 Vertex AI 上的部署大约需要 30 分钟,因为它需要先在 Google Cloud 上分配资源,然后从 Hugging Face Hub 下载权重(约 10 分钟),并加载这些权重进行 TGI 推理(约 3 分钟)。
Vertex AI 上的在线预测
最后,您可以使用 `predict` 方法在 Vertex AI 上运行在线预测,该方法会将请求发送到容器中指定的 `/predict` 路由的运行端点,并遵循 Vertex AI I/O 负载格式。
由于 `/generate` 是通过 Vertex AI 上的 TGI 暴露的端点,因此您需要在将请求发送到 Vertex AI 之前使用聊天模板格式化消息,所以您需要安装 🤗`transformers` 来使用 `PreTrainedTokenizerFast` 中的 `apply_chat_template` 方法。
%%bash
pip install --upgrade --quiet transformers
然后使用分词器将聊天模板应用于对话,如下所示:
import os
from huggingface_hub import get_token
from transformers import AutoTokenizer

tokenizer = AutoTokenizer.from_pretrained(
    "meta-llama/Meta-Llama-3.1-405B-Instruct-FP8",
    token=get_token(),
)

messages = [
    {"role": "system", "content": "You are an assistant that responds as a pirate."},
    {"role": "user", "content": "What's the Theory of Relativity?"},
]
inputs = tokenizer.apply_chat_template(
    messages,
    tokenize=False,
    add_generation_prompt=True,
)
# <|begin_of_text|><|start_header_id|>system<|end_header_id|>\n\nYou are an assistant that responds as a pirate.<|eot_id|><|start_header_id|>user<|end_header_id|>\n\nWhat's the Theory of Relativity?<|eot_id|><|start_header_id|>assistant<|end_header_id|>\n\n
这就是您将作为负载发送到已部署的 Vertex AI 端点的内容,以及生成参数,如 消耗文本生成推理 (TGI) -> 生成 中所述。
通过 Python
在同一会话中
如果您希望在当前会话中运行在线预测,可以通过 aiplatform.Endpoint(由 aiplatform.Model.deploy 方法返回)以编程方式发送请求,如下所示
output = deployed_model.predict(
    instances=[
        {
            "inputs": "<|begin_of_text|><|start_header_id|>system<|end_header_id|>\n\nYou are an assistant that responds as a pirate.<|eot_id|><|start_header_id|>user<|end_header_id|>\n\nWhat's the Theory of Relativity?<|eot_id|><|start_header_id|>assistant<|end_header_id|>\n\n",
            "parameters": {
                "max_new_tokens": 128,
                "do_sample": True,
                "top_p": 0.95,
                "temperature": 1.0,
            },
        },
    ]
)
print(output.predictions[0])
生成以下 output
Prediction(predictions=["Yer want ta know about them fancy science things, eh? Alright then, matey, settle yerself down with a pint o' grog and listen close. I be tellin' ye about the Theory o' Relativity, as proposed by that swashbucklin' genius, Albert Einstein.\n\nNow, ye see, Einstein said that time and space be connected like the sea and the wind. Ye can't have one without the other, savvy? And he proposed that how ye see time and space depends on how fast ye be movin' and where ye be standin'. That be called relativity, me"], deployed_model_id='***', metadata=None, model_version_id='1', model_resource_name='projects/***/locations/us-central1/models/***', explanations=None)从不同会话中
如果在不同的会话中部署了 Vertex AI 端点,并且您想使用它,但无法访问 `aiplatform.Model.deploy` 方法返回的 `deployed_model` 变量(如上一节所示),您也可以运行以下代码段,通过其资源名称(`projects/{PROJECT_ID}/locations/{LOCATION}/endpoints/{ENDPOINT_ID}`)实例化已部署的 `aiplatform.Endpoint`。
您需要通过 Google Cloud Console 自行检索资源名称,即 `projects/{PROJECT_ID}/locations/{LOCATION}/endpoints/{ENDPOINT_ID}` URL,或者直接替换下面的 `ENDPOINT_ID`,该 ID 可以通过之前实例化的 `endpoint`(即 `endpoint.id`)或通过 Google Cloud Console 中列出端点的在线预测部分找到。
import os
from google.cloud import aiplatform

aiplatform.init(project=os.getenv("PROJECT_ID"), location=os.getenv("LOCATION"))

endpoint_display_name = "Meta-Llama-3.1-405B-FP8-Endpoint"  # TODO: change to your endpoint display name

# Iterates over all the Vertex AI Endpoints within the current project and keeps the first match (if any), otherwise set to None
ENDPOINT_ID = next(
    (endpoint.name for endpoint in aiplatform.Endpoint.list() if endpoint.display_name == endpoint_display_name), None
)
assert ENDPOINT_ID, (
    "`ENDPOINT_ID` is not set, please make sure that the `endpoint_display_name` is correct at "
    f"https://console.cloud.google.com/vertex-ai/online-prediction/endpoints?project={os.getenv('PROJECT_ID')}"
)

endpoint = aiplatform.Endpoint(
    f"projects/{os.getenv('PROJECT_ID')}/locations/{os.getenv('LOCATION')}/endpoints/{ENDPOINT_ID}"
)
output = endpoint.predict(
    instances=[
        {
            "inputs": "<|begin_of_text|><|start_header_id|>system<|end_header_id|>\n\nYou are an assistant that responds as a pirate.<|eot_id|><|start_header_id|>user<|end_header_id|>\n\nWhat's the Theory of Relativity?<|eot_id|><|start_header_id|>assistant<|end_header_id|>\n\n",
            "parameters": {
                "max_new_tokens": 128,
                "do_sample": True,
                "top_p": 0.95,
                "temperature": 0.7,
            },
        },
    ],
)
print(output.predictions[0])
生成以下 output
Prediction(predictions=["Yer lookin' fer a treasure trove o' knowledge about them fancy physics, eh? Alright then, matey, settle yerself down with a pint o' grog and listen close, as I spin ye the yarn o' Einstein's Theory o' Relativity.\n\nIt be a tale o' two parts, me hearty: Special Relativity and General Relativity. Now, I know what ye be thinkin': what in blazes be the difference? Well, matey, let me break it down fer ye.\n\nSpecial Relativity be the idea that time and space be connected like the sea and the sky."], deployed_model_id='***', metadata=None, model_version_id='1', model_resource_name='projects/***/locations/us-central1/models/***', explanations=None)通过 Vertex AI 在线预测 UI
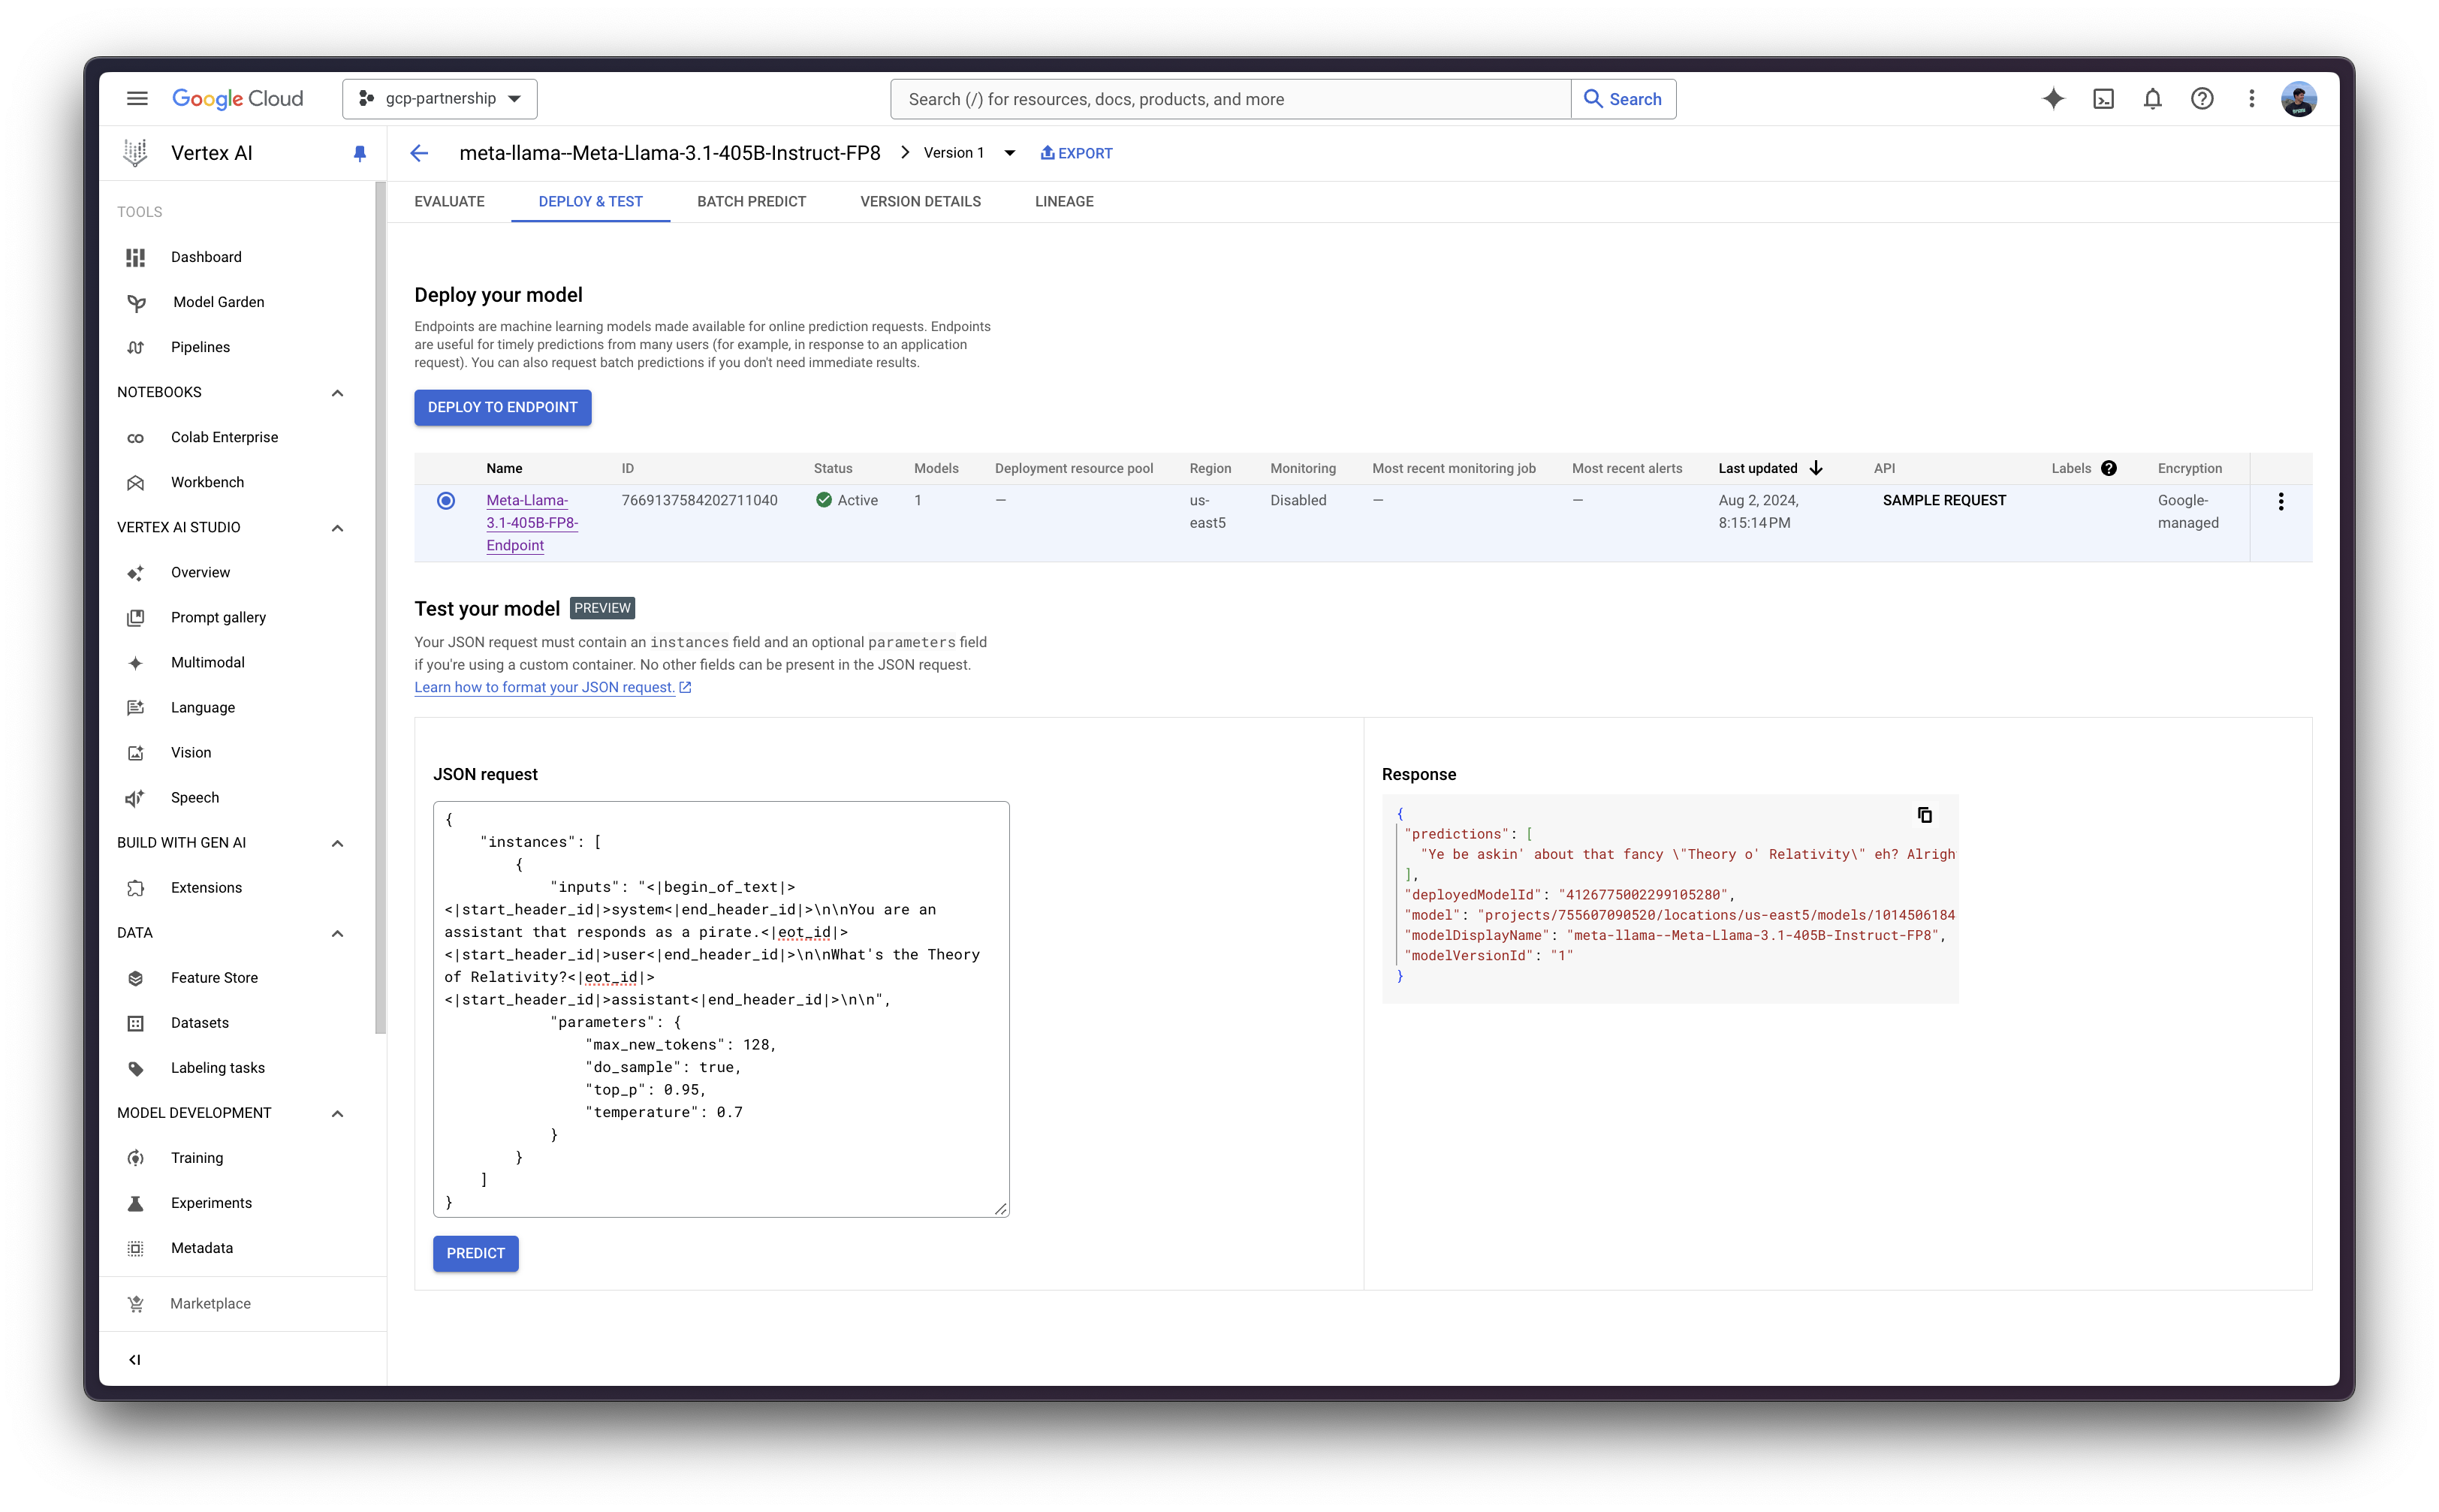
或者,出于测试目的,你也可以使用 Vertex AI 在线预测用户界面,该界面提供了一个字段,用于输入根据 Vertex AI 规范(如上例所示)格式化的 JSON 有效负载:
{
    "instances": [
        {
            "inputs": "<|begin_of_text|><|start_header_id|>system<|end_header_id|>\n\nYou are an assistant that responds as a pirate.<|eot_id|><|start_header_id|>user<|end_header_id|>\n\nWhat's the Theory of Relativity?<|eot_id|><|start_header_id|>assistant<|end_header_id|>\n\n",
            "parameters": {
                "max_new_tokens": 128,
                "do_sample": true,
                "top_p": 0.95,
                "temperature": 0.7
            }
        }
    ]
}
资源清理
最后,您可以按如下方式释放已创建的资源,以避免不必要的费用
deployed_model.undeploy_all用于从所有端点取消部署模型。deployed_model.delete用于在undeploy_all方法后,从部署模型的端点中优雅地删除模型。model.delete用于从注册表中删除模型。
deployed_model.undeploy_all()
deployed_model.delete()
model.delete()
或者,你也可以按照以下步骤从 Google Cloud Console 中删除这些资源:
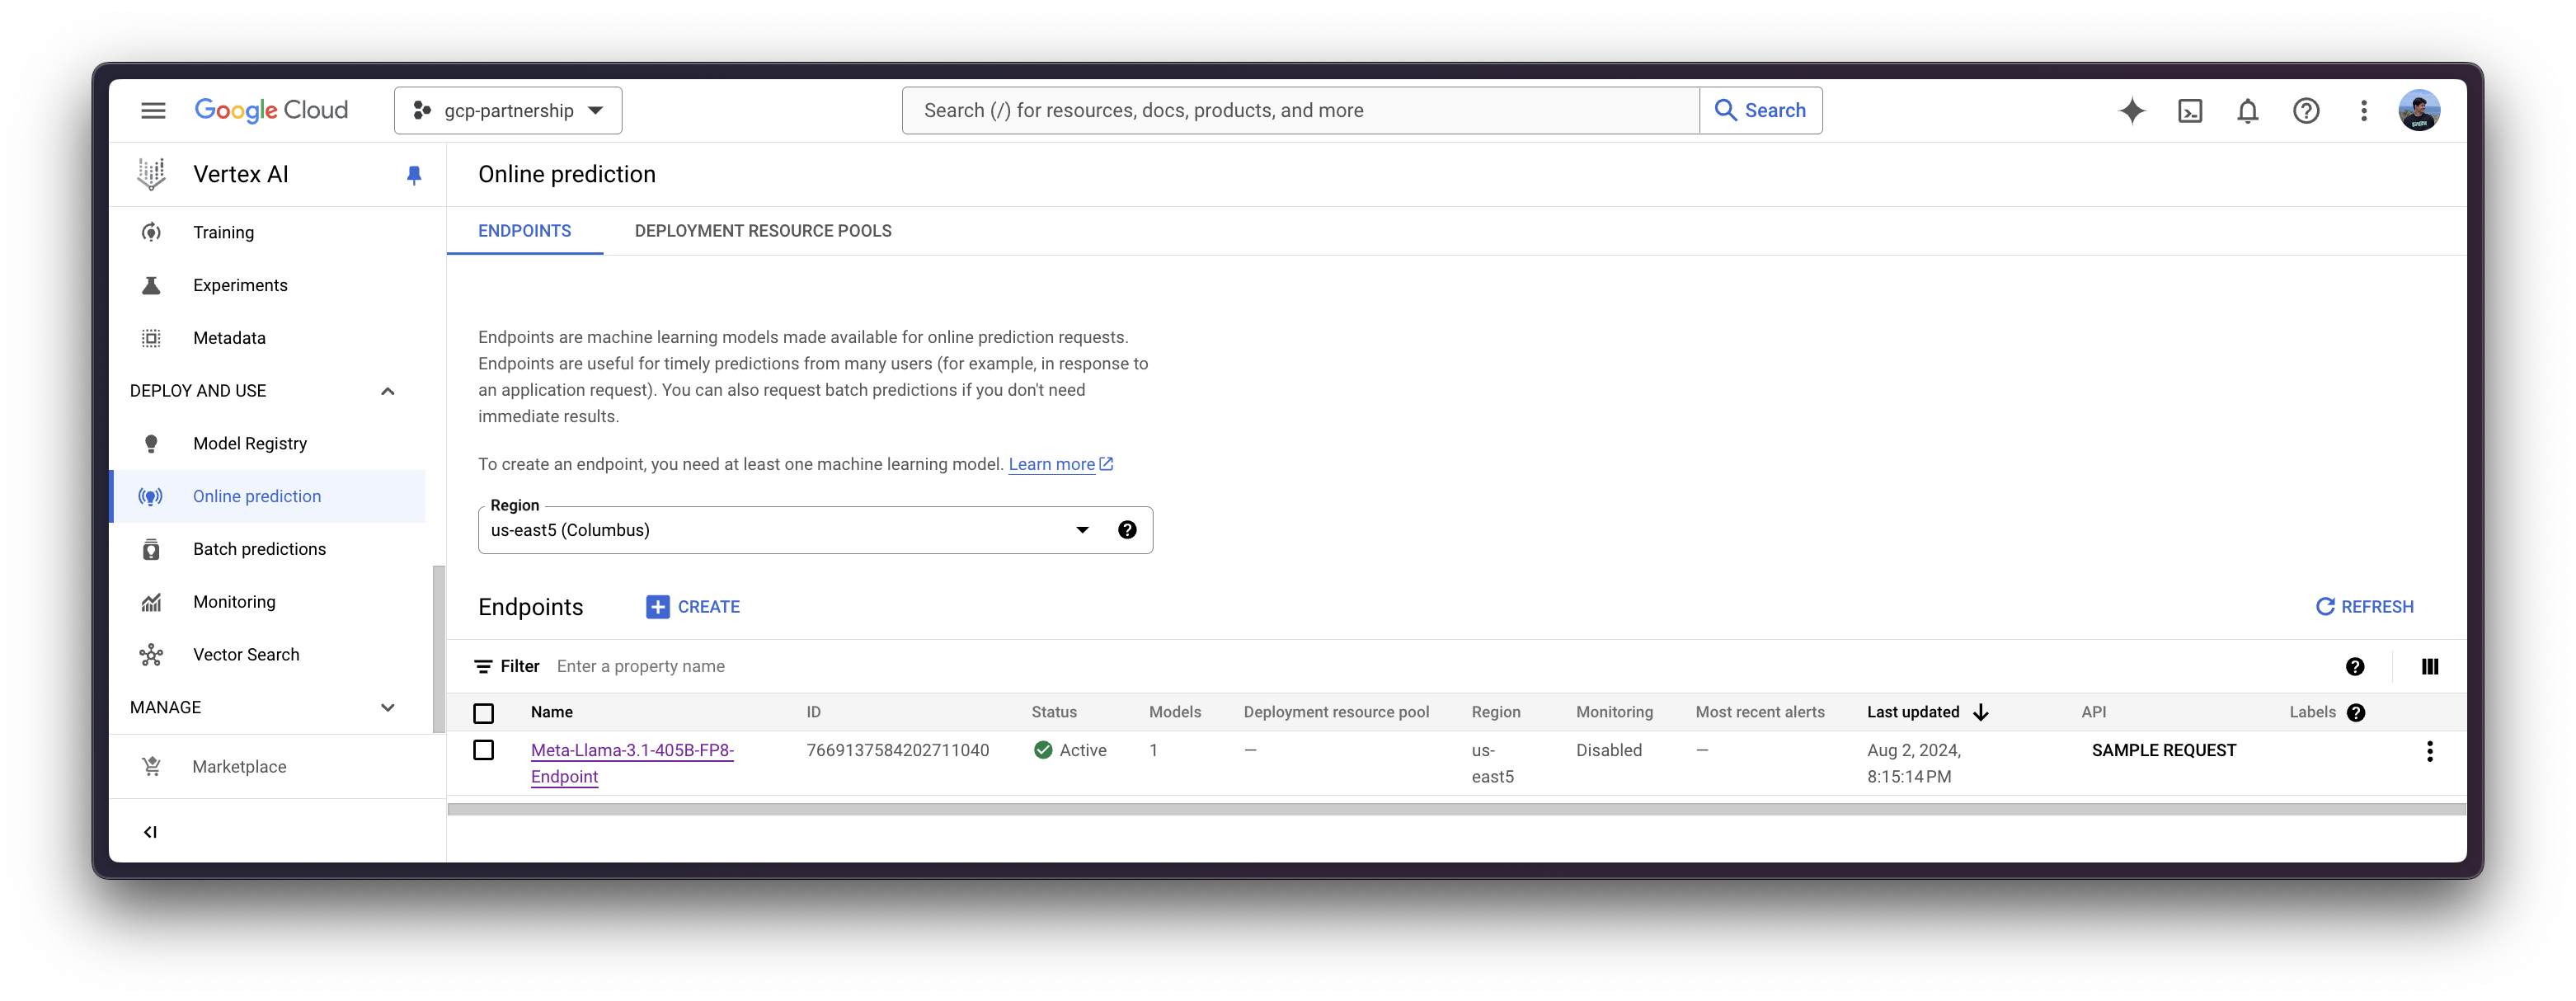
- 前往 Google Cloud 中的 Vertex AI
- 前往“部署和使用”->“在线预测”
- 点击端点,然后点击已部署的模型以“从端点取消部署模型”
- 然后返回端点列表并删除该端点
- 最后,前往“部署和使用”->“模型注册表”,然后删除模型
📍 在 GitHub 上找到完整的示例 此处!